阅读视图

发现新文章,点击刷新页面。
✇Tomshardware

HyperX Omen 15 review: Strong gaming performance and colorful OLED display, with obvious cost-cutting measures

In today’s AI-dominated tech space, gamers have been bombarded with rising prices for storage, memory, and even GPUs. So gamers are increasingly looking for value when purchasing a new system. To that end, HP is attempting to deliver solid gaming performance at an accessible price with the HyperX Omen 15. It’s worth noting that the Omen now takes the place of the Victus 15 in HP’s mainstream gaming laptop range, with the Omen Max occupying the top spot.

The Omen 15 has a strong foundation with a Core Ultra 9 processor, 32GB of RAM, a 15.3-inch 1800p OLED display, and a sleek design. HP delivers all this for just over $2,000, and it has strong gaming performance, but there are compromises in chassis construction and features you’d expect at this price point.

Design of the HyperX Omen 15

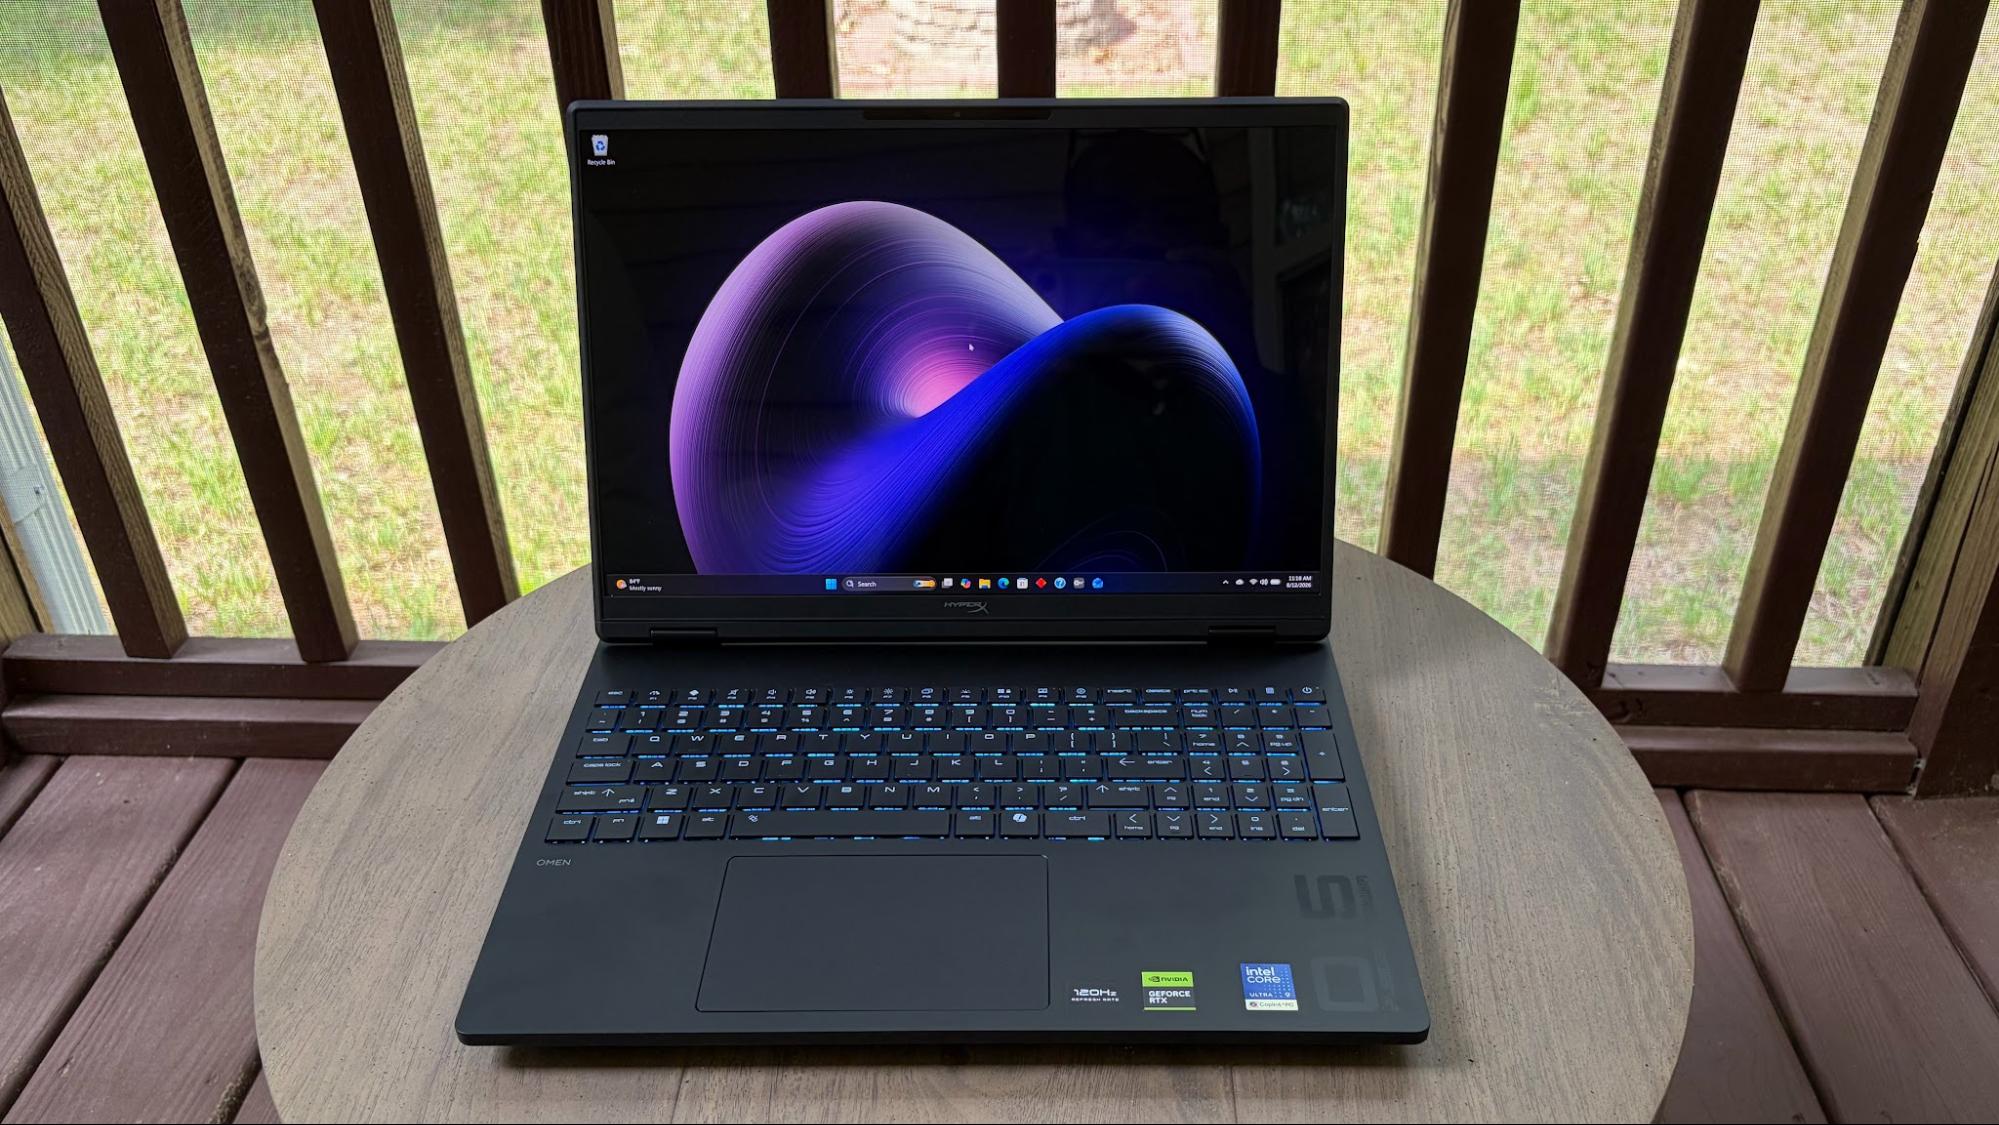
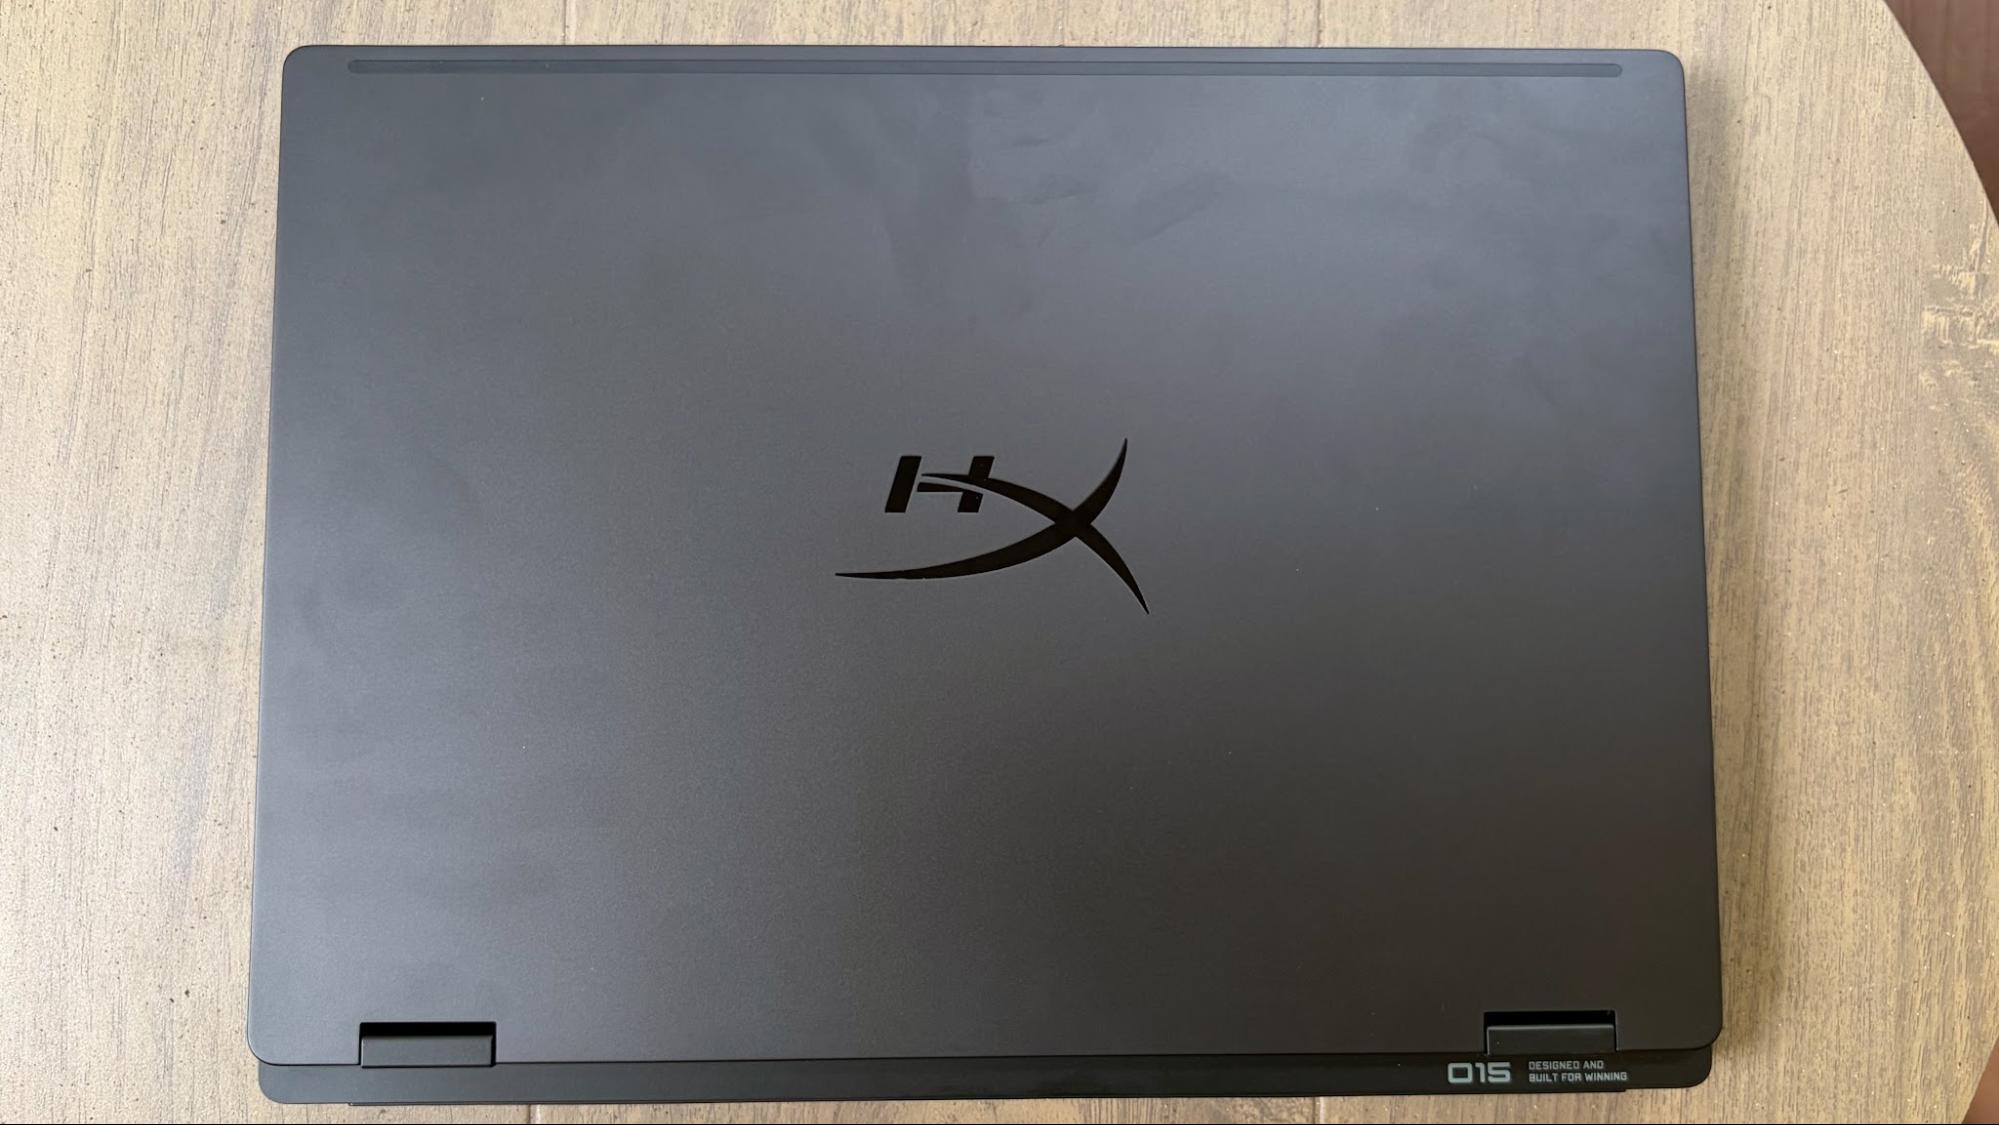
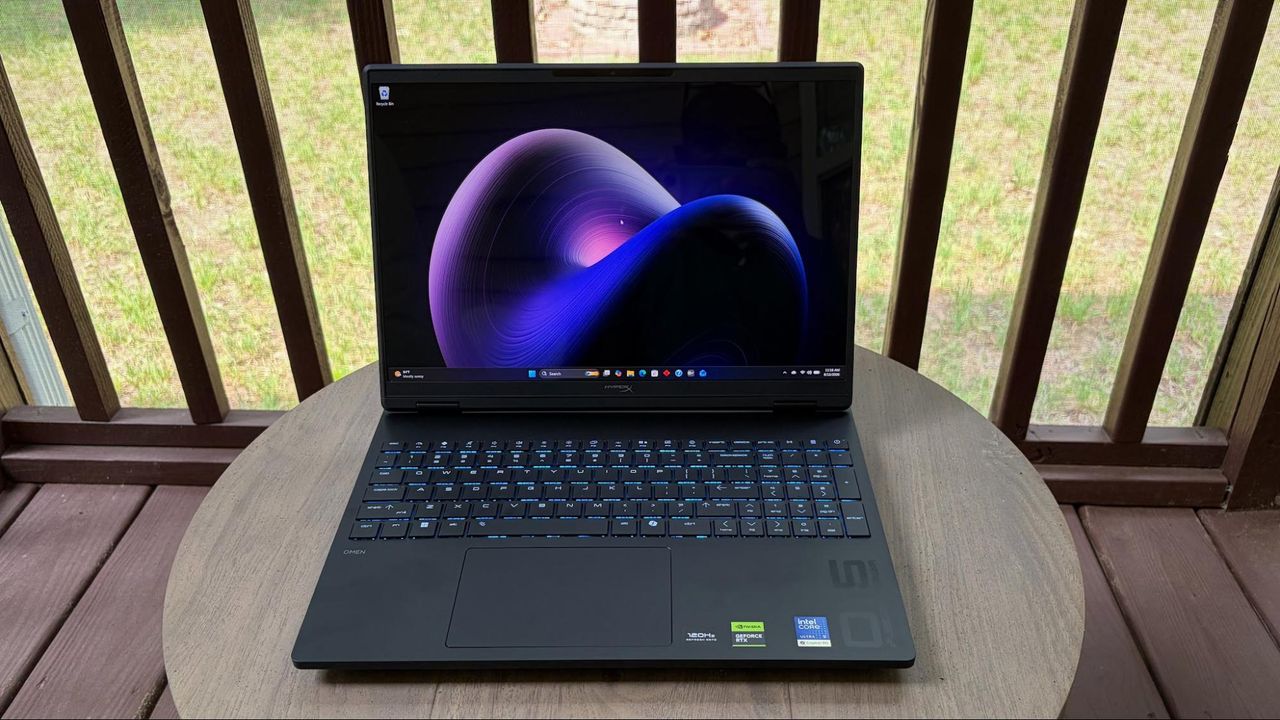
The Omen 15 shares its design language with the slightly larger Omen Max 16 that I previously reviewed. It’s an unassuming design, finished in Shadow Black, with just a hint of shimmering flakes if you look closely under light. There aren’t any garish design flourishes or additional RGB effects (other than the keyboard).

Like the Omen Max 16, the Omen 15 identifies itself with an “O15” script on the right side of the deck. Given that the Omen 15 is less than half the price of its larger sibling, you only get an aluminum lid. Everything else, including the upper and lower chassis, is constructed of a much cheaper (and more pliable) plastic.

HyperX Omen 15
Tom's Hardware
HyperX Omen 15
Tom's Hardware
HyperX Omen 15
Tom's Hardware
HyperX Omen 15
Tom's Hardware
HyperX Omen 15
Tom's Hardware

The desk easily deforms when pressing on it, and the whole laptop flexes with minimal effort, twisting it from corner to corner. The overall feel of the laptop doesn’t quite seem up to par with what I’d expect from a gaming laptop priced over $2,000.

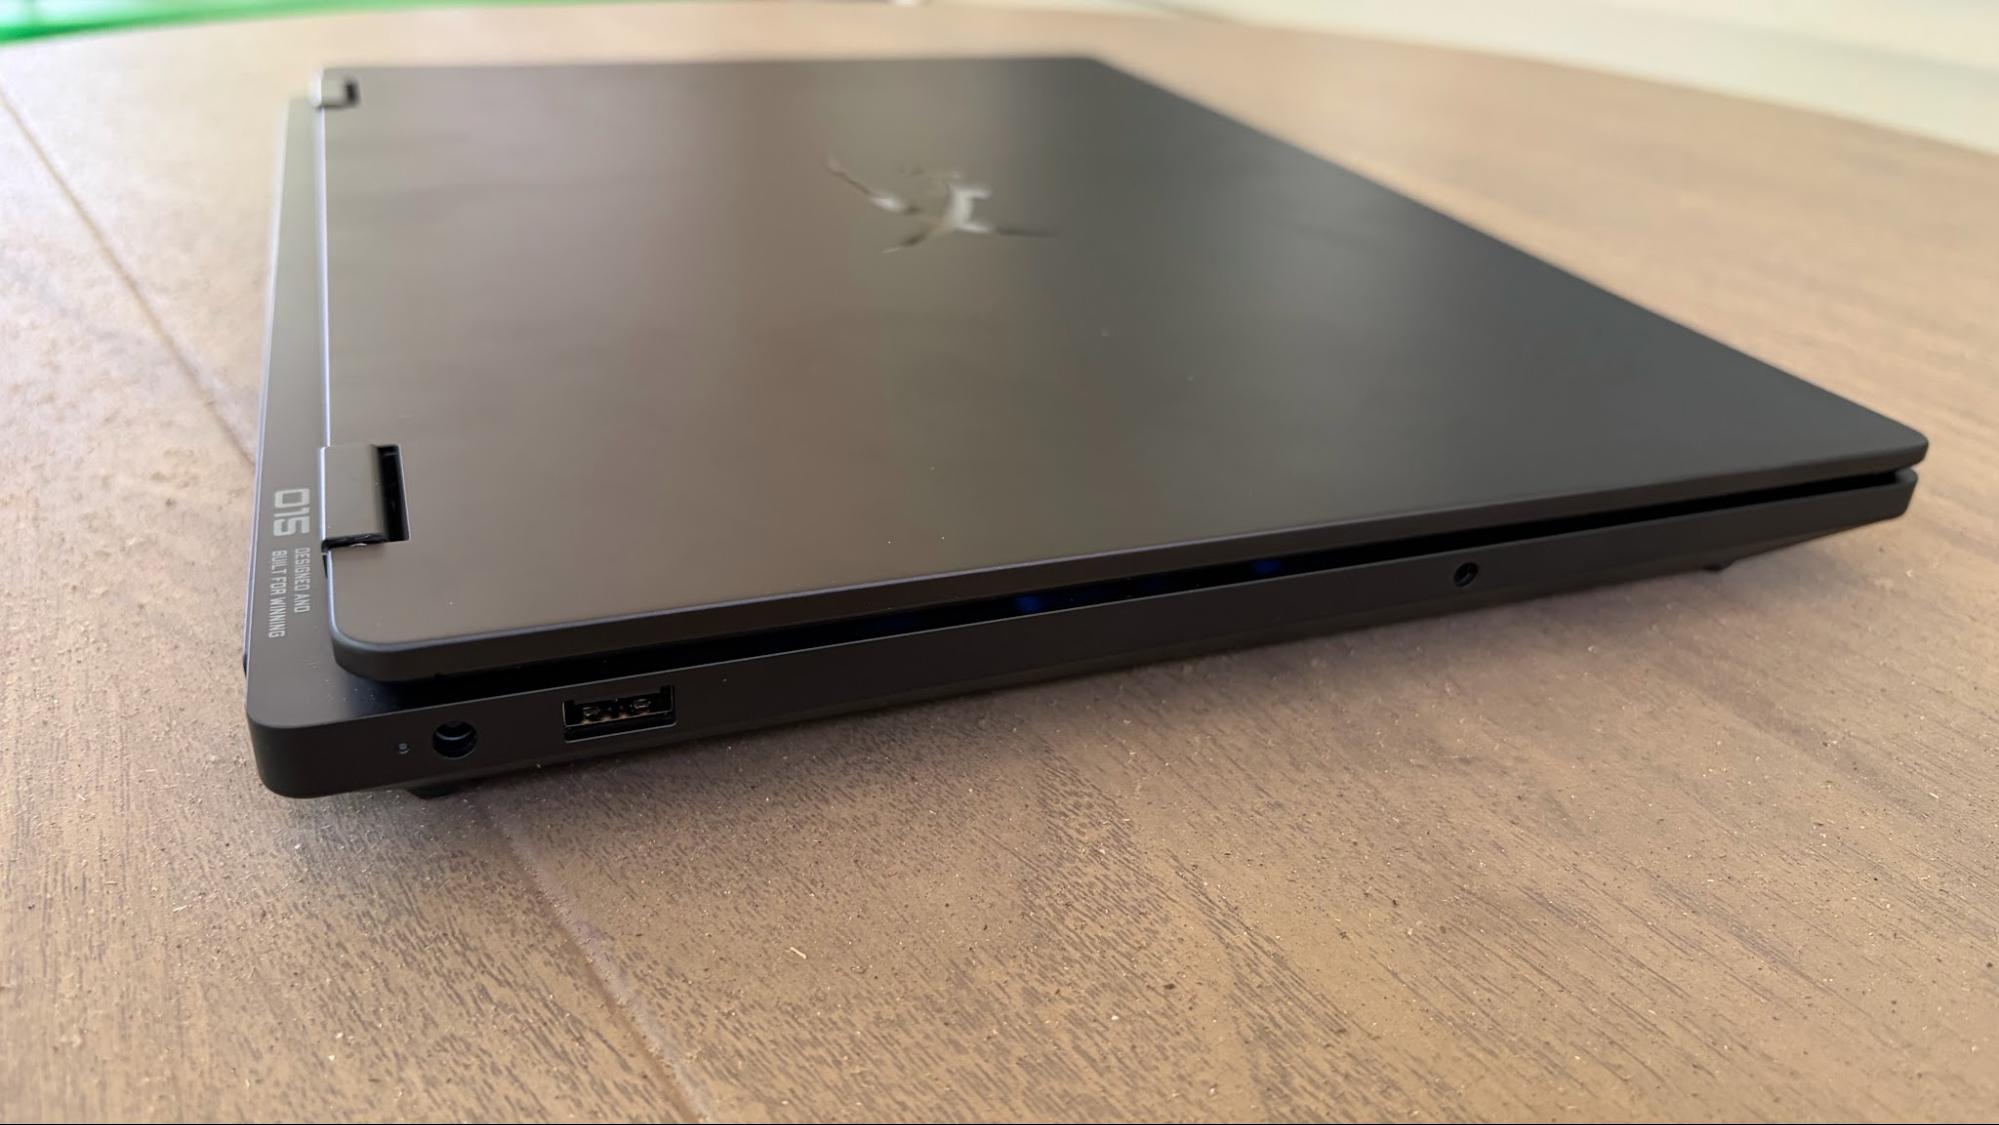
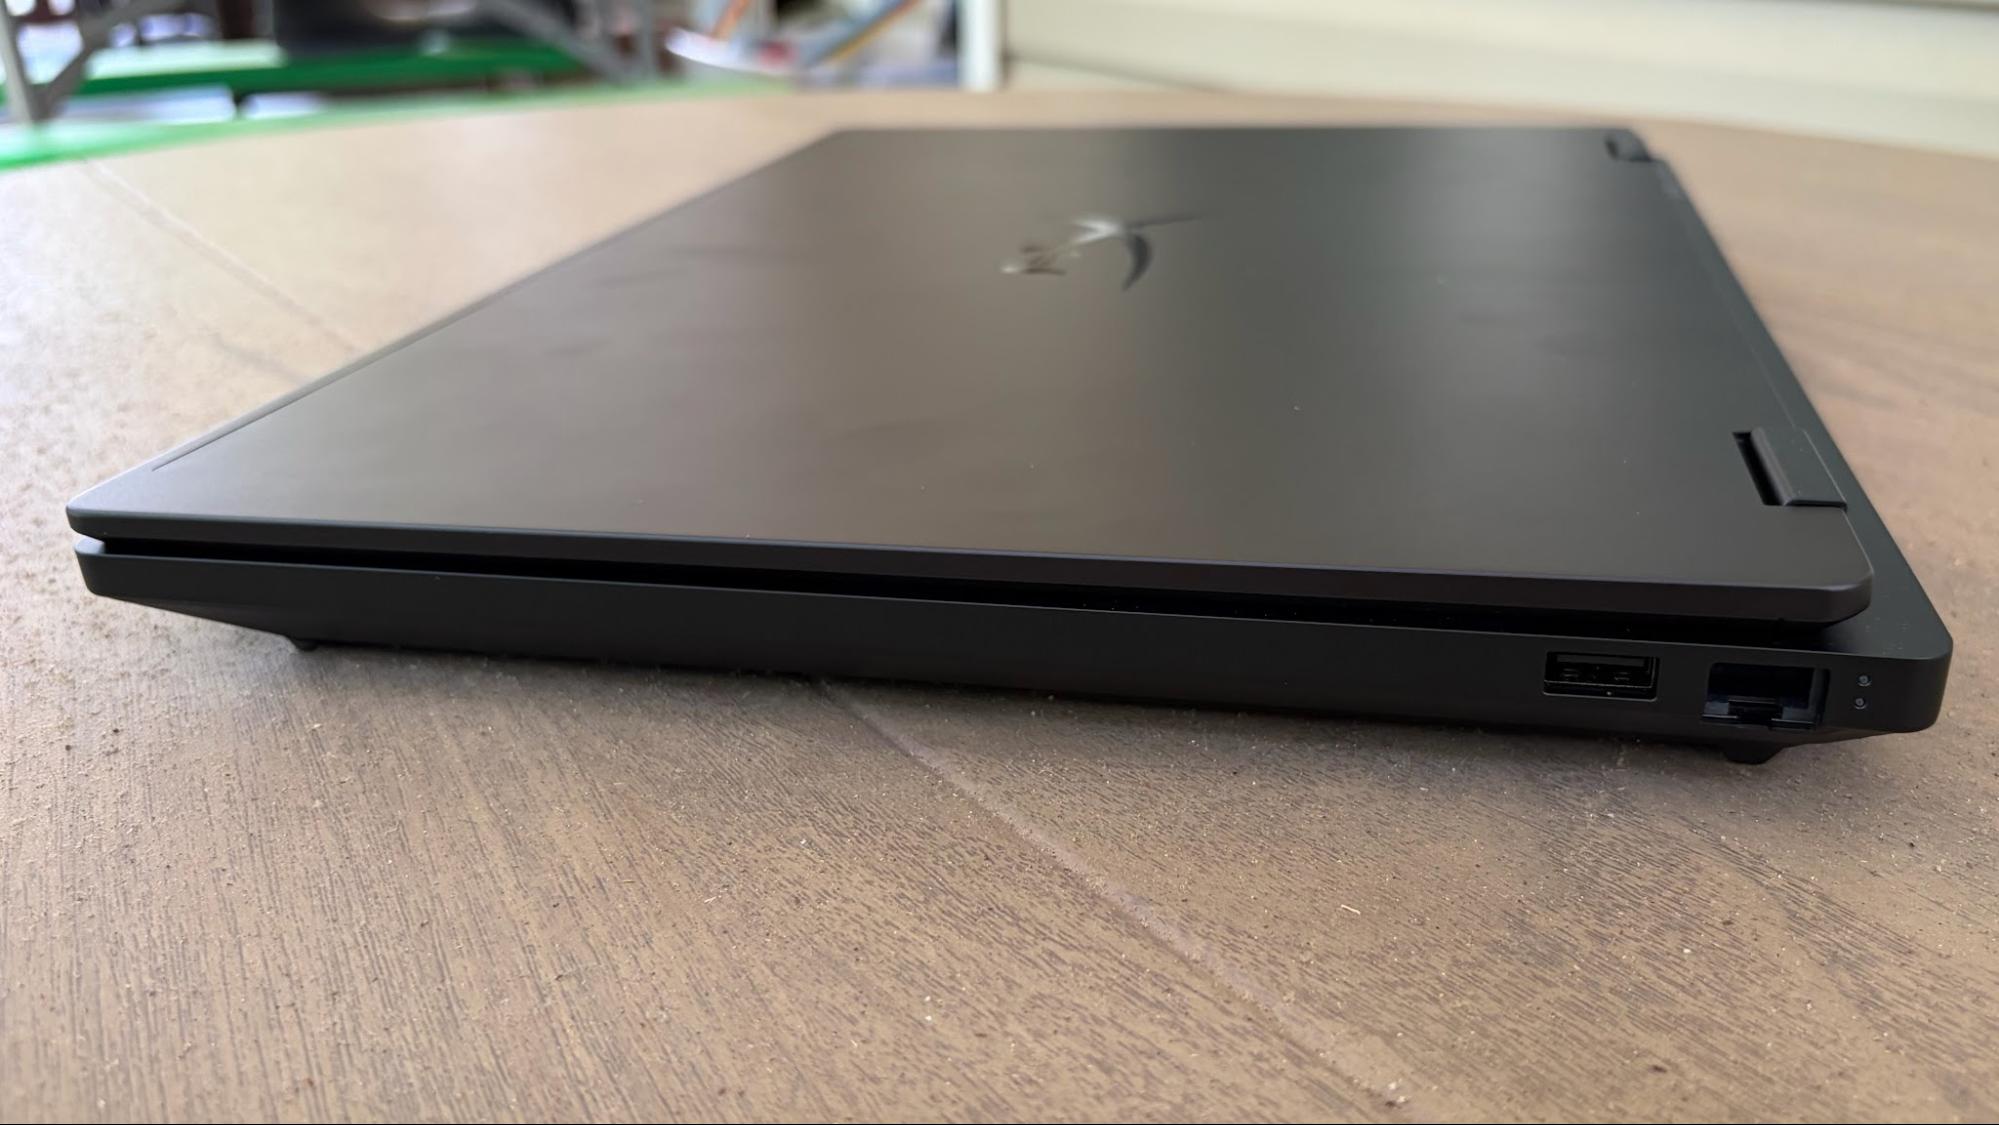
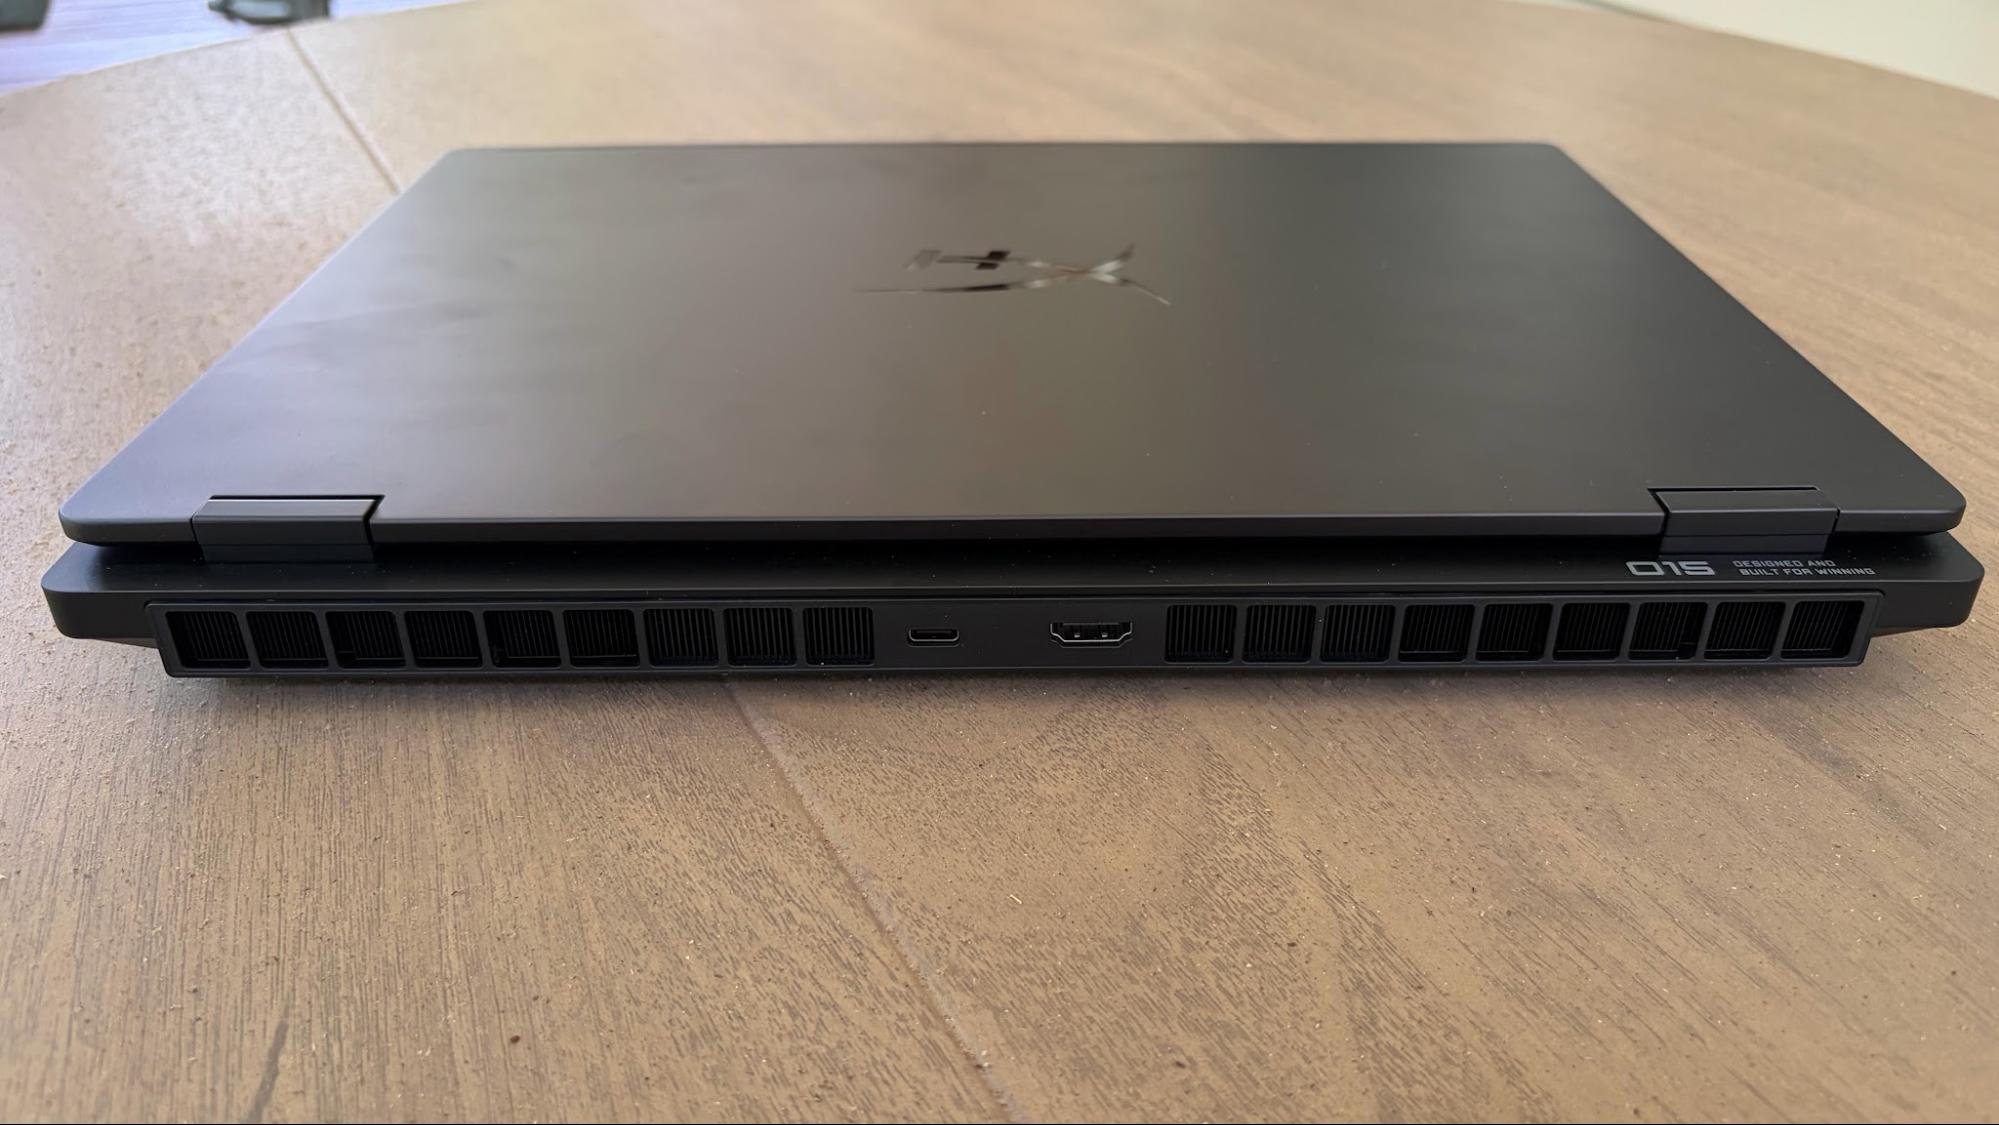
There’s also another interesting omission when looking around the chassis. Despite its price tag, there are no Thunderbolt ports. And you only get one USB-C 3.2 Gen 1 port on the back, beside an HDMI 2.1 port. There’s a GbE Ethernet port and a USB-A 3.2 Gen 1 port on the right side of the chassis, while a proprietary barrel-style power port, another USB-A port, and a 3.5 mm combo audio jack are on the left.

Our Omen 15 review unit measures 13.5 x 9.96 x 0.93 inches and weighs 4.89 pounds. For comparison, the Gigabyte Aero X16 is 14 x 9.9 x 0.78 inches and 4.2 pounds, while the Framework Laptop 16 measures 14.03 x 11.43 x 0.82 inches and 5.29 pounds. Finally, the Predator Triton 14 AI is 12.68 x 8.84 x 0.71 inches and 3.5 pounds (due to its smaller 14.5-inch display).

HyperX Omen 15 Specifications

CPU

Intel Core Ultra 9 386H

Graphics

Nvidia GeForce RTX 5070 Laptop GPU (8GB GDDR7, 1,642 MHz Boost Clock, 85 W Max TGP)

Memory

32GB DDR5-5600 (2x 16GB)

Storage

1TB PCIe 4.0 NVMe M.2 SSD

Display

15.3-inch, 2880x1800, 120 Hz, 16:10, OLED

Networking

MediaTek Wi-Fi 7, Bluetooth 6.0

Ports

1x USB-C (10 Gbps), 2x USB-A (10 Gbps), 1x HDMI 2.1, 3.5 mm combo audio jack, GbE

Camera

1080p IR webcam

Battery

70 Whr

Power Adapter

200 W

Operating System

Windows 11 Home

Dimensions (WxDxH)

13.5 x 9.96 x 0.93 inches

Weight

4.89 pounds

Price (as configured)

$2,099.99

Gaming and Graphics on the HyperX Omen 15

Our Omen 15 review unit came configured with an Intel Core Ultra 9 386H processor, 32GB of DDR5-5600 memory, and a GeForce RTX 5070 GPU (85W TGP).

As for the assembled competitors, we have the Aero X16 (Ryzen AI 7 350, 32GB, RTX 5070 85W), Predator Triton 14 AI (Core Ultra 9 288V, RTX 5070 110W), and Framework Laptop 16 (Ryzen AI 7 350, RTX 5070 100W).

I’ve been playing a lot of Battlefield 6 recently, and I tend to run at native resolution in Overkill detail mode, with DLSS Quality and frame generation enabled. However, I dialed it back to High detail mode instead of Overkill to accommodate just 8GB of memory on the RTX 5070. Using these settings, I was able to average between 70 and 85 frames per second.

HyperX Omen 15
Tom's Hardware
HyperX Omen 15
Tom's Hardware
HyperX Omen 15
Tom's Hardware
HyperX Omen 15
Tom's Hardware
HyperX Omen 15
Tom's Hardware

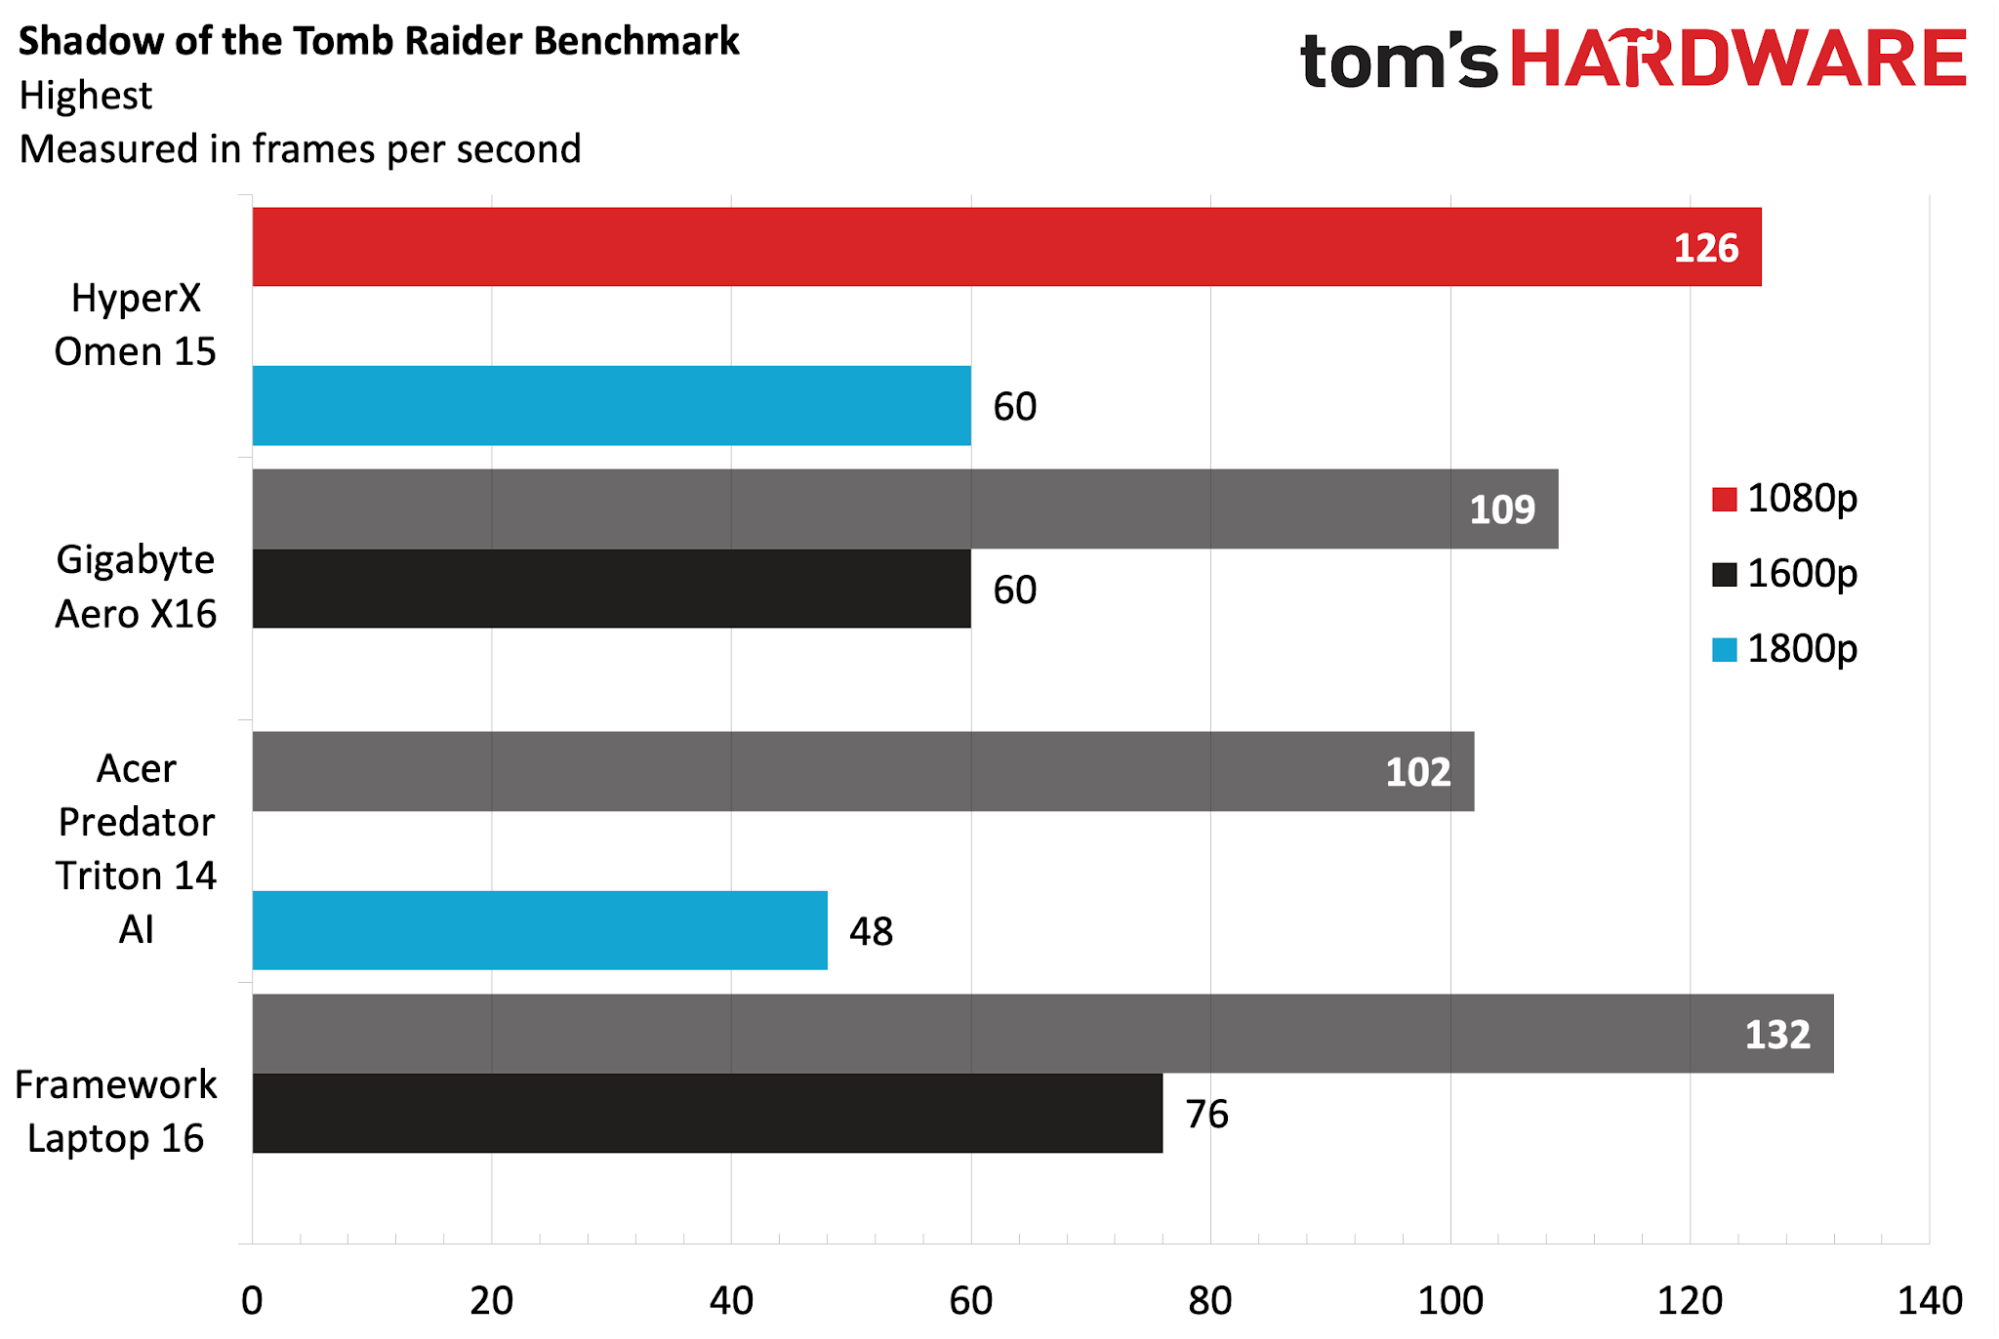
We start off our gaming benchmarks with Shadow of the Tomb Raider (Highest settings), where the Omen 15 started off on the right foot with 126 FPS at 1080p resolution and 60 FPS at 1800p. The Framework Laptop 16 eked out 6 additional FPS at 1080p and another 17 at its native resolution. However, we still consider it a good showing, given that the RTX 5070 in the Omen 15 operates at a 85W TGP (versus 100W for the Framework) and at a higher native resolution (1800p versus 1600p).

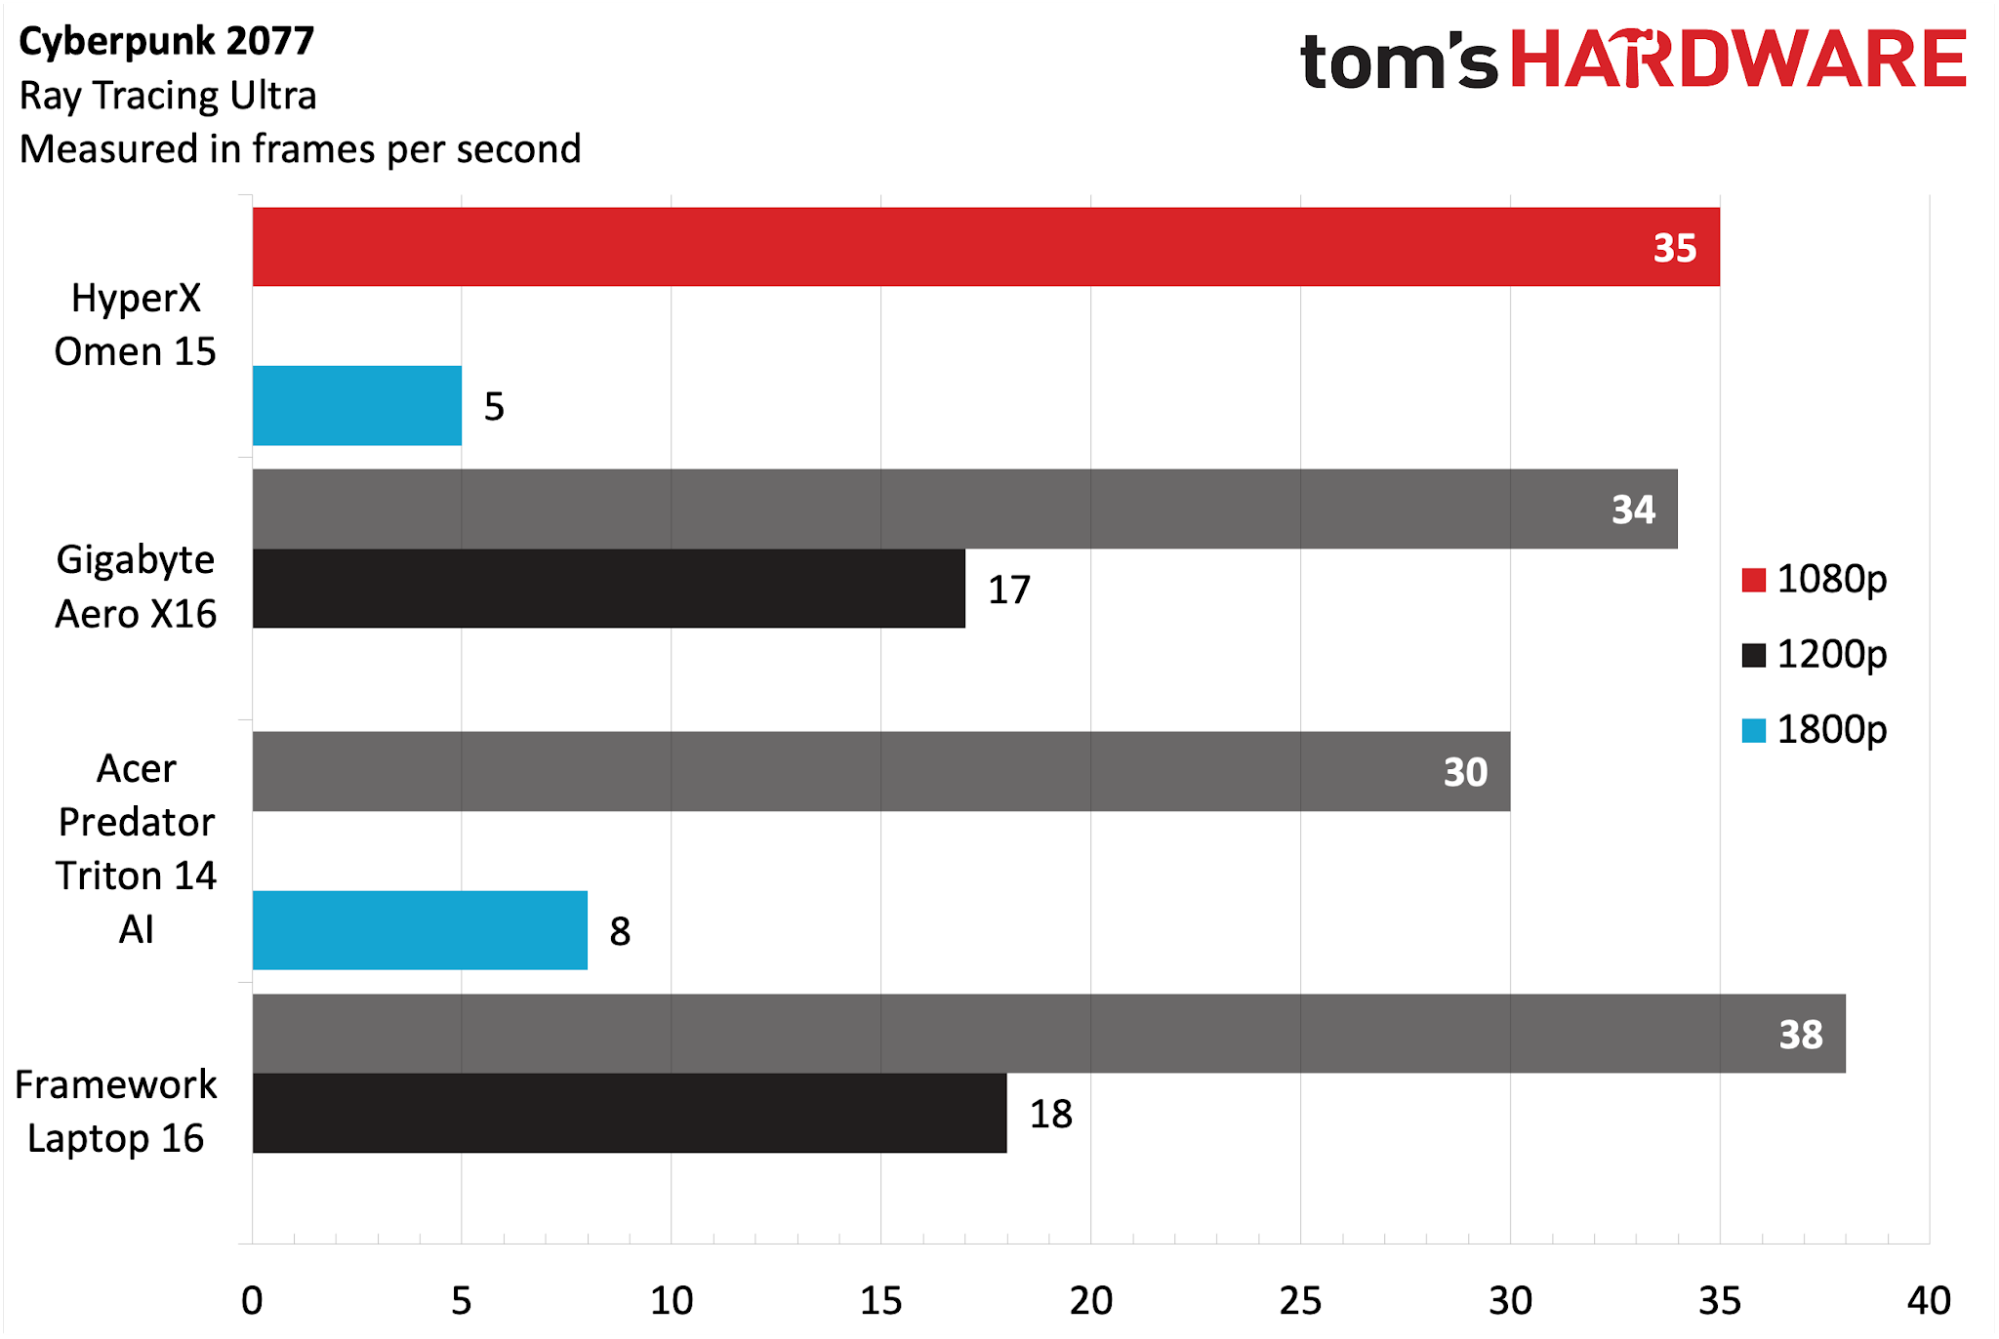
Cyberpunk 2077 (Ray Tracing Ultra settings) again saw the Omen 15 in second place to the Laptop 16. This time, it hit 35 FPS at 1080p resolution compared to 38 FPS for the Laptop 16. Performance at 1800p was in the single digits for the Omen 15, while the Laptop 16 managed 18 FPS. Both are slideshow-worthy numbers that are nothing to brag about.

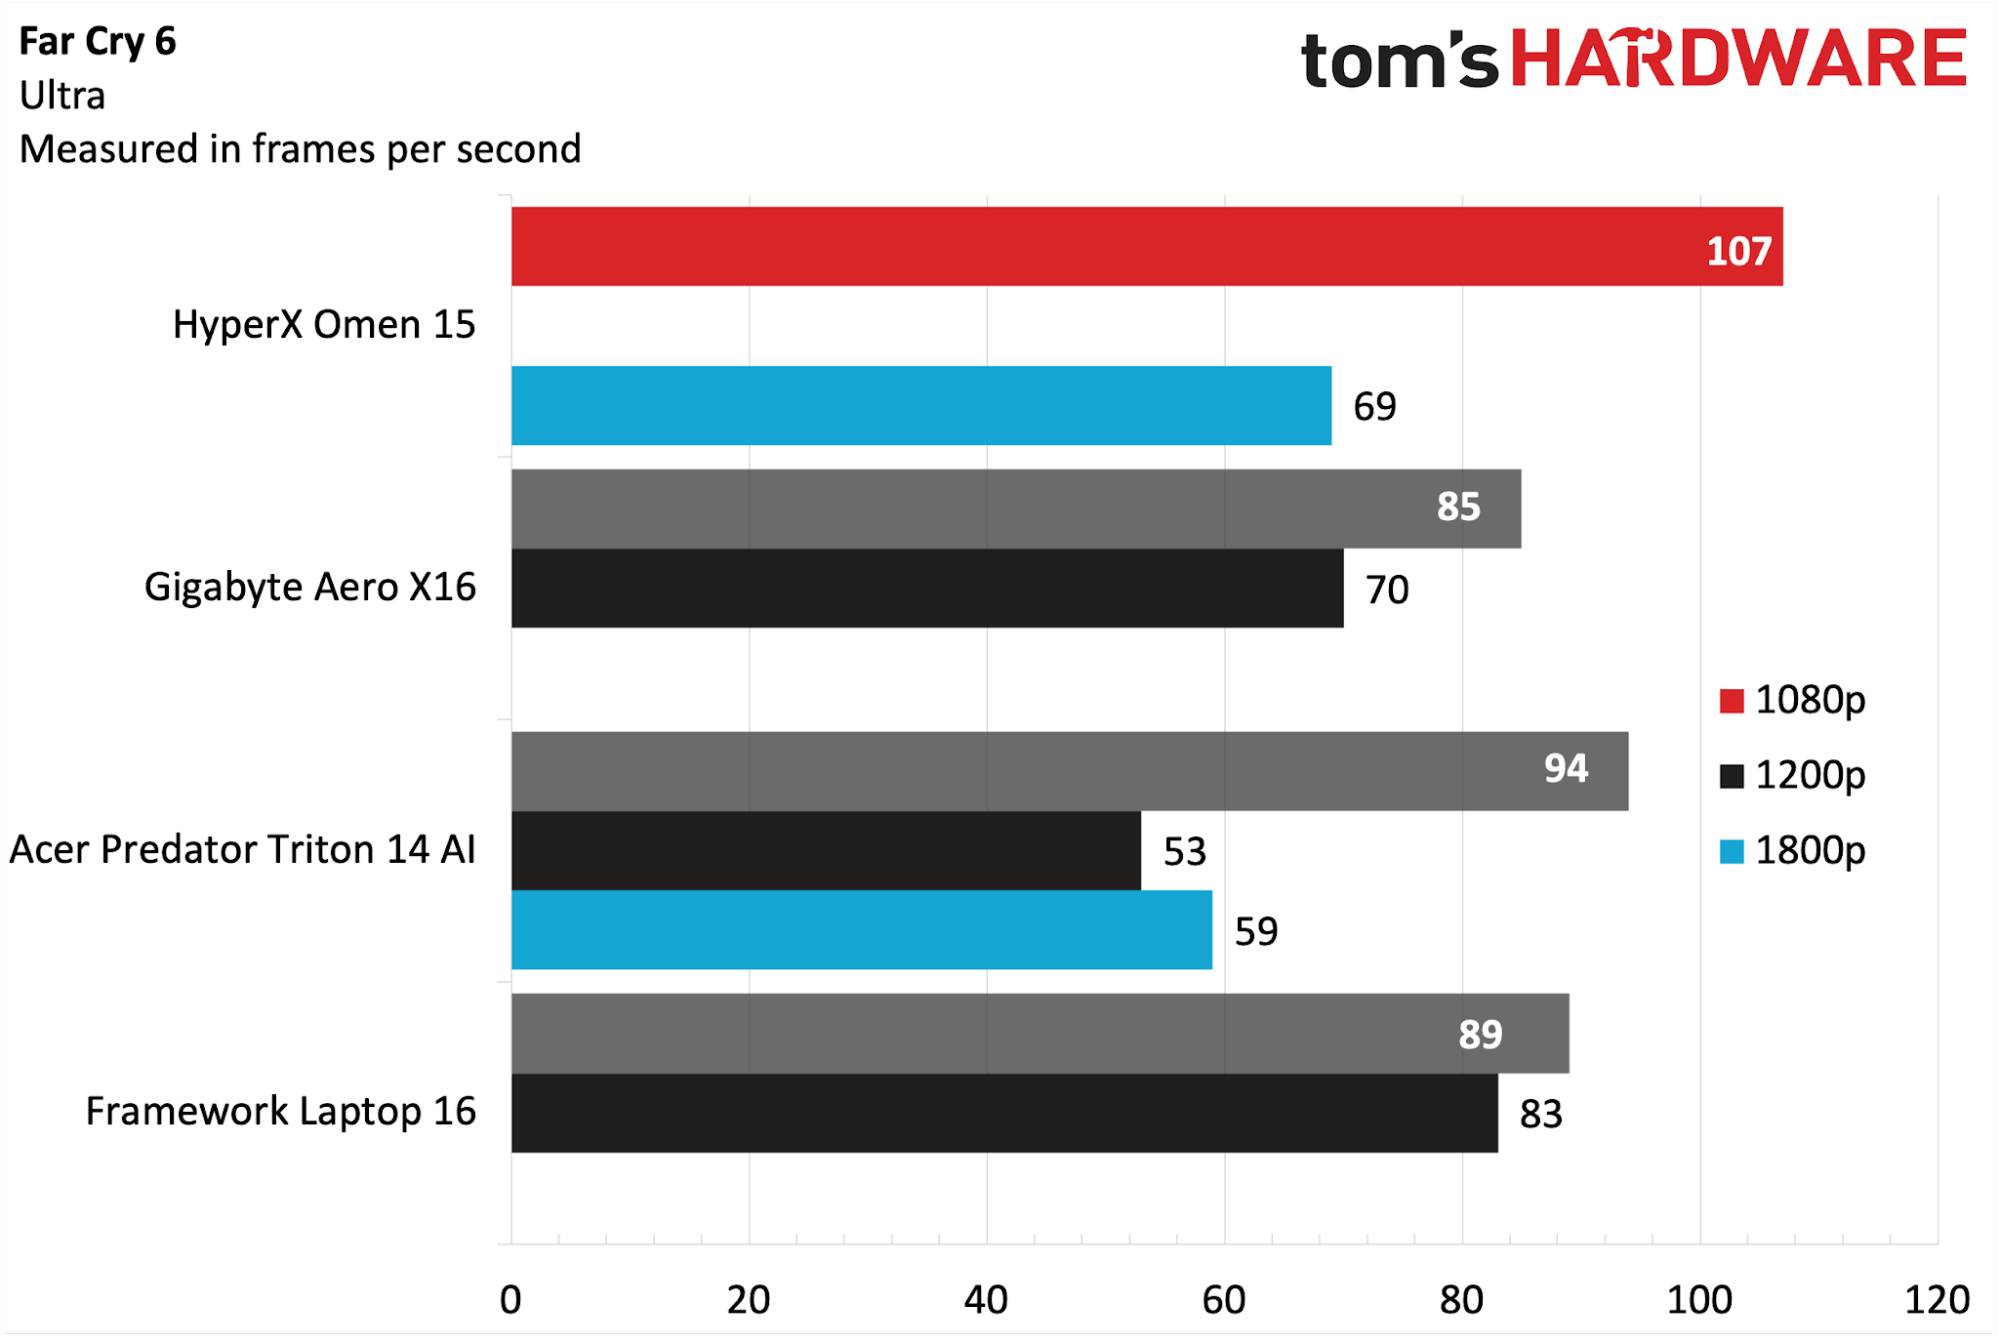
Far Cry 6 (Ultra settings) was a high point for the Omen 15, which bested all competitors with 107 FPS at 1080p resolution. Cranking the dial to 1800p, that figure dropped to 69 FPS, compared to 70 FPS for the Aero X16 running at 1600p. The Laptop 16 forged ahead with 83 FPS at 1600p.

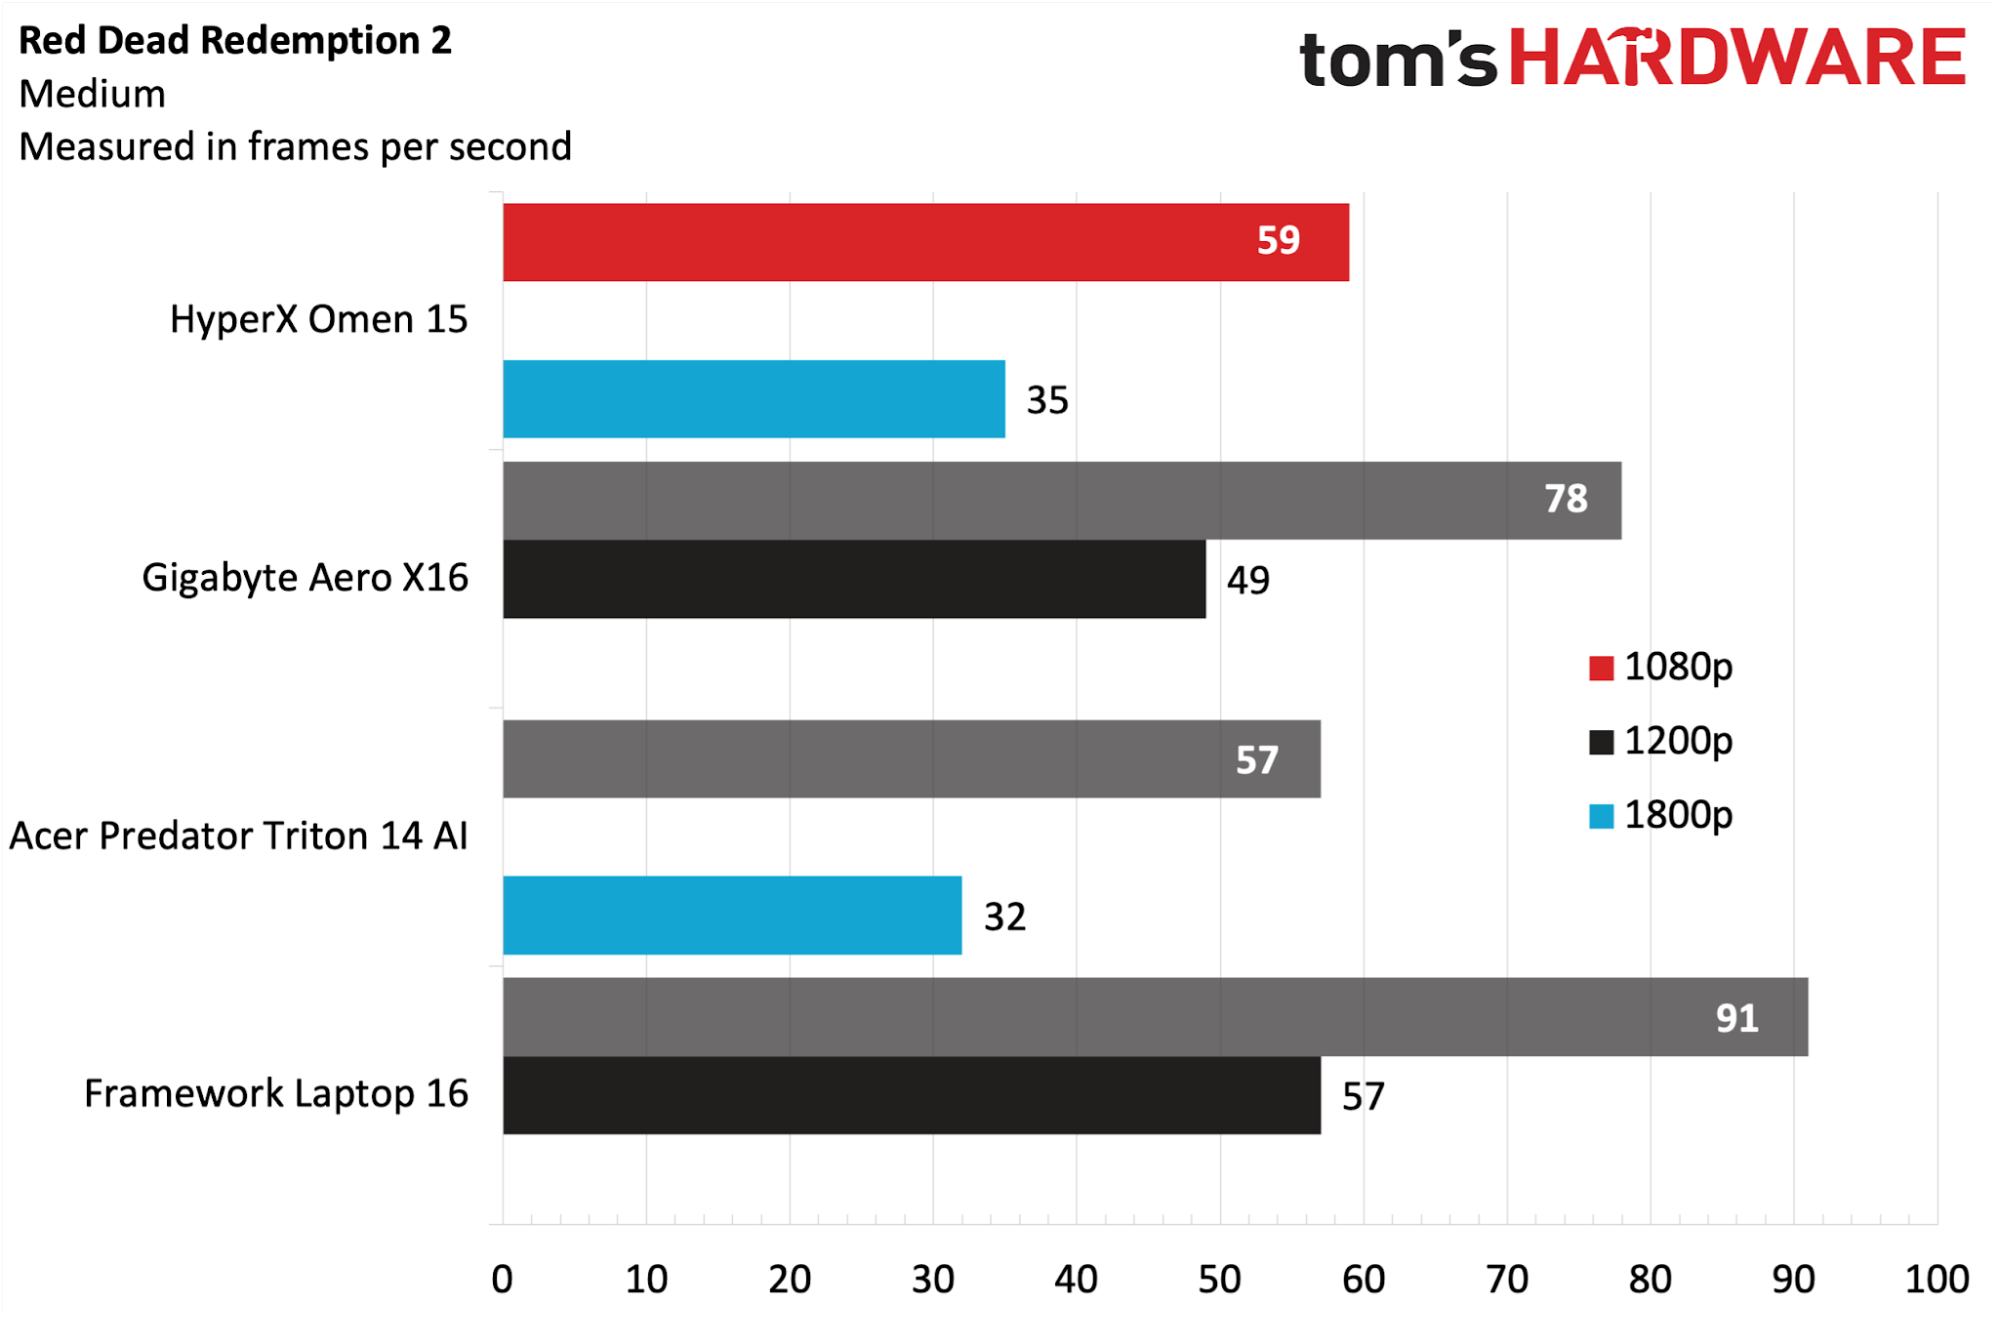
Red Dead Redemption 2 (Medium settings) was something of a sore spot for the Omen 15 (59 FPS at 1080p), which fell well below the Aero X16 (78 FPS) and the Laptop 16 (91 FPS). Boosting the resolution to 1800p also saw the Omen 15 in third place, with 35 FPS, well off the pace set by the Laptop 16 (57 FPS).

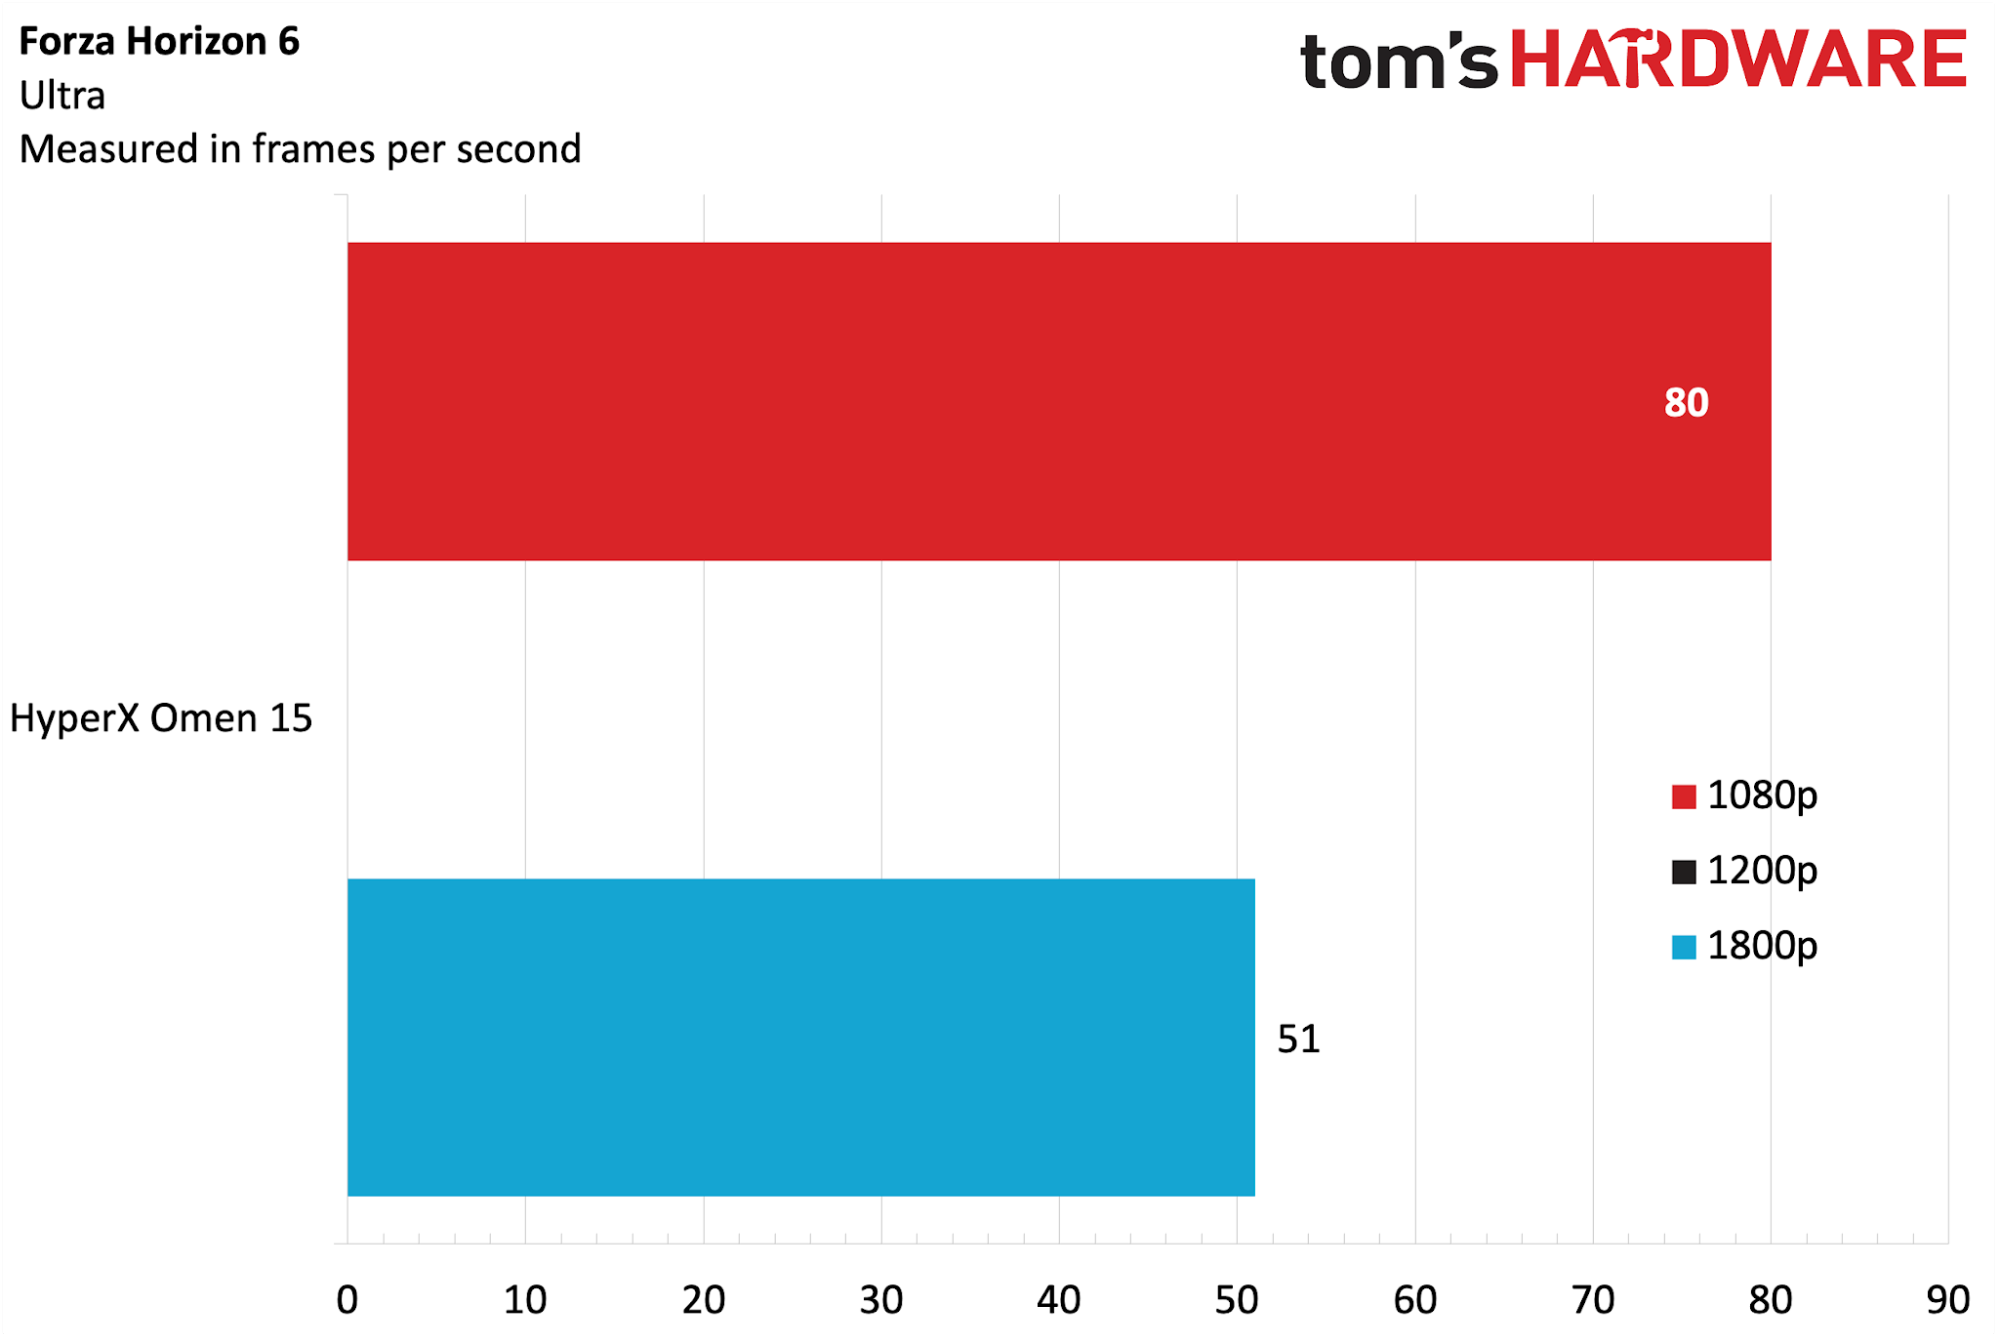
Forza Horizon 6 (Ultra settings) is a more recent benchmark in our testing suite, and so far, the Omen 15 is the only entry in this class of gaming laptops. With that said, the Omen 15 achieved 80 FPS at 1080p and 51 FPS at 1800p.

On our Metro Exodus stress test, the Omen 15 review unit averaged 141.62 FPS at 1080p across 15 loops using the RTX preset. The CPU performance cores averaged 3.52 GHz, the efficiency cores averaged 2.82 GHz, and the low-power efficiency cores ran at 1.9 GHz. The RTX 5070 GPU averaged 2.0 GHz.

Productivity Performance on the HyperX Omen 15

With a Core Ultra 9 386H processor, 32GB of DDR5-5600 memory, and a 1TB PCIe 4.0 SSD onboard, we expected solid performance from the Omen 15. Those expectations were met in terms of CPU performance, while storage performance lagged a bit behind the competition.

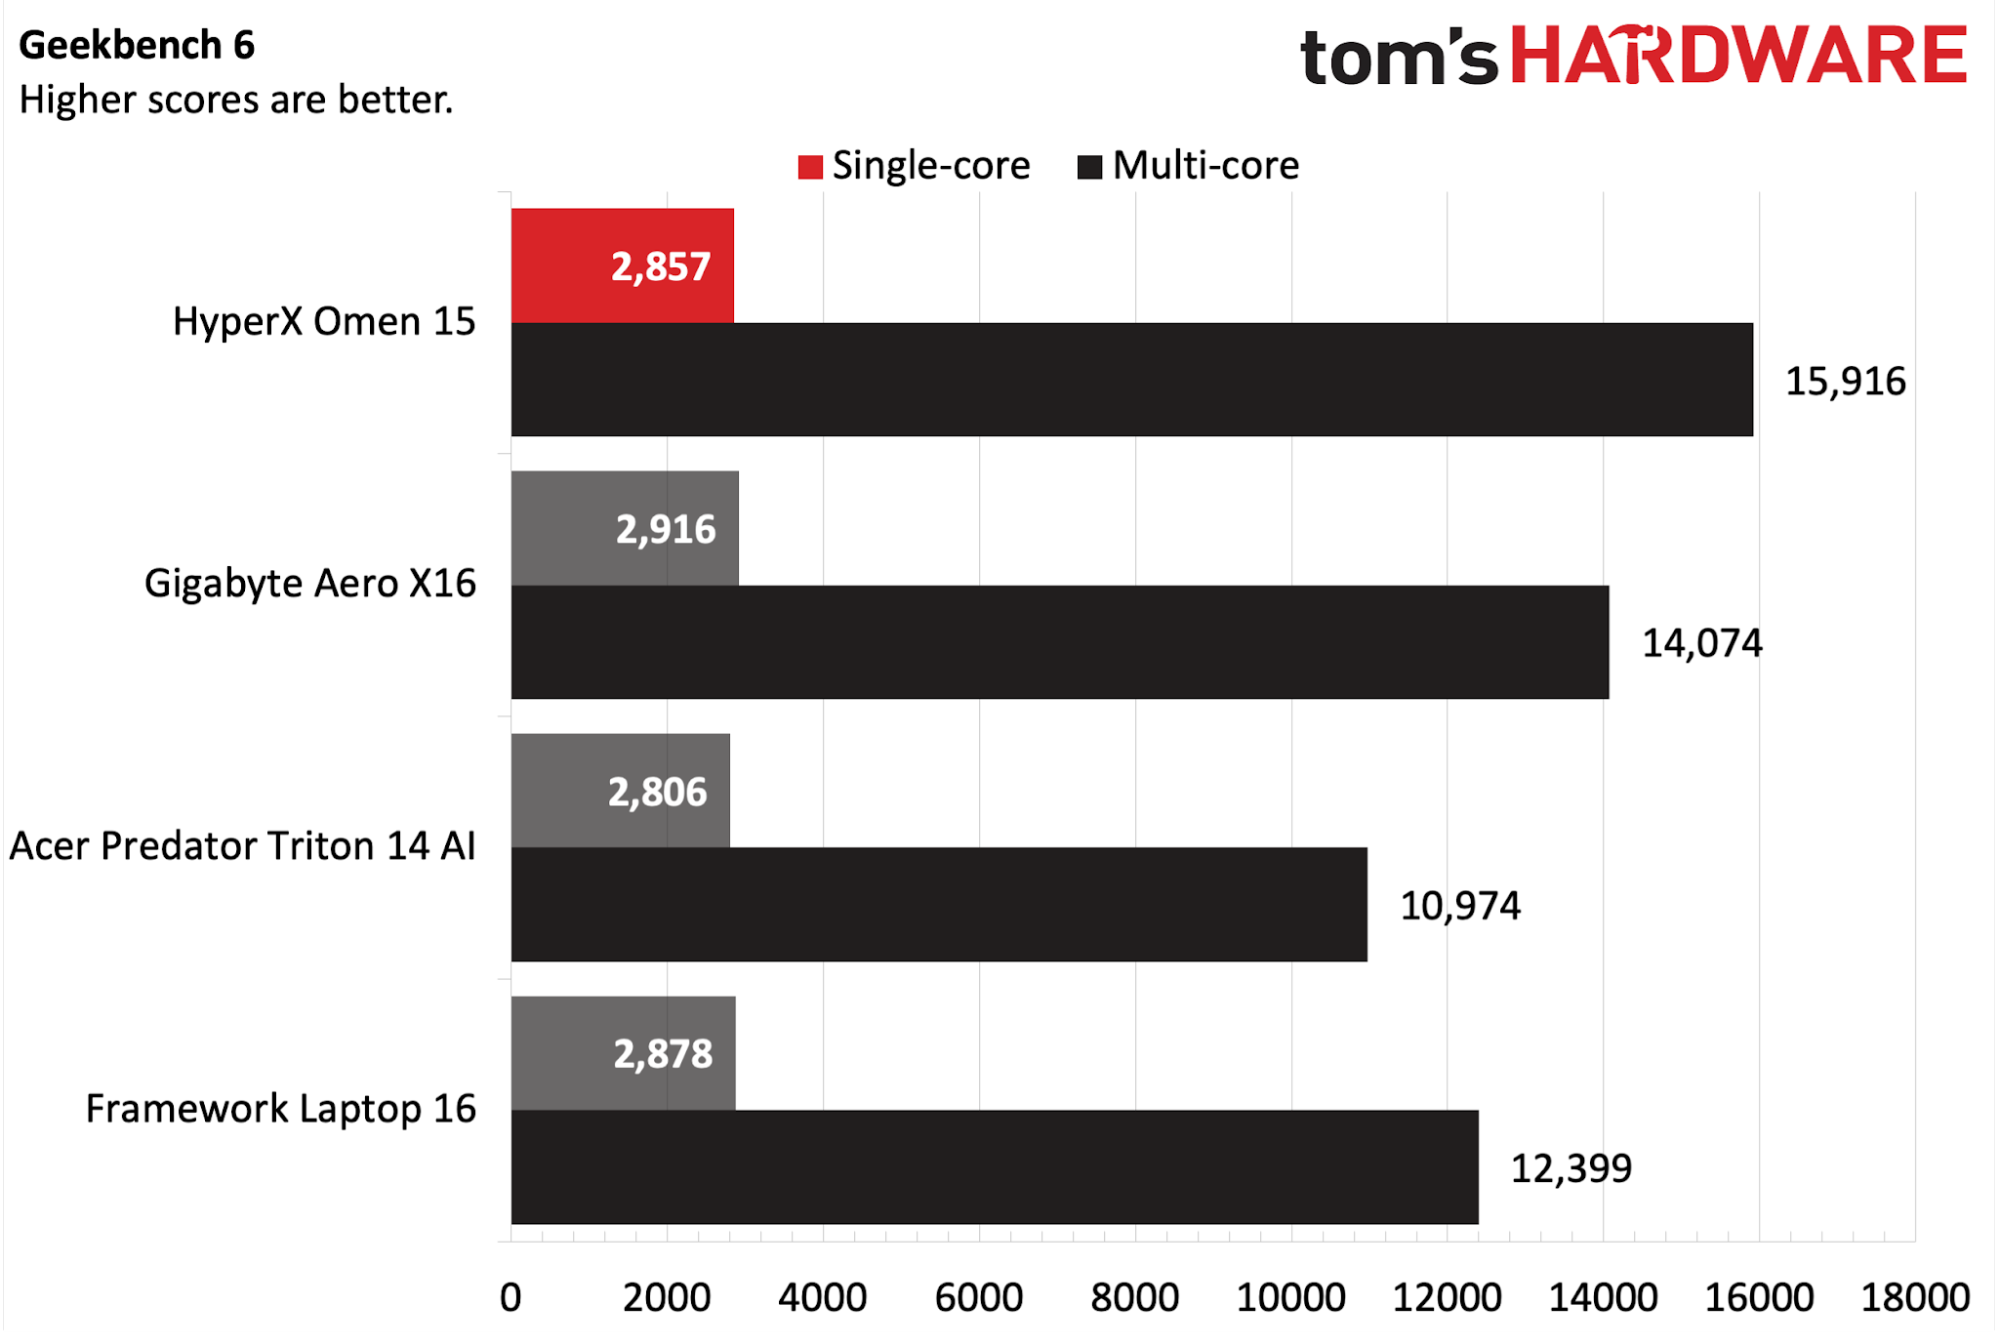
The Omen 15 performed well in Geekbench 6, hitting 2,857 in the single-core benchmark, keeping it right in the mix with the other competitors. However, it sprinted out ahead of the pack in multi-core, delivering 15,916 compared to 14,074 on the second-place Aero X16.

HyperX Omen 15
Tom's Hardware
HyperX Omen 15
Tom's Hardware
HyperX Omen 15
Tom's Hardware

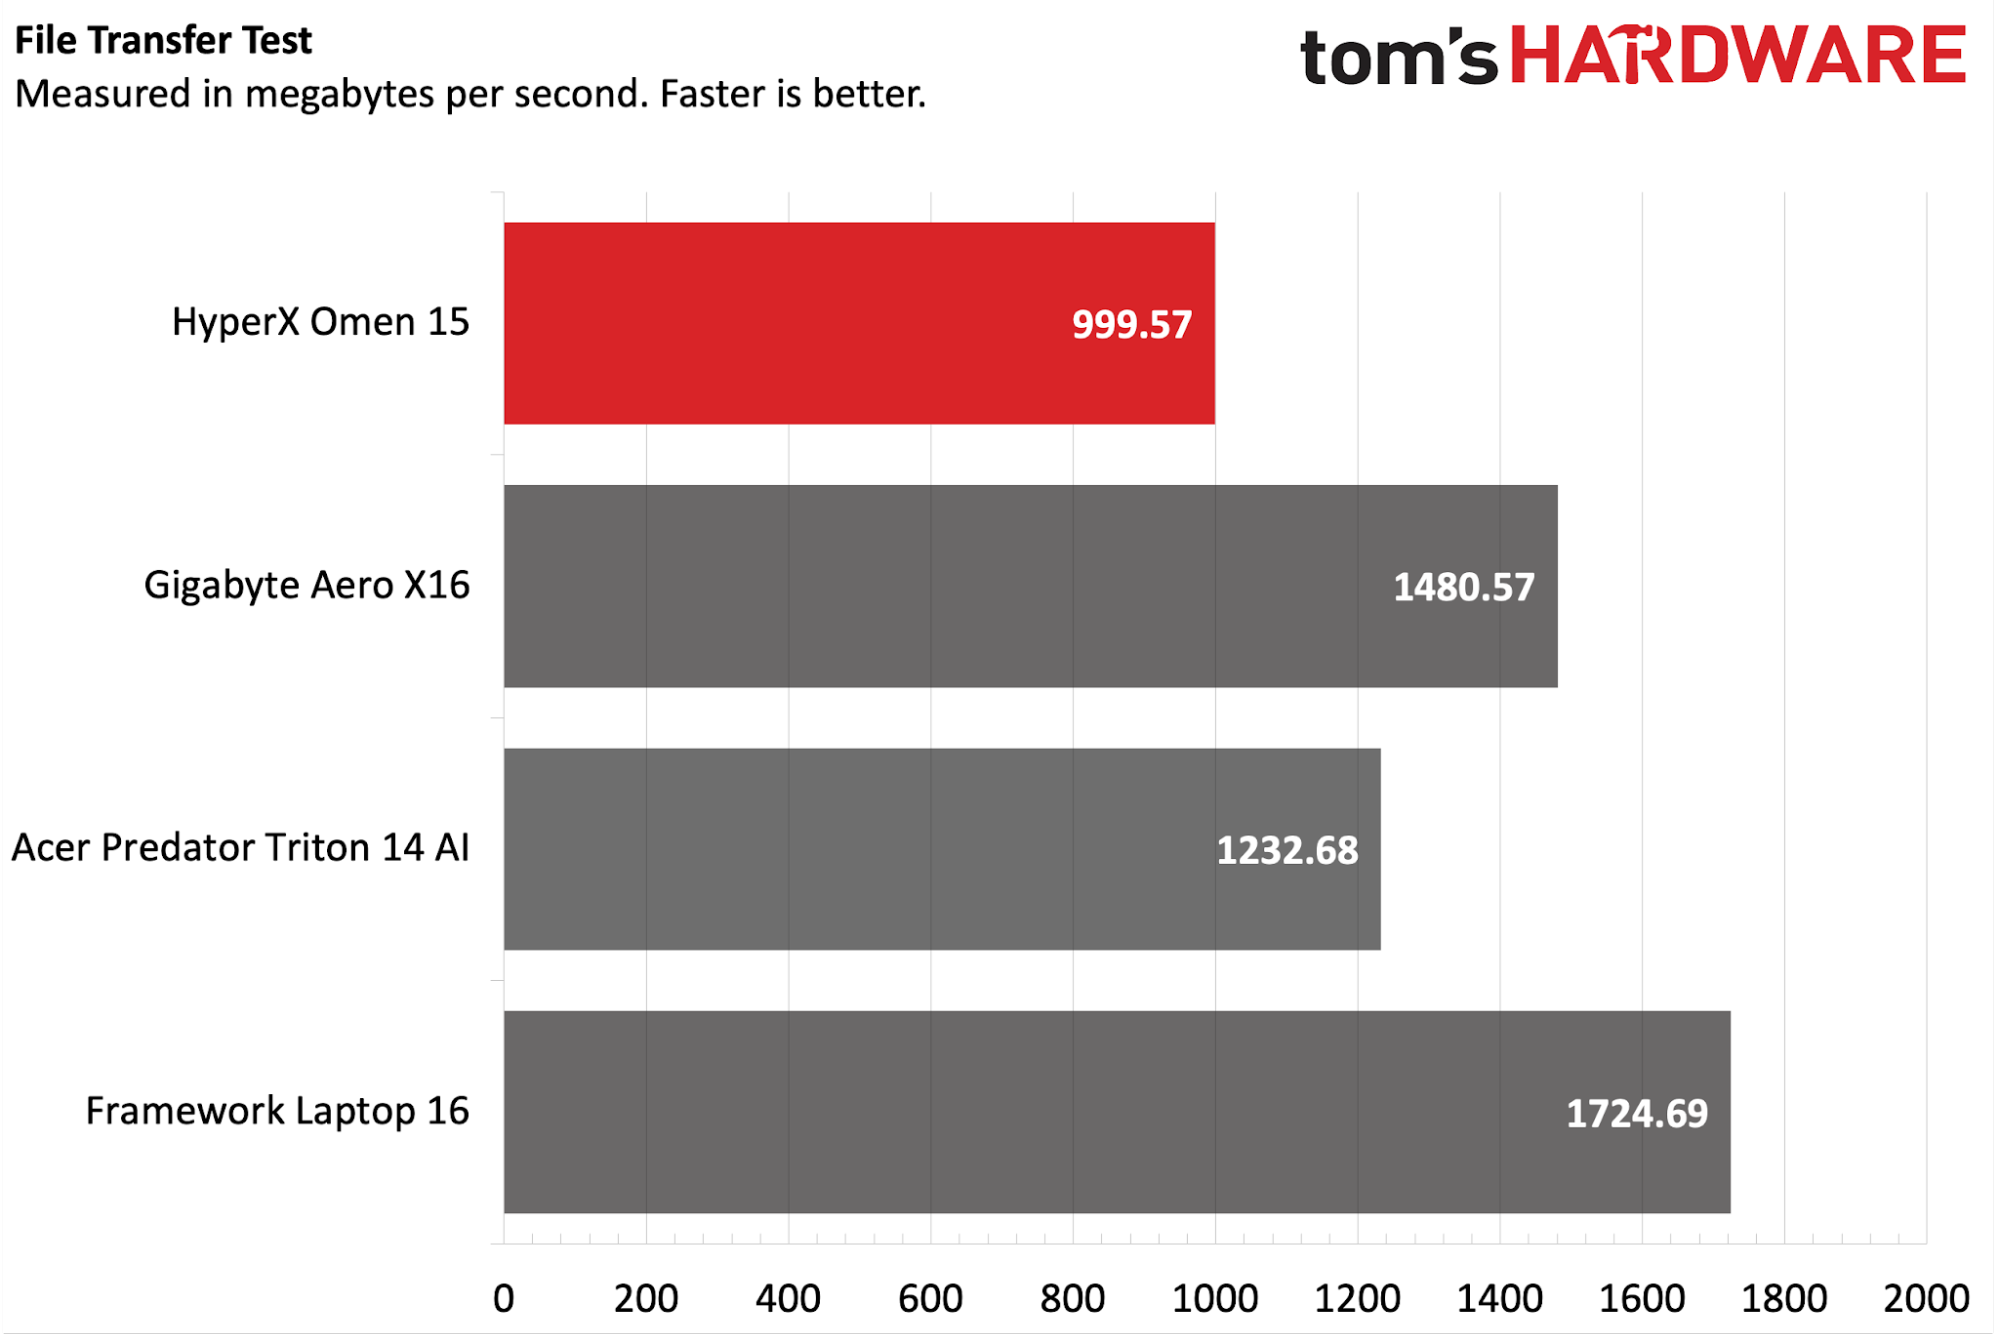
The Omen 15 was at the back of the pack on our file transfer test, coming in at 999 MBps from the Samsung MZVMX1T0HCLD-00BH1 SSD versus an average of around just under 1,500 MBps for the other three competitors.

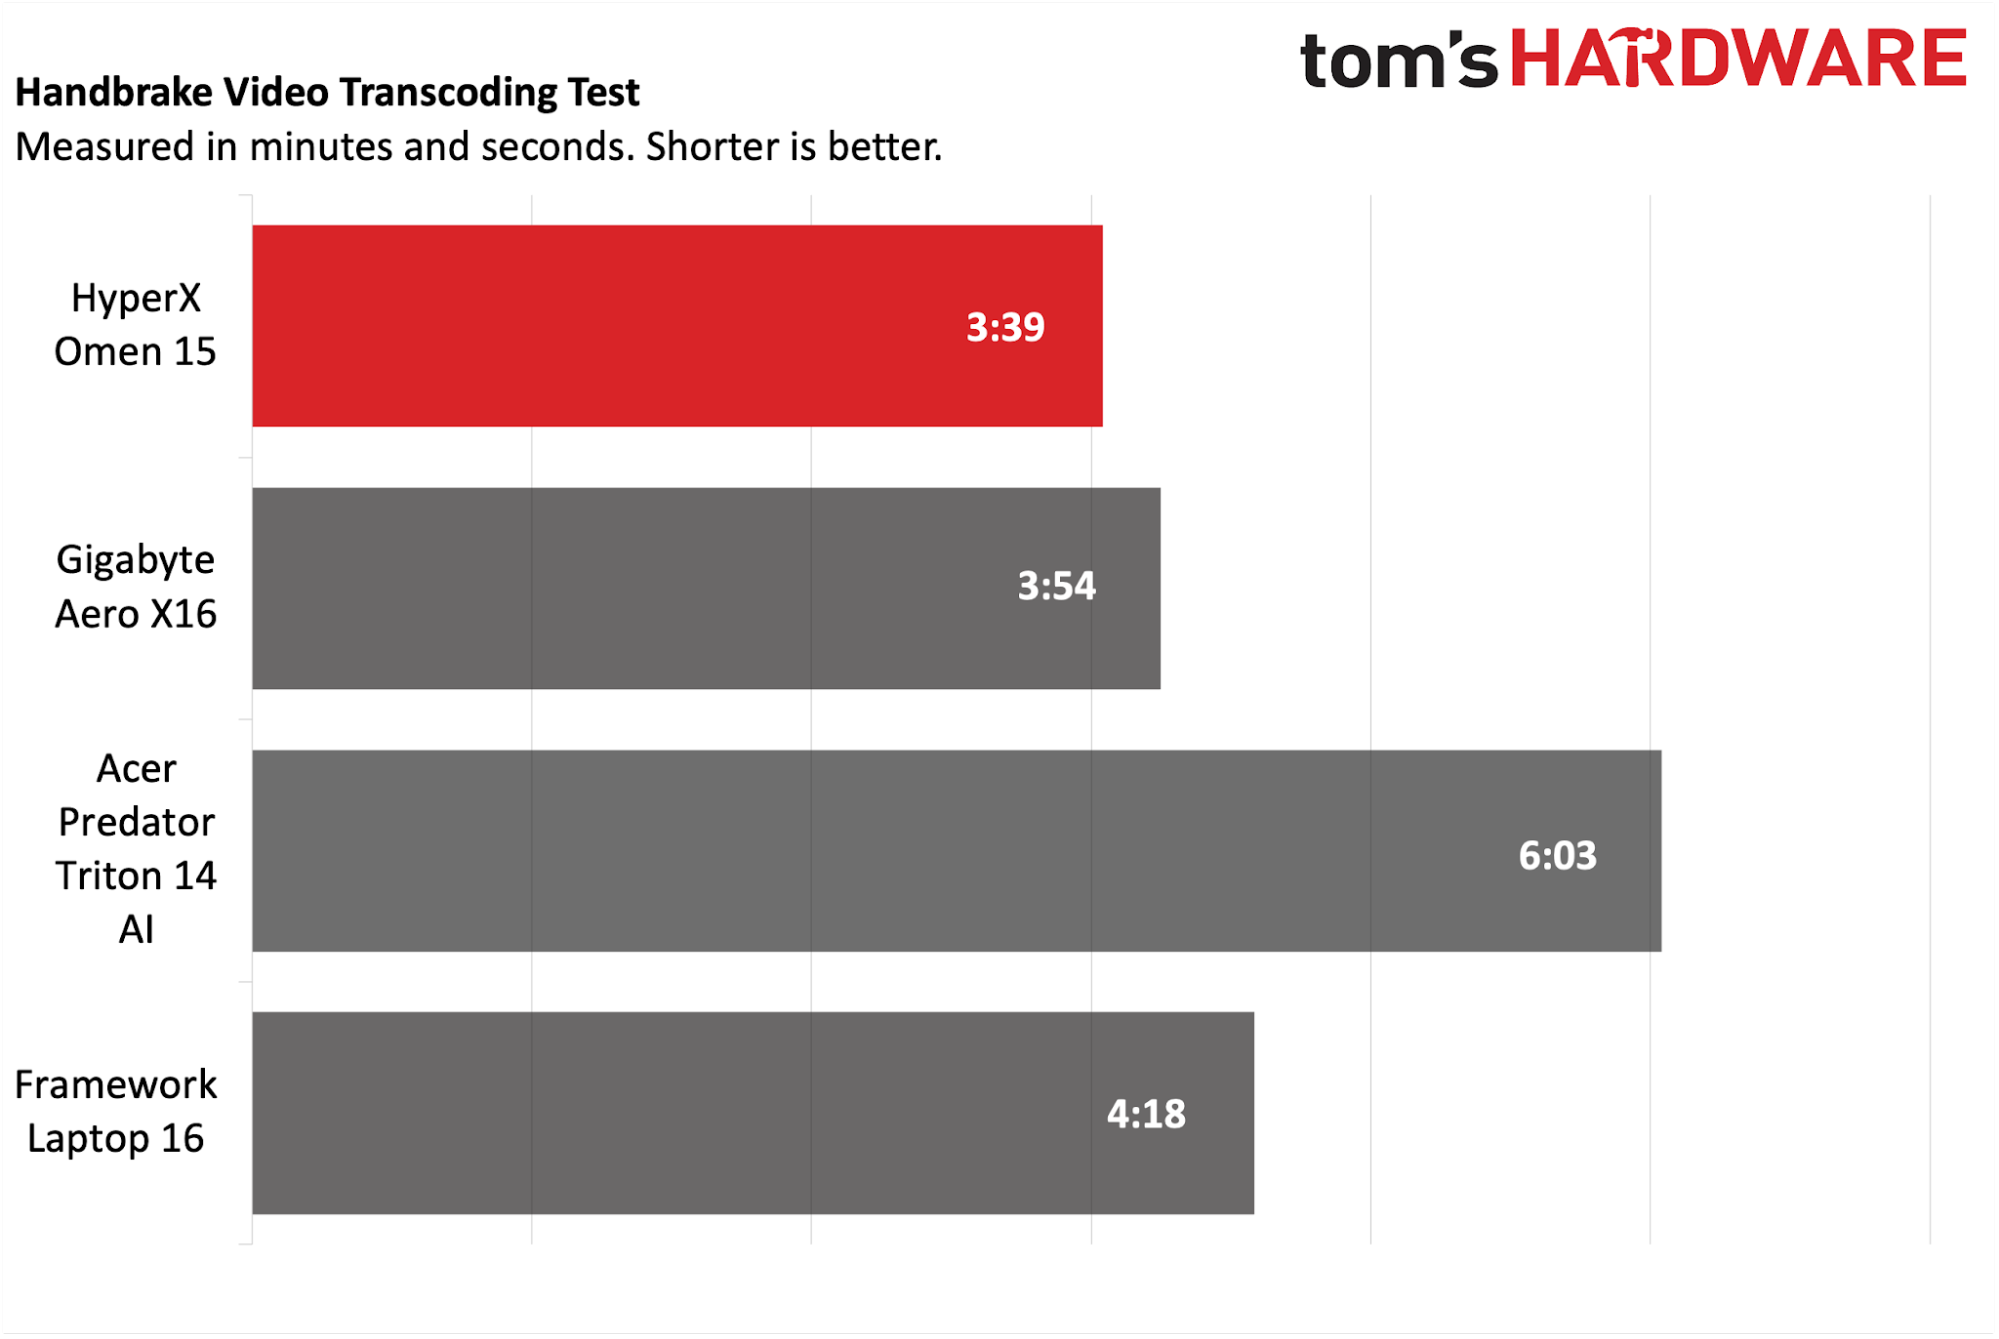
Moving on to our HandBrake test, where we transcode a 4K video file to 1080p, the Omen 15 took the top spot, finishing the task in 3 minutes and 39 seconds. That was about 15 seconds faster than the second-place Aero X16.

Display on the HyperX Omen 15

Our review unit came equipped with a 15.3-inch 2880 x 1800 OLED display. Interestingly, the refresh rate is limited to just 120 Hz, compared to the faster 144 Hz to 165 Hz that we see in competitors like the Aero X16 and Laptop 16.

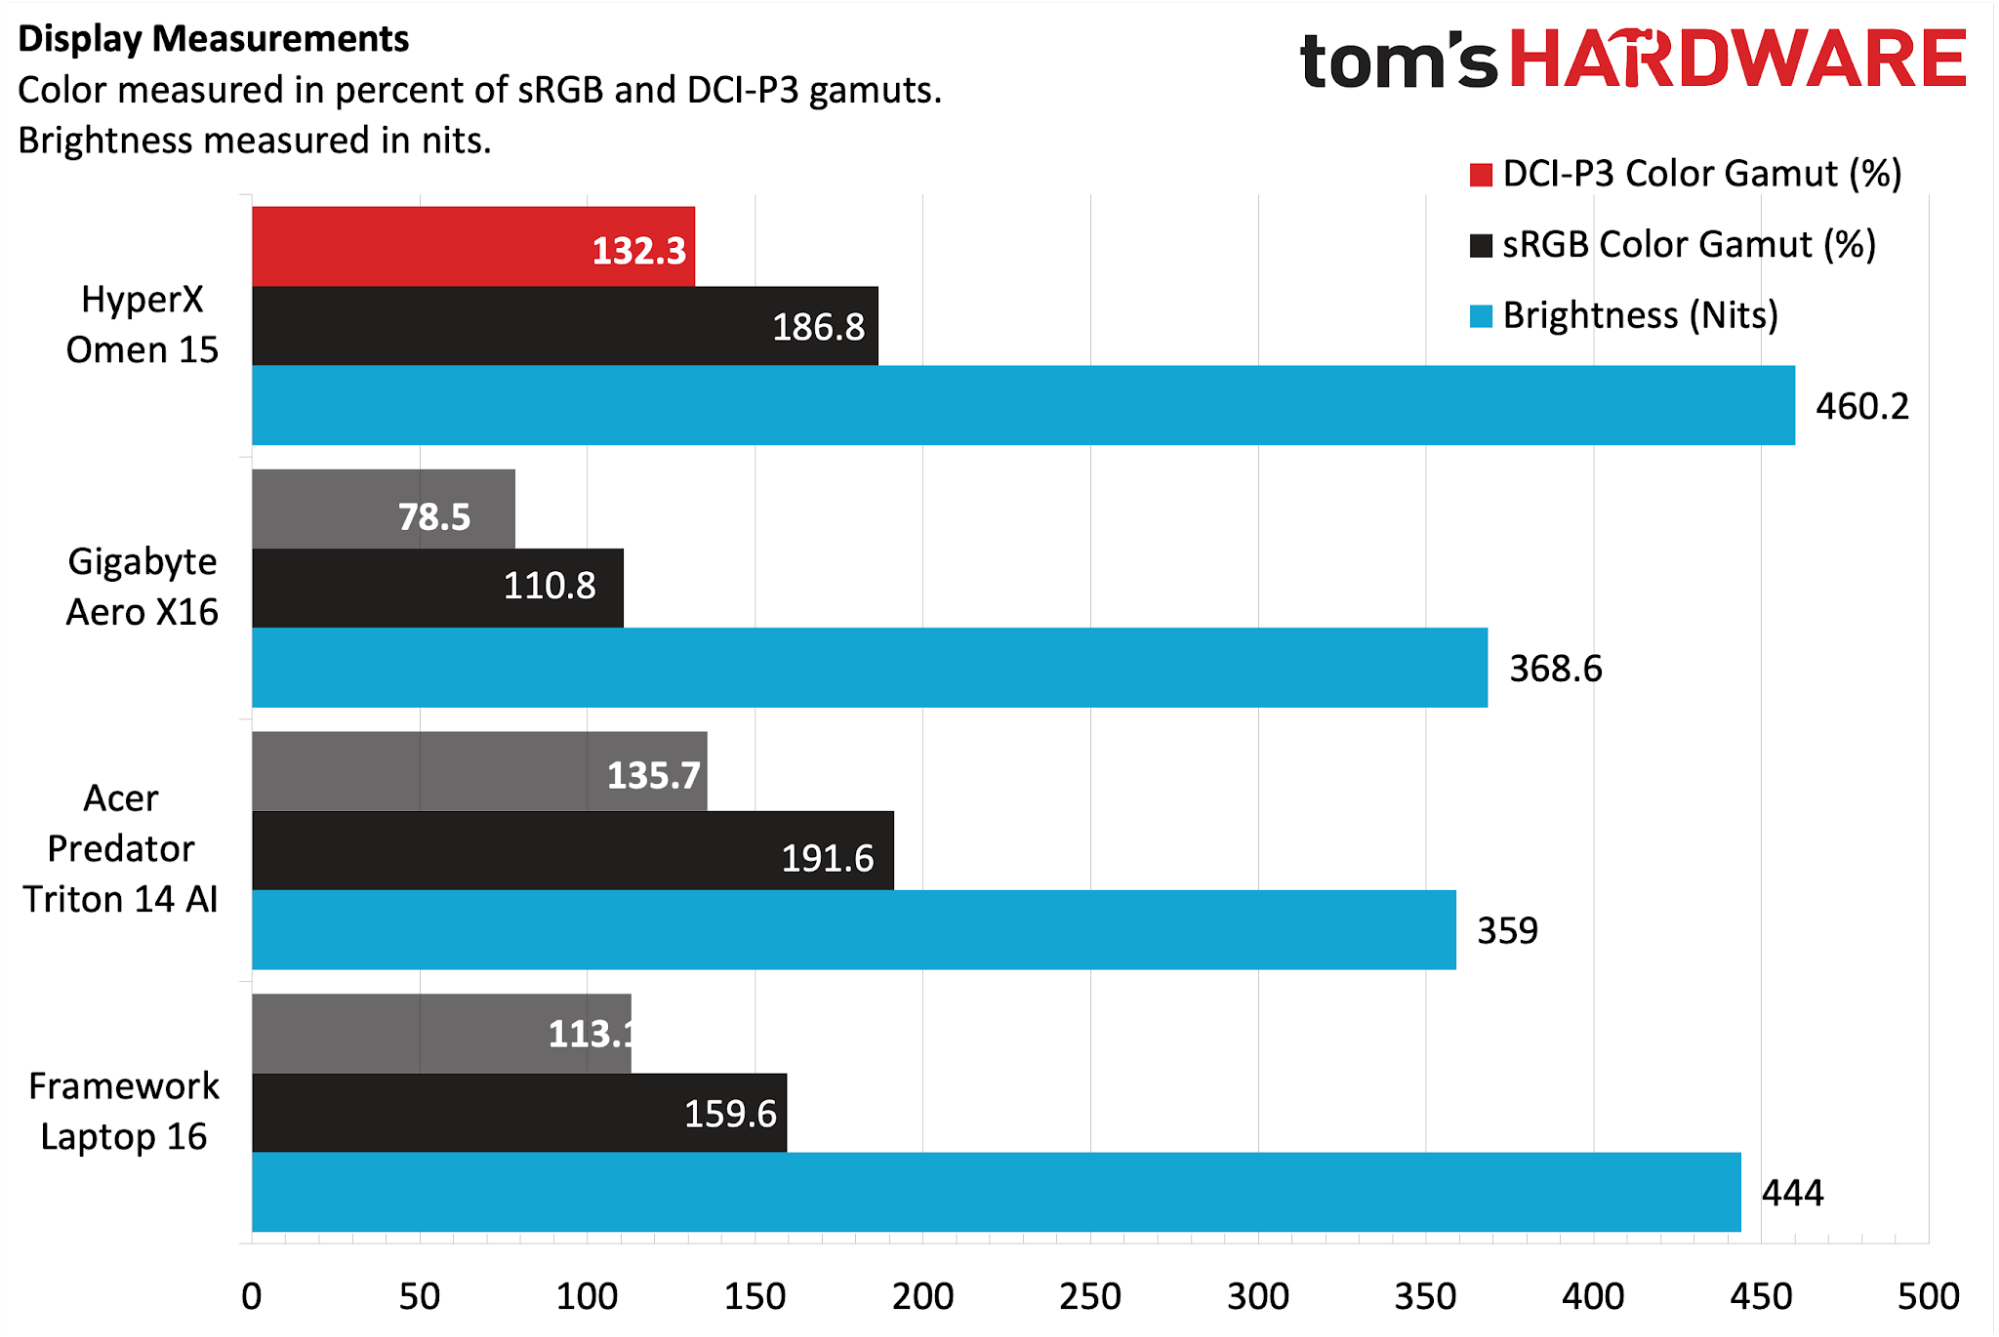
The Omen 15’s OLED panel performed roughly on par with the rest of the laptops in this segment, as it covered 132.3 percent of the DCI-P3 color space and 186.8 percent of sRGB. It even managed to take the top spot in the brightness category, hitting 460.2 nits compared to 444 nits for the Laptop 16.

HyperX Omen 15

(Image credit: Tom's Hardware)

I love OLED panels, and the 1800p unit on the Omen 15 just proves that that love shows no sign of abating. Colors looked rich, blacks were jet black, and brightness levels in my home office setting (with an abundance of overhead lighting) were more than adequate.

I played quite a bit of Forza Horizon 6 using the Omen 15, and marveled at the bright, colorful, and reflective car bodies as I competed in various events.

Keyboard and Touchpad on the HyperX Omen 15

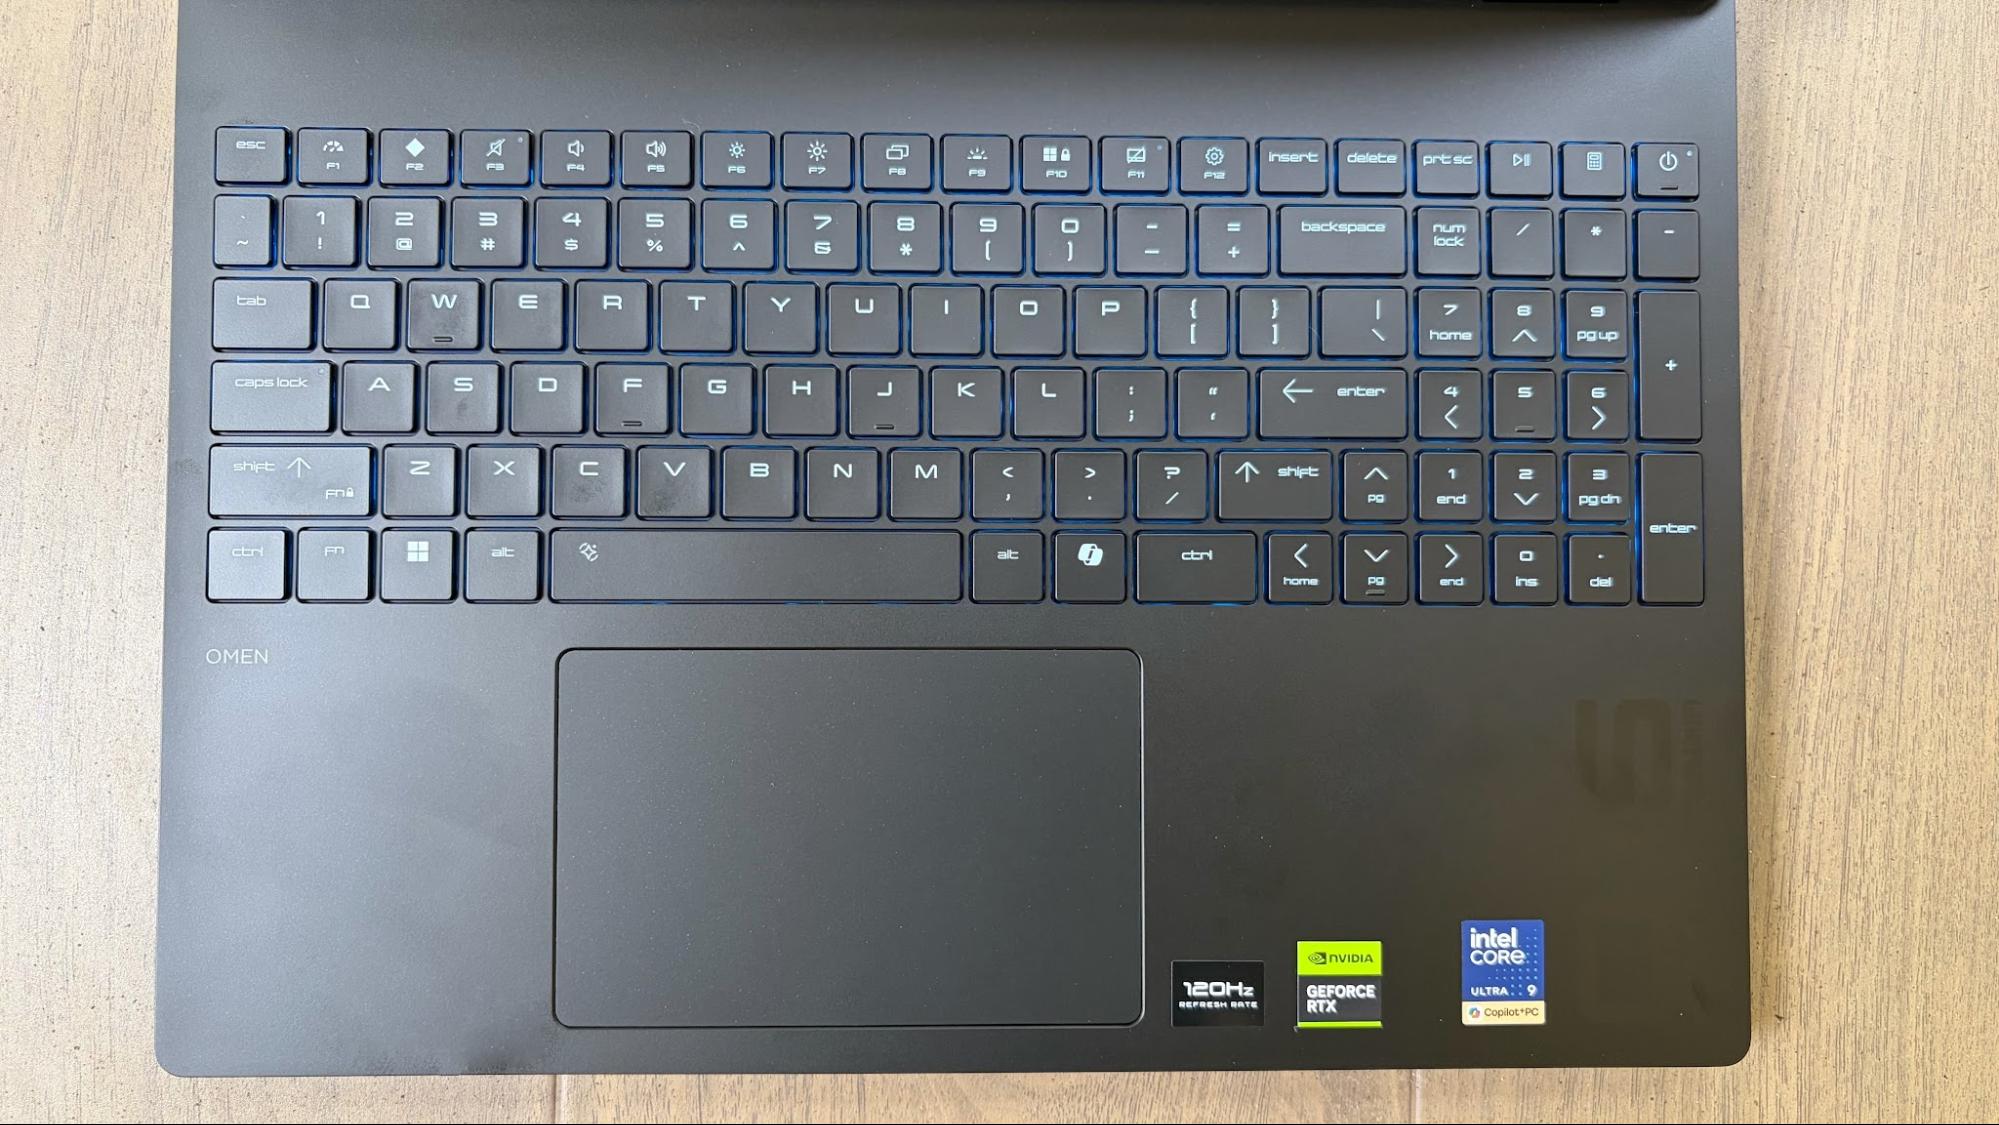
There have been noticeable improvements made to the Omen 15’s keyboard, at least compared to the previous Victus 15. The biggest change is the move from half-height arrow keys to full-size. The tiny, half-height function keys have also been enlarged.

HP also boasts of an 8K polling rate for the Omen 15’s keyboard (equating to a response time of 0.125 ms). I wouldn’t consider myself to be a highly competitive gamer, so any upgrades in this area are lost on me. The keyboard also features 4-zone RGB backlighting.

HyperX Omen 15

(Image credit: Tom's Hardware)

Using the Keyhero.com typing test, I averaged around 87 words per minute with 95% accuracy, which is on par with my typical typing speed. I found the keyboard comfortable for typing and gaming.

There’s nothing particularly noteworthy about the touchpad, which features a top-hinged design. Its surface allowed my finger to glide smoothly, although it is a bit loud and clanky when clicked.

Audio on the HyperX Omen 15

The Omen 15 features stereo speakers supporting DTS:X Ultra and HyperX Audio Control. I was pleasantly surprised by the sound emanating from the speaker, which was rich in volume and clarity. While lacking any real semblance of bass, the underlying output was clean.

I took the opportunity to fire up “Mujahadin and Opium,” which is a horn- and string-filled track by John Barry from The Living Daylights soundtrack. There is just something very chilling about the interplay of the strings and horns; the former of which starts the track, while the latter beautifully fills in classic James Bond tradition.

The speakers also did well to mimic engine sounds as I went corner carving in Forza Horizon 6, be it a high-strung flat-6 or a burbling V8.

Upgradeability of the HyperX Omen 15

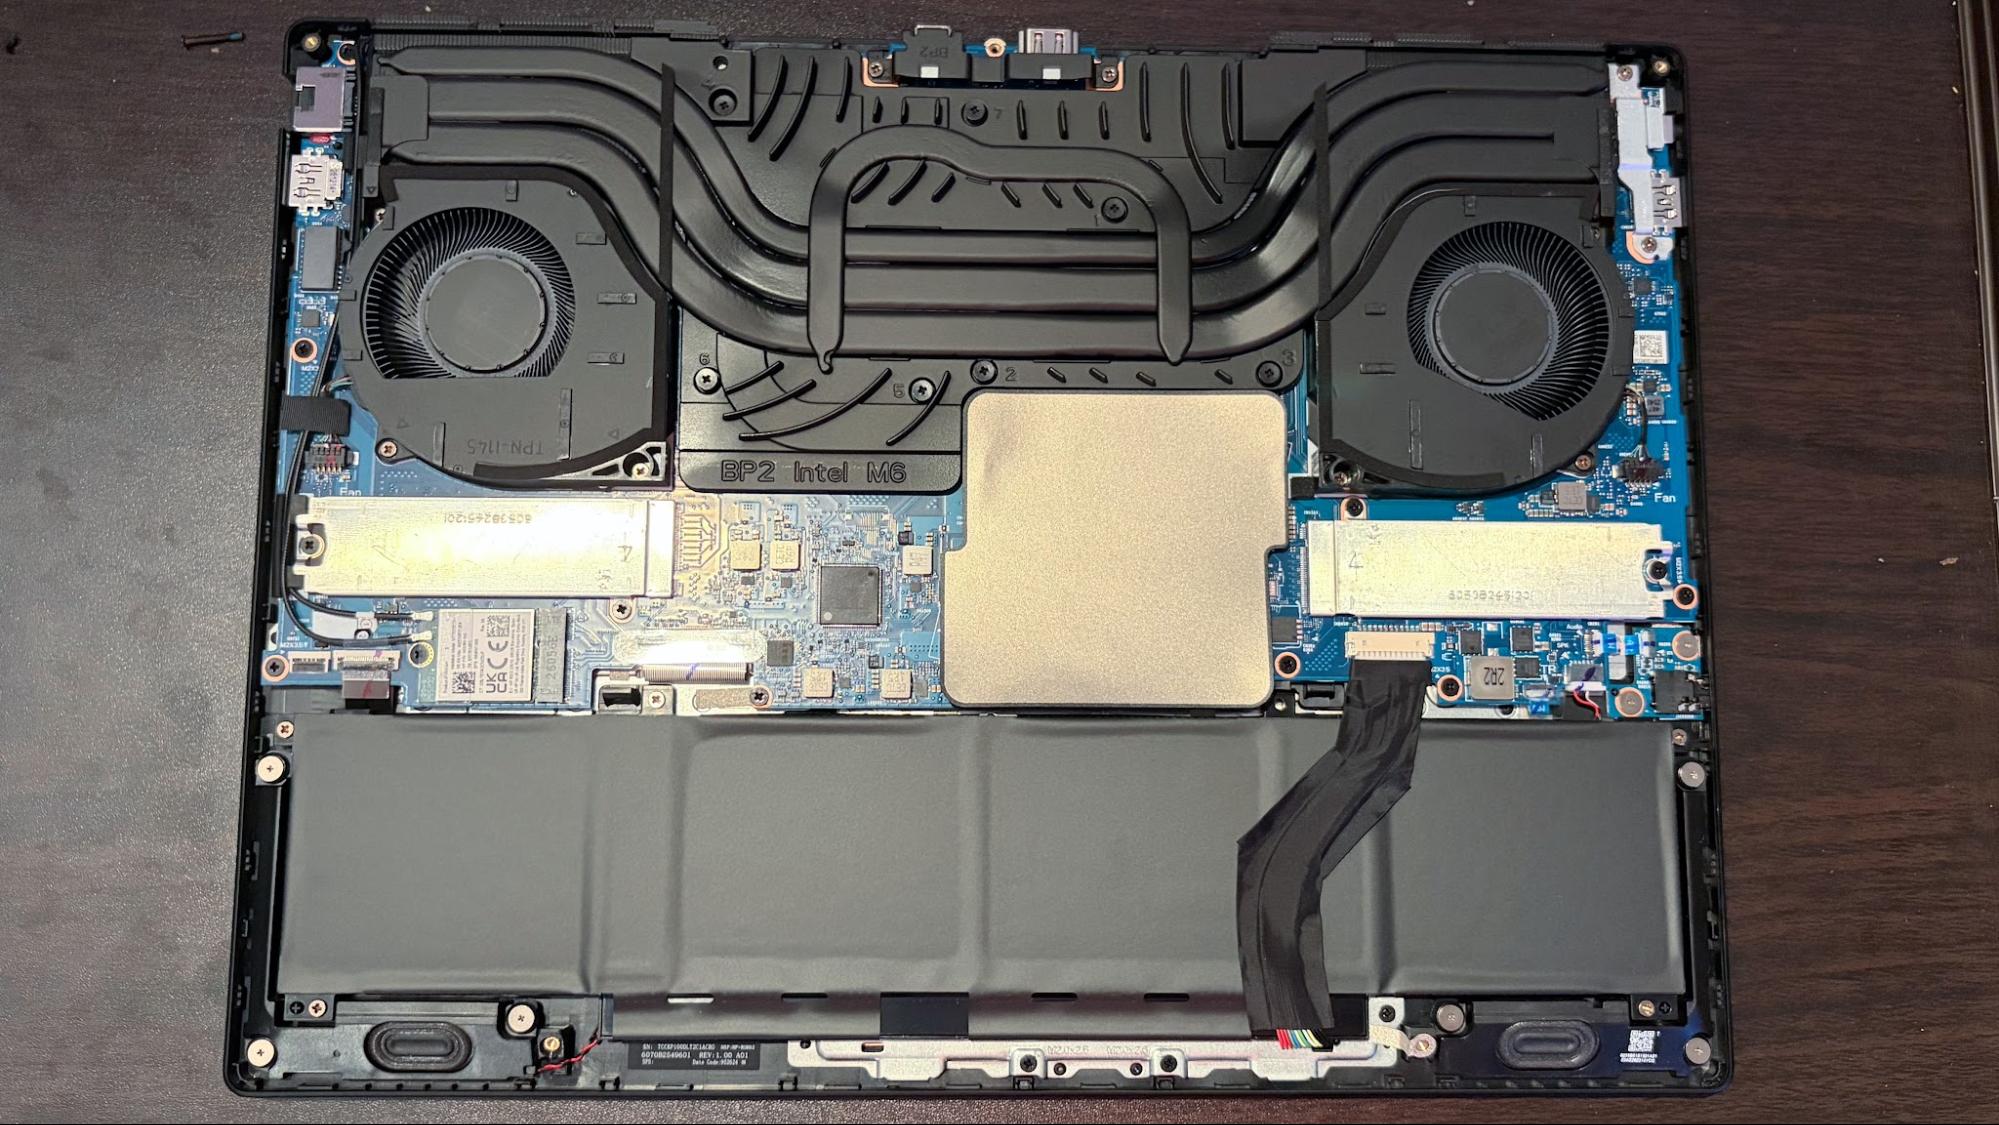
Flipping the Omen 15 over to reveal its bottom panel, you’ll find five screws holding it in place. Three of the screws are exposed, while the two corner screws at the back are hidden beneath tiny rubber plugs. I needed to use a safety pin to pry them out, which was annoying.

HyperX Omen 15
Tom's Hardware
HyperX Omen 15
Tom's Hardware
HyperX Omen 15
Tom's Hardware
HyperX Omen 15
Tom's Hardware

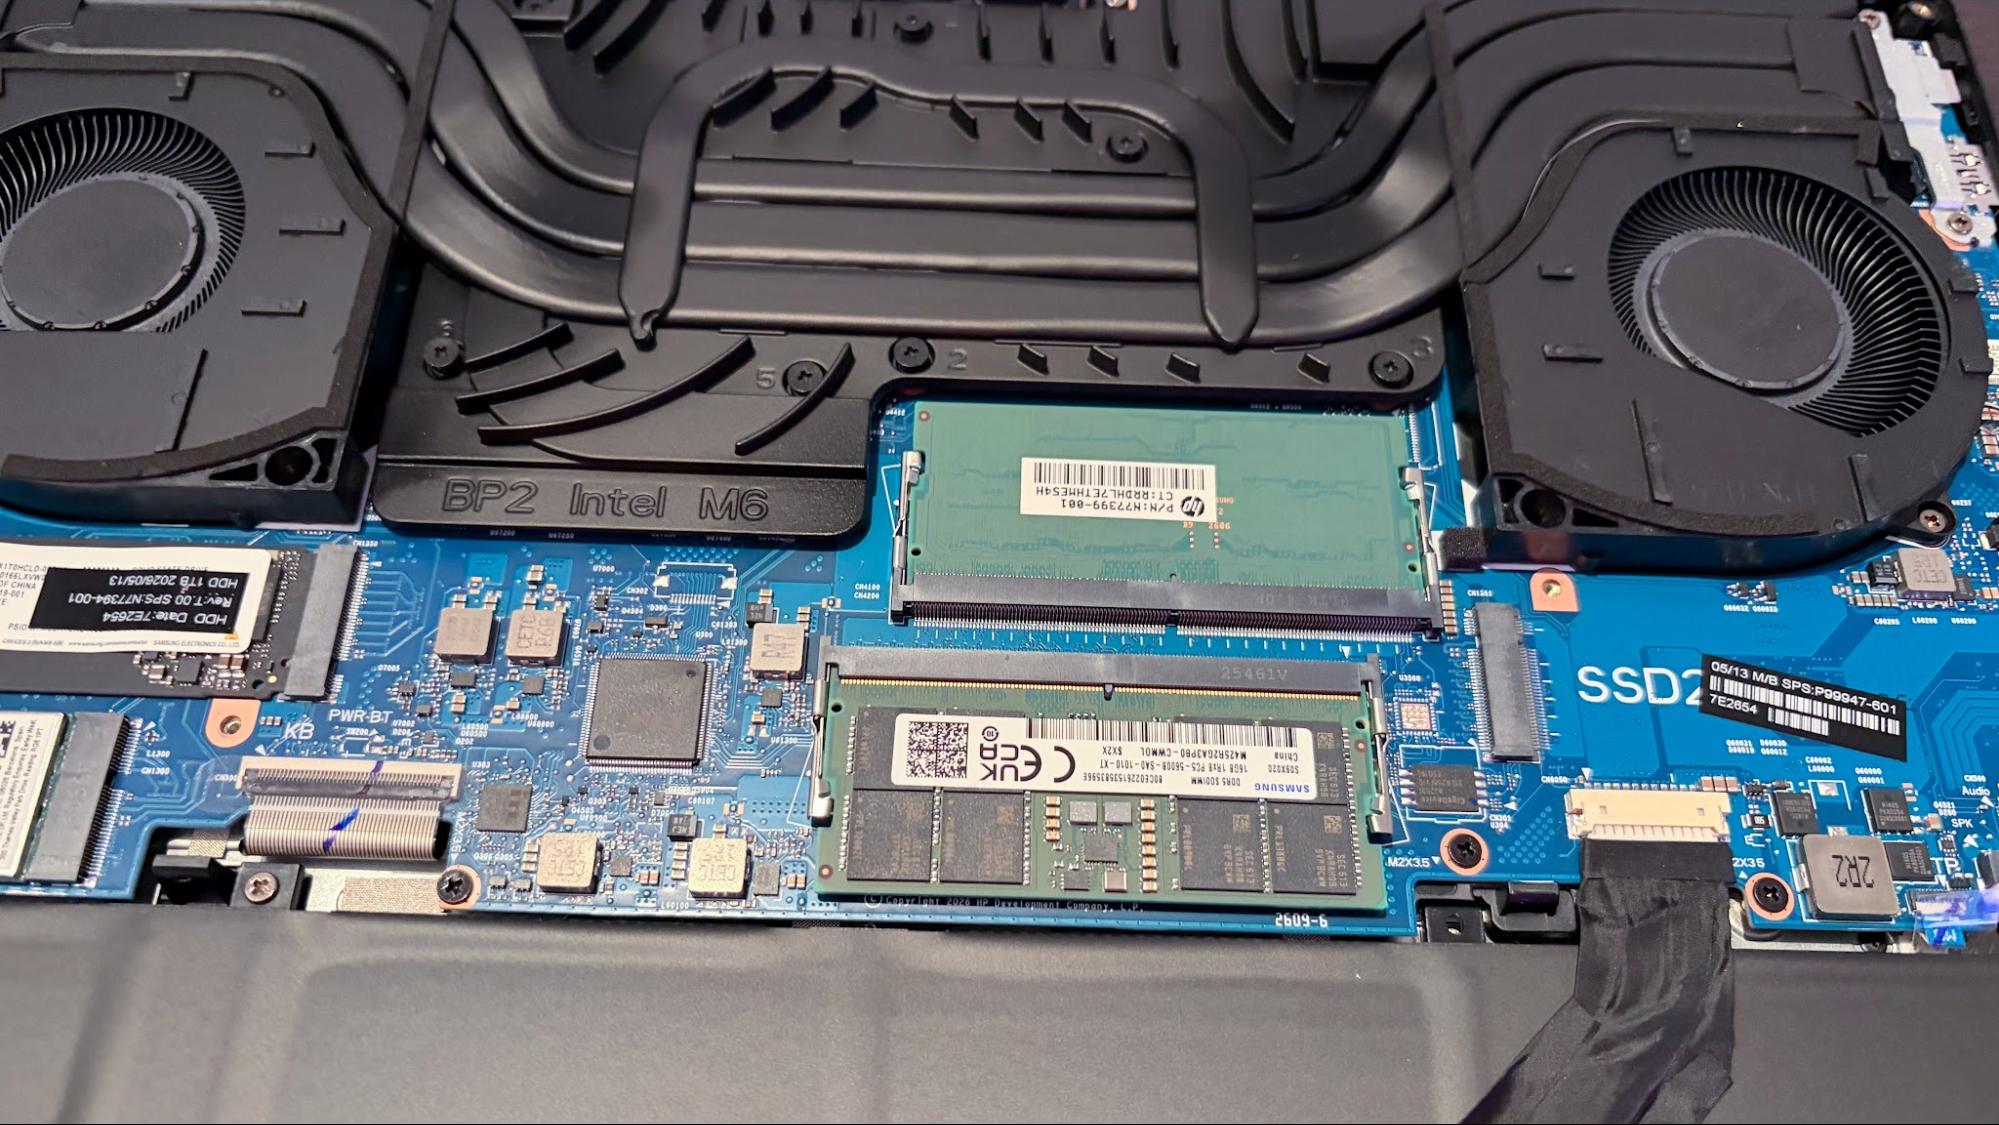
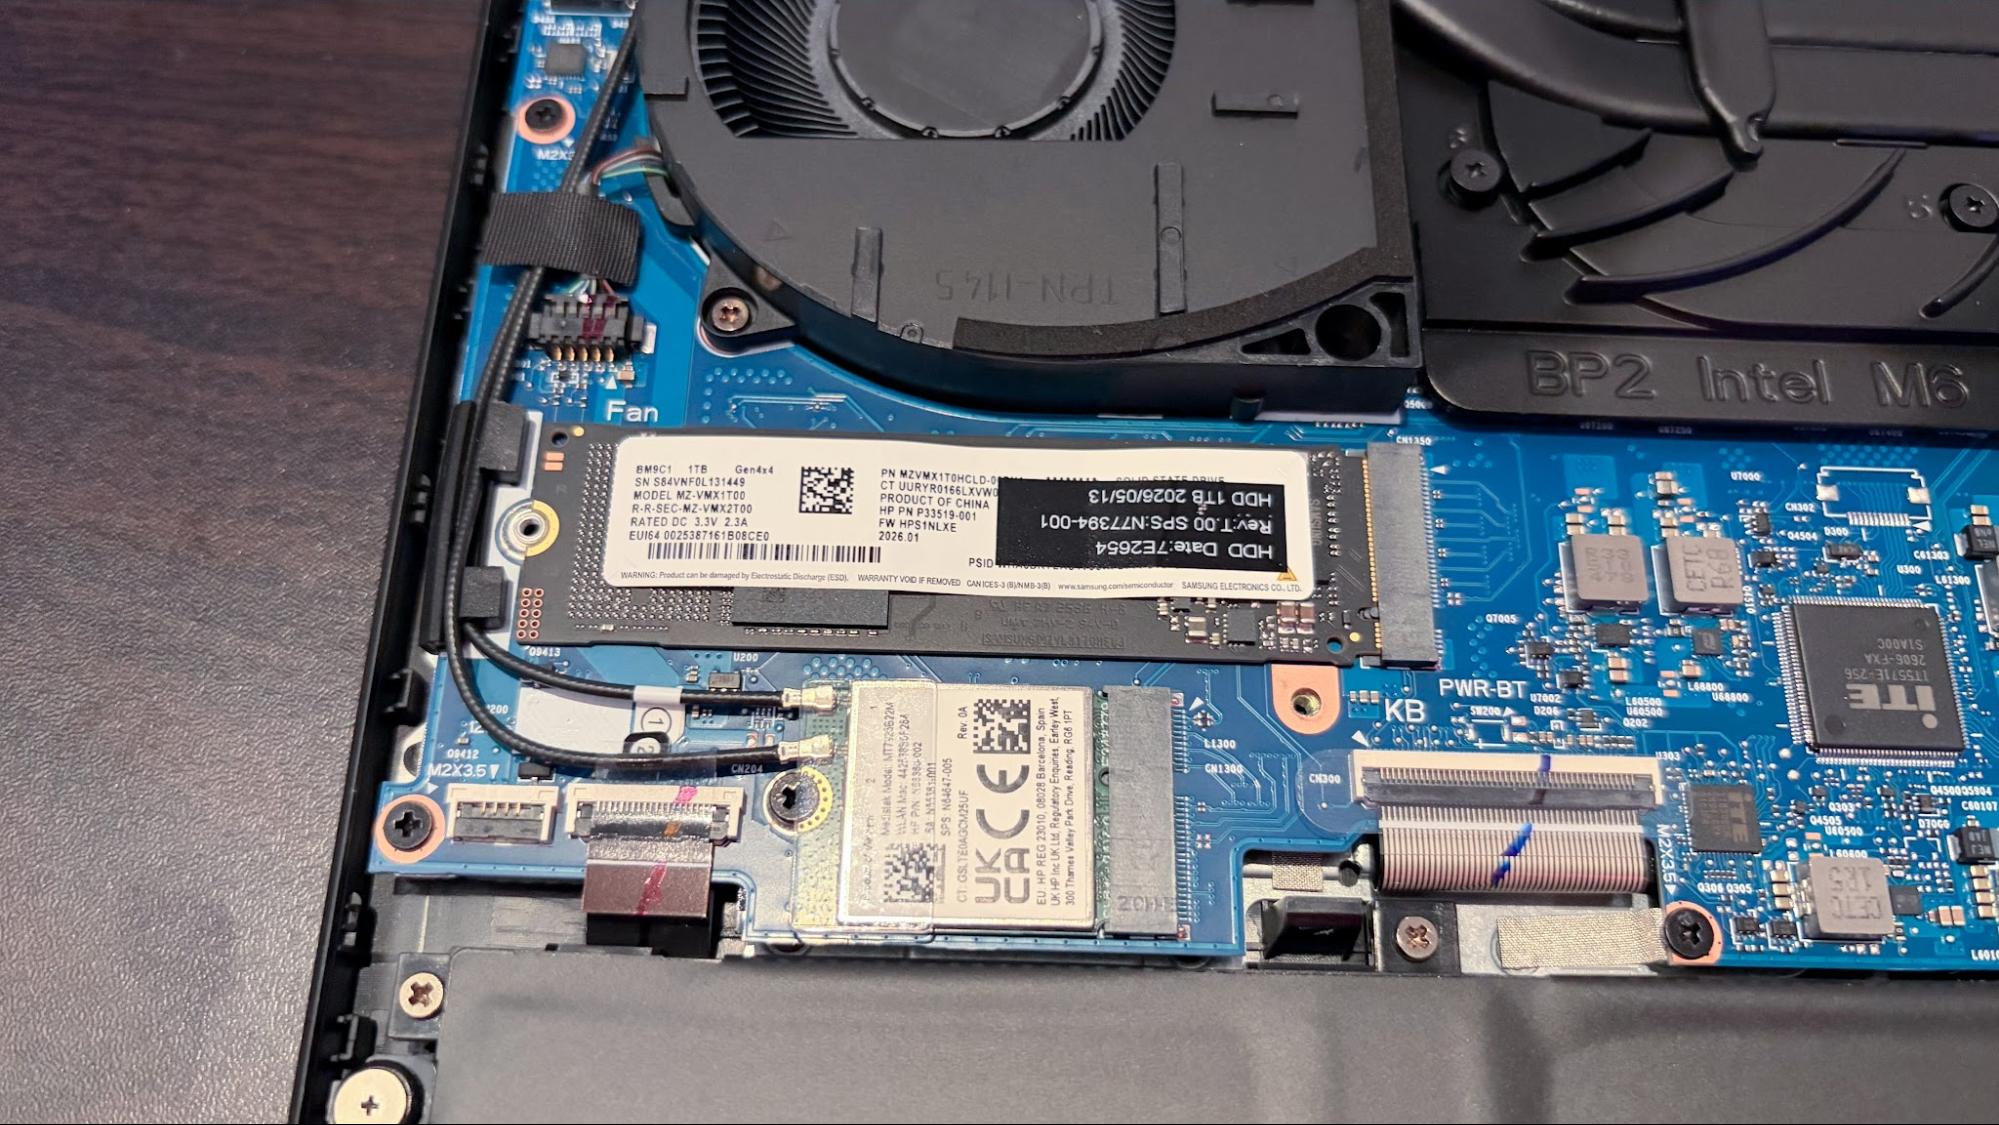
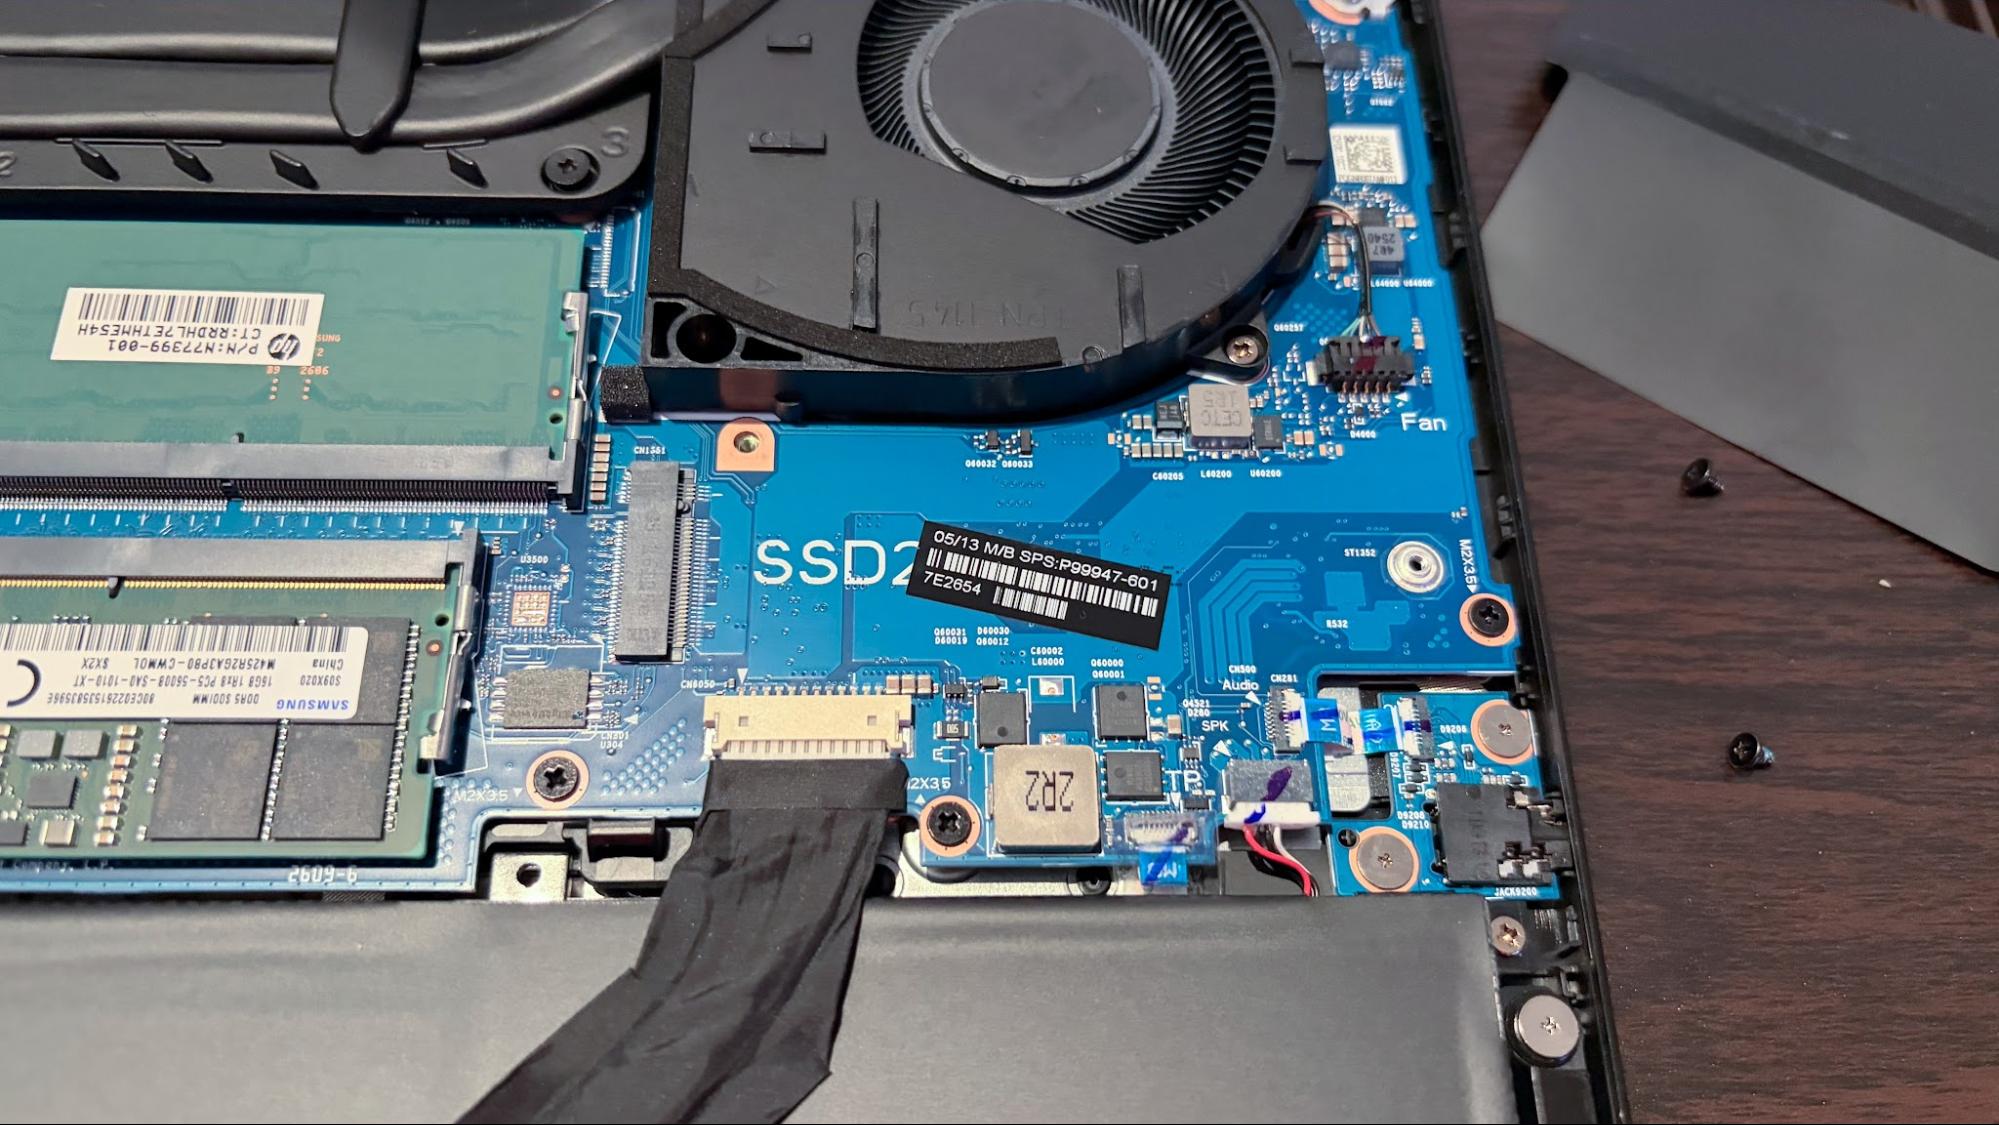
With the panel removed, you’ll find easy access to the battery, both M.2 SSD bays, the Wi-Fi card, and the two SO-DIMM slots (which are covered by a flexible I/O shield).

Battery Life on the HyperX Omen 15

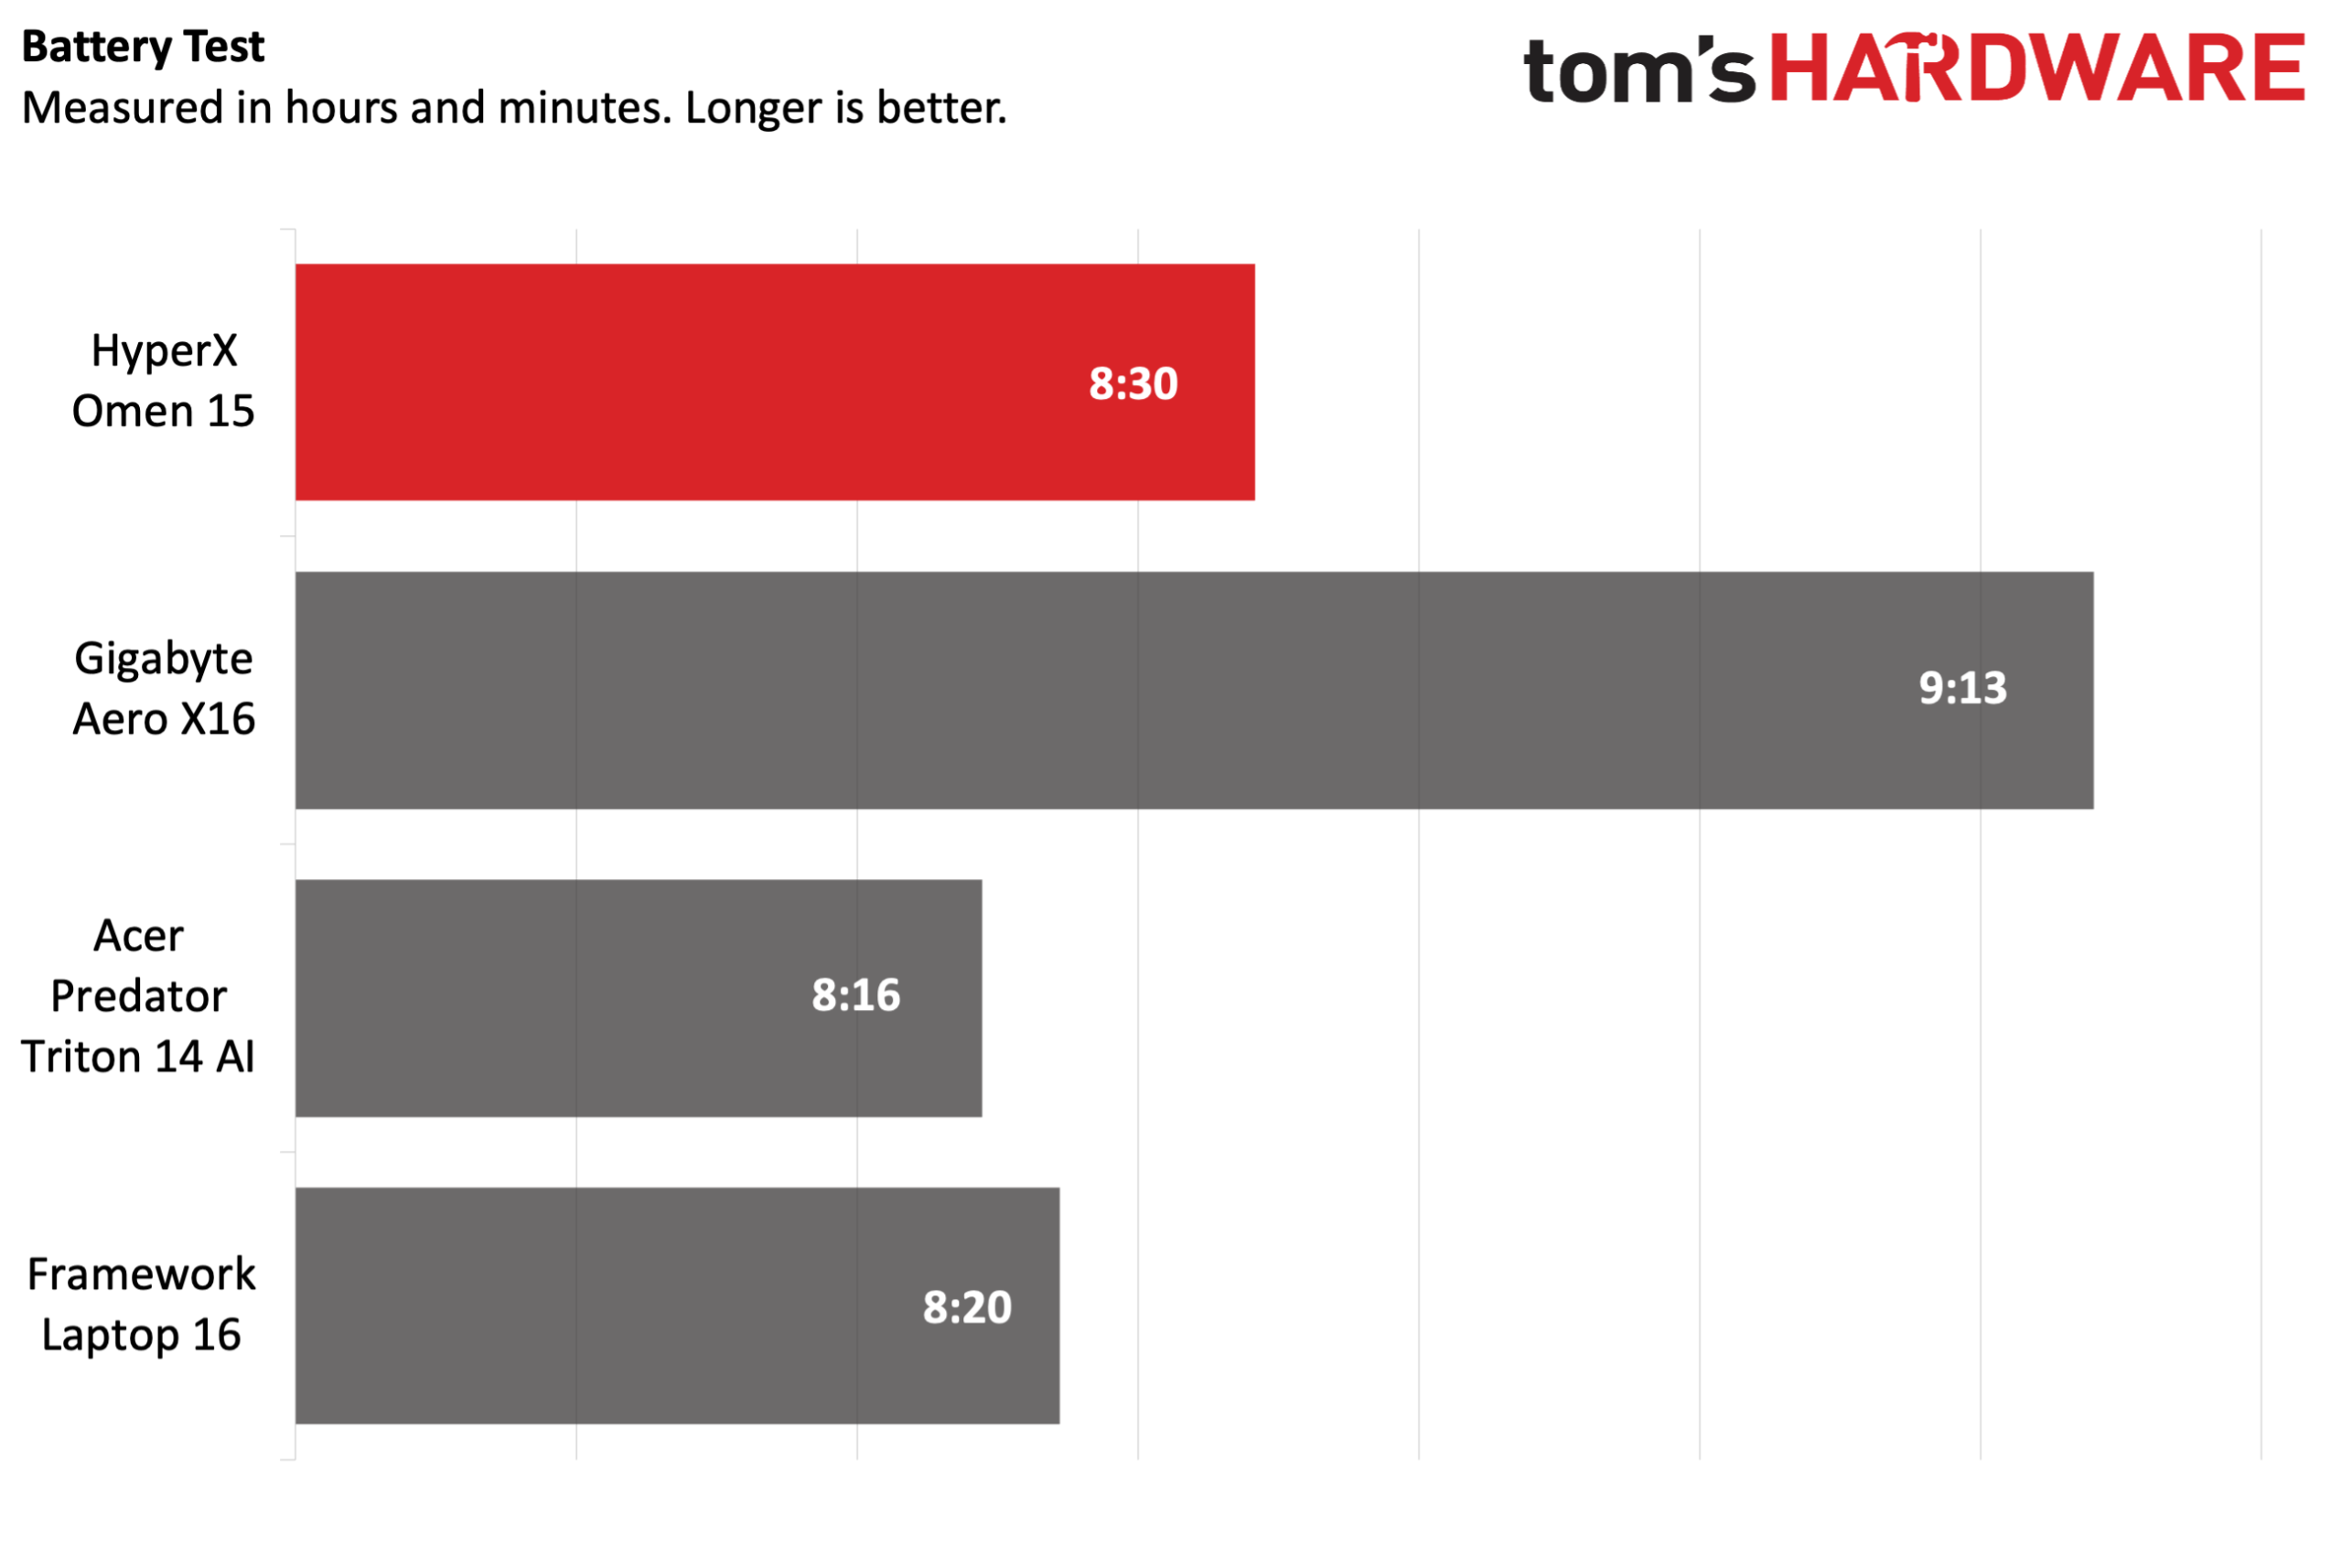
The Omen 15 is powered by a 70 WHr battery, and it performed well against its peers. Our battery test leverages web browsing, video streaming over Wi-Fi, and OpenGL testing with the screen brightness set at 150 nits.

HyperX Omen 15

(Image credit: Tom's Hardware)

The HyperX laptop endured for 8 hours and 30 minutes, which was 10 minutes longer than the Laptop 16 and 14 minutes longer than the Predator Triton 14 AI. However, it was no match for the Aero X16, which lasted 9 hours and 13 minutes.

Heat on the HyperX Omen 15

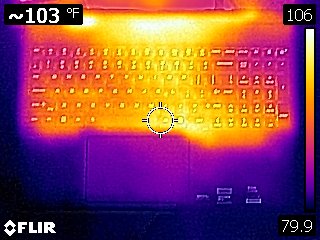
During the Metro Exodus stress test, we measured the Omen 15's keyboard at 95.4 degrees Fahrenheit (F) between the G and H keys, while the touchpad was 85.1 F.

HyperX Omen 15
Tom's Hardware
HyperX Omen 15
Tom's Hardware

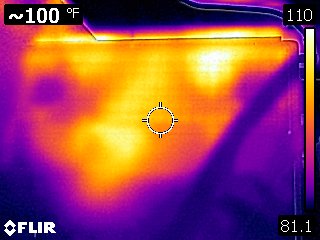
The hottest part of the laptop was near the bottom-rear of the chassis, measuring 110 F.

While running the Metro Exodus stress test, the CPU measured 63.4 degrees Celsius (C). Meanwhile, the RTX 5070 came in at 63.2 C.

Webcam on the HyperX Omen 15

The Omen 15 uses a standard 1080p webcam with IR capabilities, meaning it can be used with Windows Hello biometric authentication in Windows 11.

The camera is fine, and by no means a standout in any particular area. It covers the basics, offering decent color reproduction, and did a passable job of picking out my facial hair. However, I did notice a fair amount of noise in the image. However, if you mainly use the camera to hop on a few Zoom calls here and there, it’s more than adequate.

HyperX Omen 15 Software and Warranty

HP has no qualms about loading up its systems with a copious amount of apps, as you'll find a variety of software including HP, HP Documentation, HP PC Hardware Diagnostics, HP Smart, HP Privacy Settings, and HP TV+ (and that's not even all of them).

However, the HP utility that you'll probably interact with the most is the Omen Gaming Hub. Here you'll find controls for tweaking nearly every aspect of the system, from power modes to RGB lighting for the keyboard.

The Omen 15 comes with a one-year manufacturer warranty.

HyperX Omen 15 Configurations

Our Omen 15 review unit came configured with an Intel Core Ultra 9 386H processor, 32GB of DDR5-5600 memory, a 1TB PCIe 4.0 SSD, GeForce RTX 5070 GPU, and a 2880 x 1800 OLED 120 Hz display. It’s listed on HP’s website with an MSRP of $2,799, but is currently available for $2,099 with a 25% off coupon.

There are various configurations available with slightly different specs, but the 15-ga0762nr SKU features a Core i7-14650HX processor, 16GB of DDR5-5600 RAM, a 1TB PCIe 4.0 SSD, an RTX 5060 GPU, and a 2560 x 1600 OLED with a 180 Hz refresh rate. This system is priced at $1,999, or just a $100 discount compared to our review unit’s sale price. However, the price disparity makes more sense when you consider our review unit’s MSRP.

Bottom Line

On the one hand, the HyperX Omen 15 has solid gaming performance across the board, and its CPU performance in productivity tasks is top-of-the-class. In addition, the 15.3-inch OLED display looks great and offers an expansive 2880 x 1800 resolution.

On the other hand, the chassis is constructed of cheap and flexy plastic, while SSD performance lags behind its competitors. In addition, the display is limited to a 120 Hz refresh rate, and you don’t get any Thunderbolt ports (if that’s something that’s important to you at this price point).

Where things get even more complicated is with pricing. Our review unit carries an MSRP of $2,799, but HP is currently selling it for $2,099 after discounts. At MSRP, our review unit is an absolute non-starter, while the sale price makes it a much more palatable option. But even at its sale price, we feel that the Gigabyte Aero X16 makes a far more compelling buy at just $1,799.

✇Tomshardware

Acer launches seven new gaming monitors across Nitro and Predator families — tri-mode panels, QD-OLEDs, Mini LEDs, 1,000 Hz, and more

IFA 2026 is upon us, and Acer has unleashed a whole onslaught of new products across various categories. One specific category is monitors, where Acer announced no less than seven new Nitro- and Predator-branded products to satisfy nearly every price point and gaming niche. With prices ranging from $299 to $1,199, there’s something for everyone with today’s announcements.

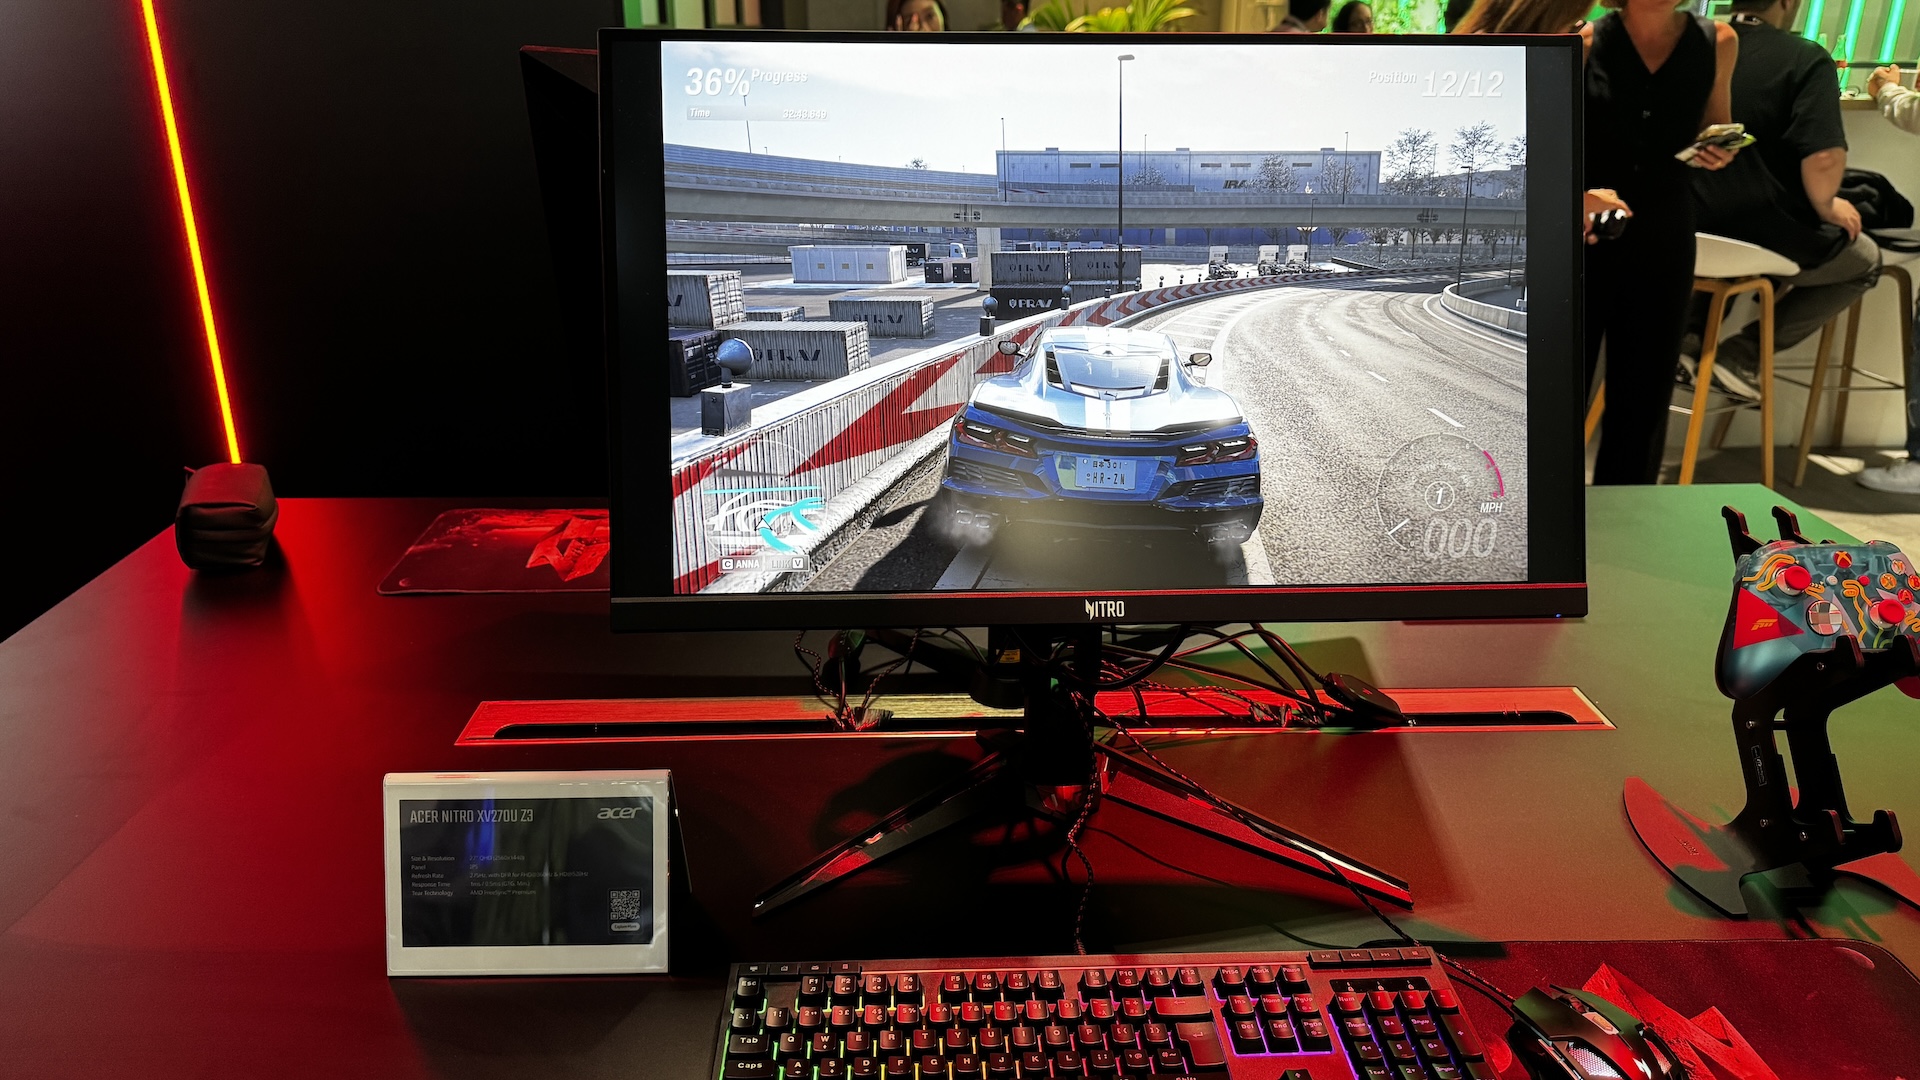
We’ll start our coverage with the Nitro family, which has four new members, the cheapest of which is the Nitro XV270U Z3 at $299. The XV270U Z3 is a tri-mode monitor, offering three distinct resolution/refresh rate presets. This is a 27-inch monitor with an IPS panel, QHD resolution, and a 275 Hz refresh rate. However, you can switch to two additional modes: 1080p at 360 Hz or 720p at 520 Hz. I haven’t gamed at 720p since the turn of the century, but the resolution is here for folks who crave frame rates over everything else.

The Nitro XV275U Z2 is another 27-inch tri-mode monitor with an IPS panel, but it is upgraded with 1,152-zone Mini LED backlighting. The available resolutions and refresh rates mirror those of the XV270U Z3, but there are a few additional perks. The XV275U Z2 offers a typical brightness of 500 nits (twice that of the XV270U Z3) and reaches 1,000 nits in HDR mode. Despite the pretty substantial upgrades, the Nitro XV275U Z2 is only $30 more expensive at $329.

Acer IFA 2026
Tom's Hardware
Acer IFA 2026
Tom's Hardware
Acer IFA 2026
Tom's Hardware
Acer IFA 2026
Tom's Hardware
Acer IFA 2026
Tom's Hardware
Acer IFA 2026
Tom's Hardware
Acer IFA 2026
Tom's Hardware
Acer IFA 2026
Tom's Hardware
Acer IFA 2026
Tom's Hardware

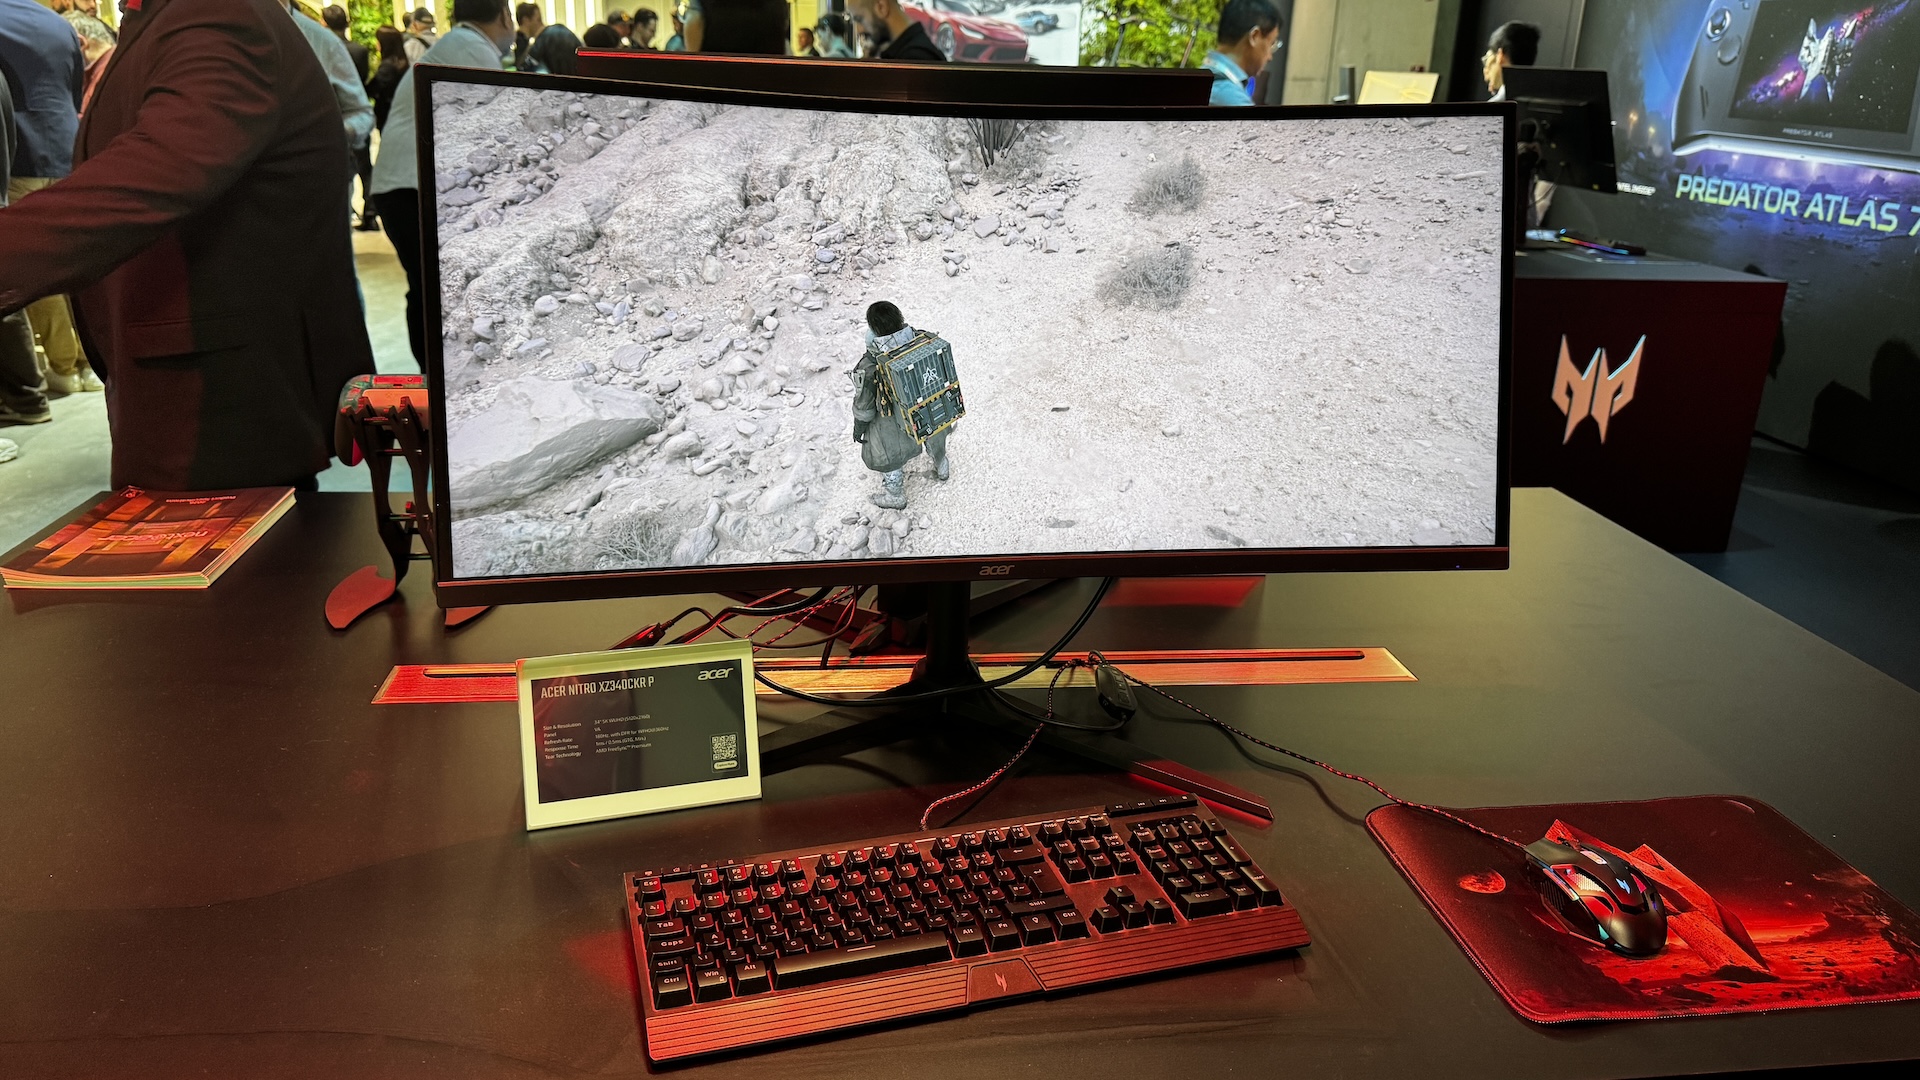
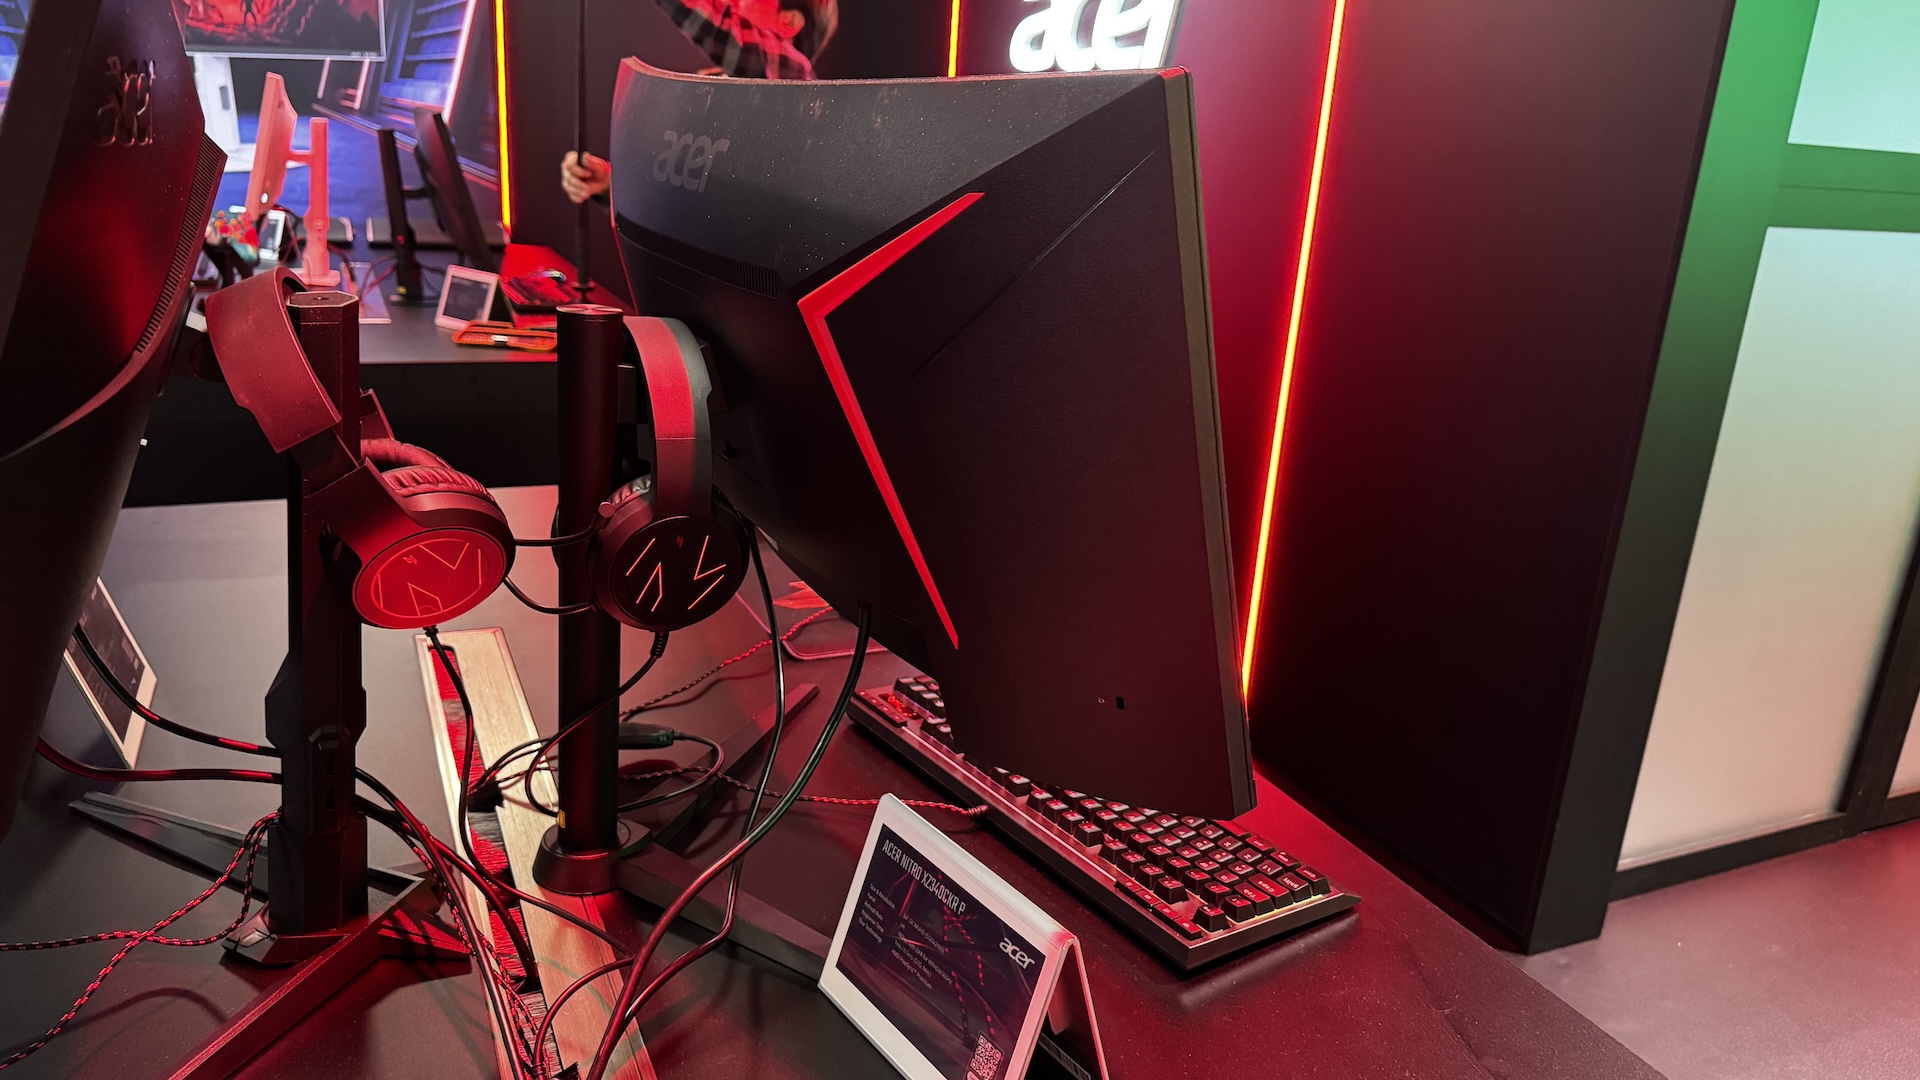
The next two Nitro monitors also offer 5K resolution, and we'll start with the $699 Nitro XZ340CKR P. It features a 34-inch IPS panel with 5120 x 2160 resolution (21:9 aspect ratio) and a maximum refresh rate of 180 Hz. However, Acer also infuses the Nitro XZ340CKR P with a dual-mode switch, allowing it to operate at WFHD (2560 x 1880) at 360 Hz.

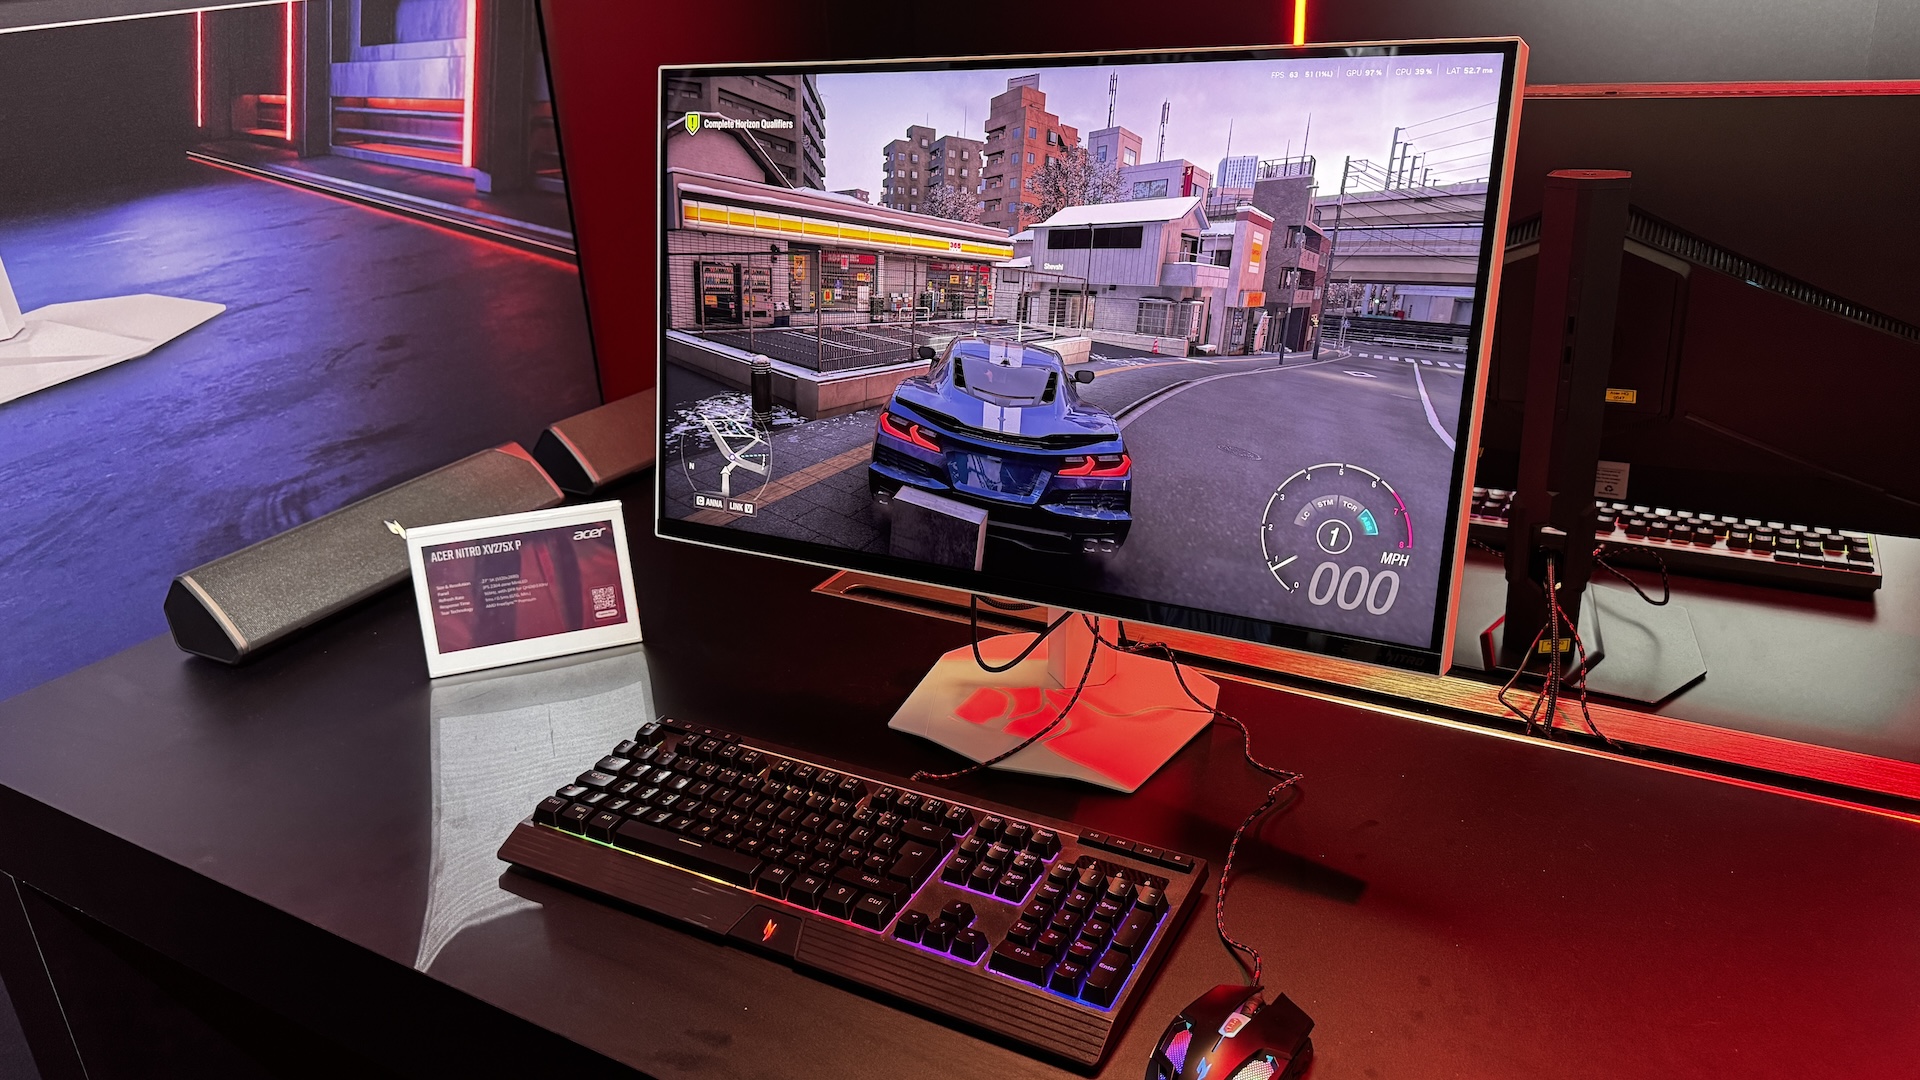
Rounding out the new additions to the family is the Nitro XV275X P, which squeezes a 5120 x 2880 resolution (16:9 aspect ratio) in a 27-inch IPS panel. For those who crave the ultimate in pixel density, the Nitro XV275X P should tick all the right boxes. The panel tops out at 165 Hz at native resolution, but if you're willing to drop down to 2560 x 1440, you can bump the max refresh rate to 330 Hz. The monitor has a typical brightness of 450 nits, but can jump up to 1,400 nits in HDR mode. However, you'll pay for that density and performance with a price tag of $1,199.

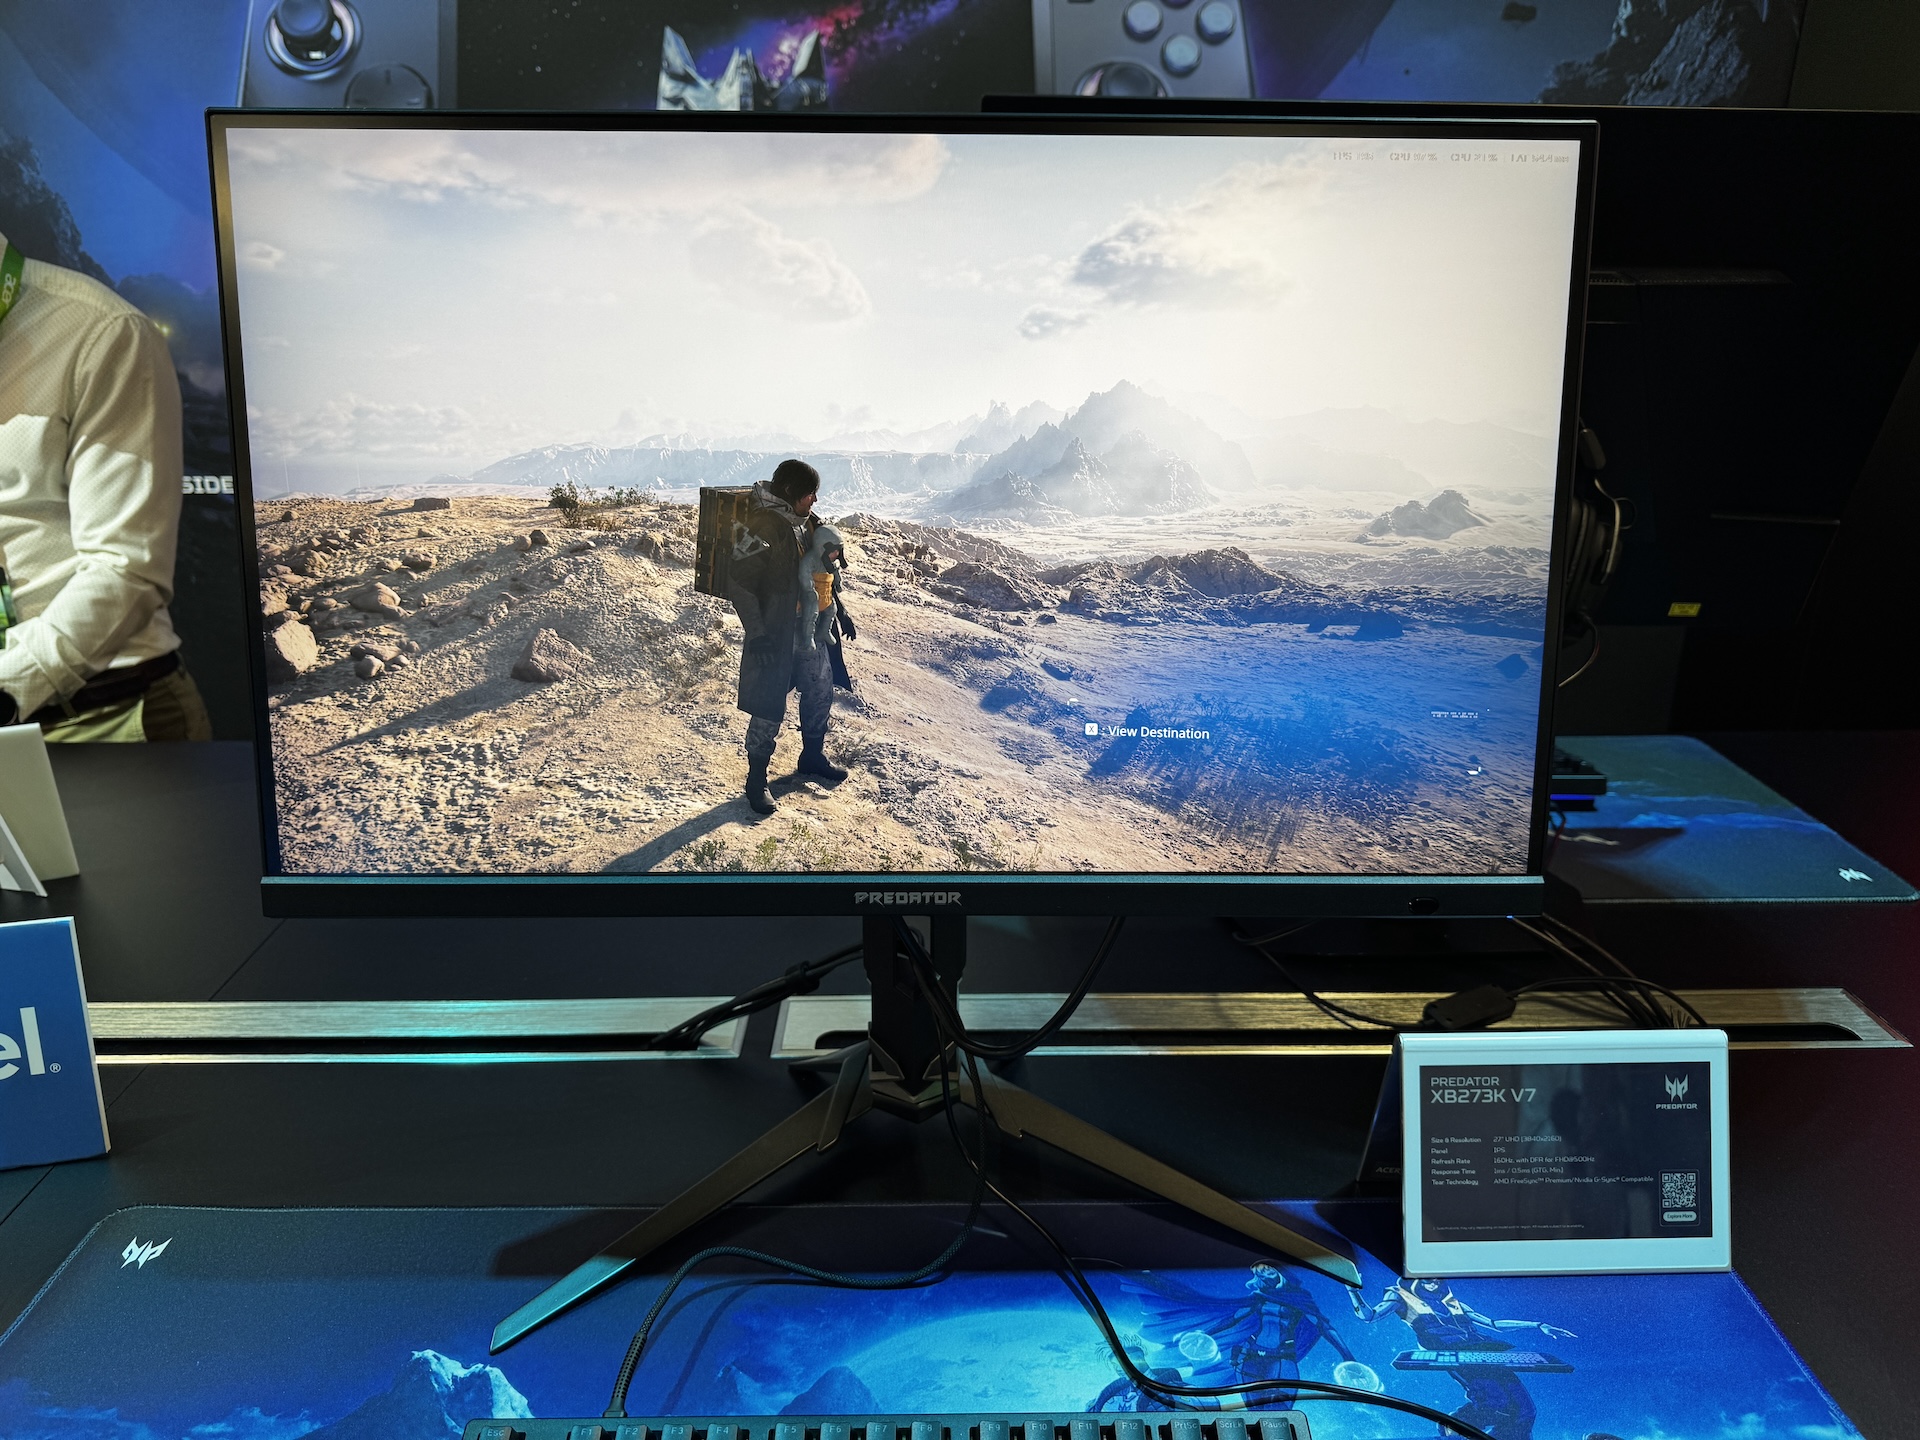
Shifting gears to the Predator family, we start at the lower end of the price spectrum with the $449 XB273K V7. The XB273K V7 natively runs at 4K resolution with a 160 Hz refresh rate. However, thanks to Dynamic Frequency and Resolution, you can switch to 1080p resolution and more than triple the maximum refresh rate to 500 Hz.

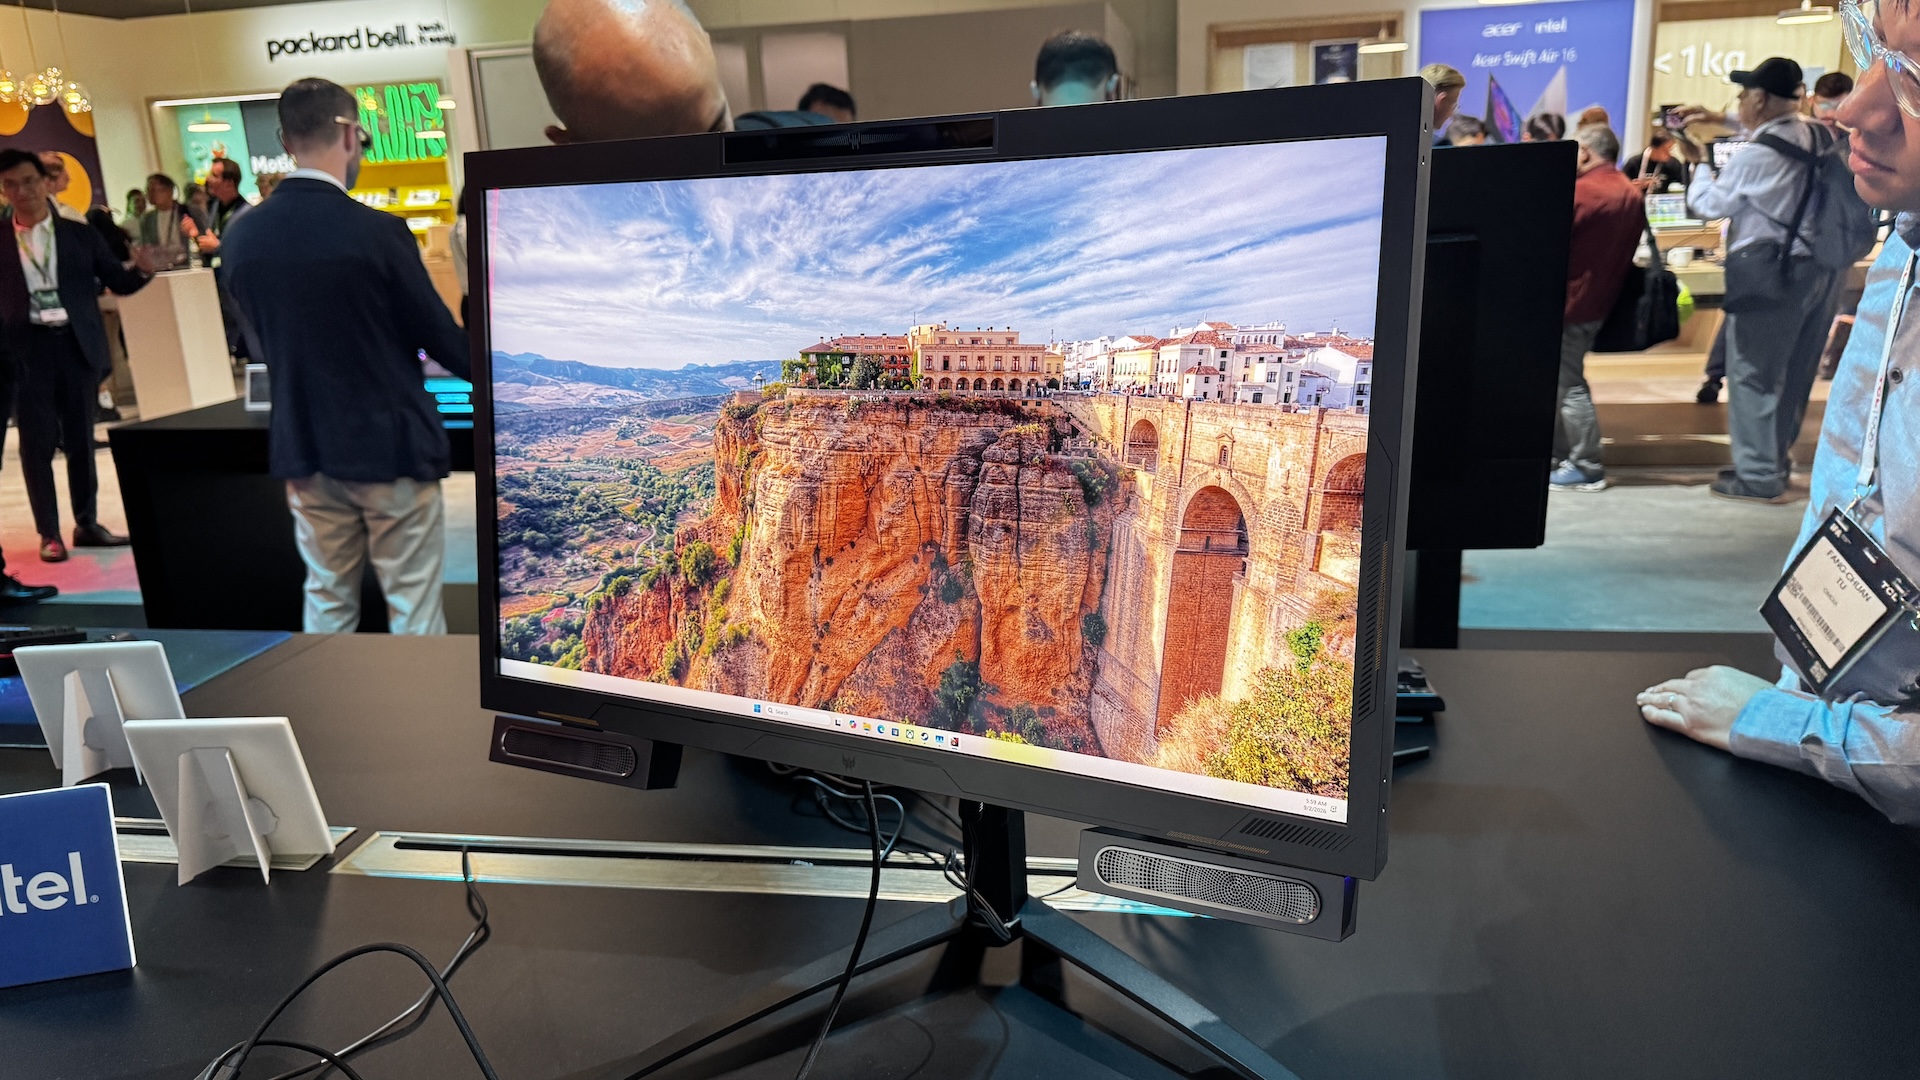
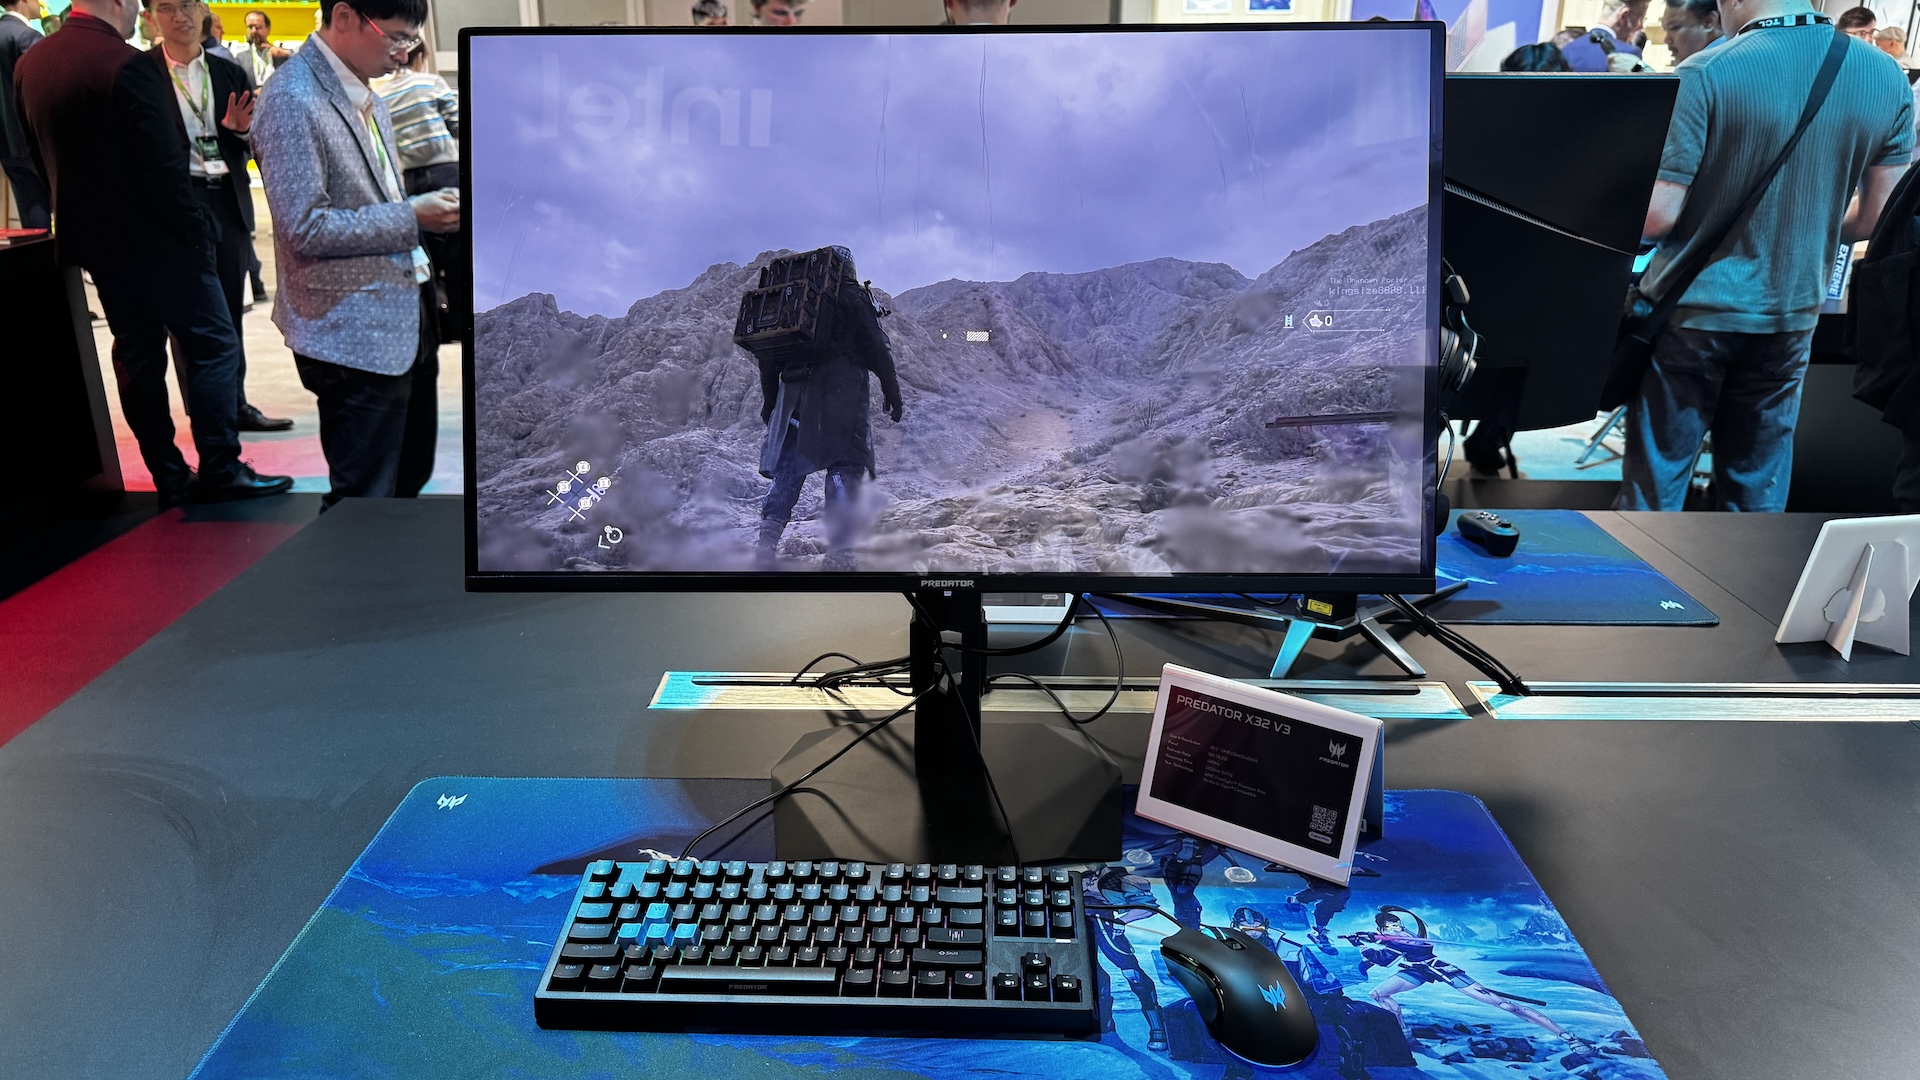
Stepping up the price ladder, we come to the $899 Predator X32 V3, the first of Acer's monitors announced today that use Penta Tandem QD-OLED panel technology. The 31.5-inch panel has a native 4K (3840 x 2160) resolution and a 180 Hz maximum refresh rate. Unlike the other multi-mode monitors that are launching, you're stuck with 180 Hz no matter which resolution you choose.

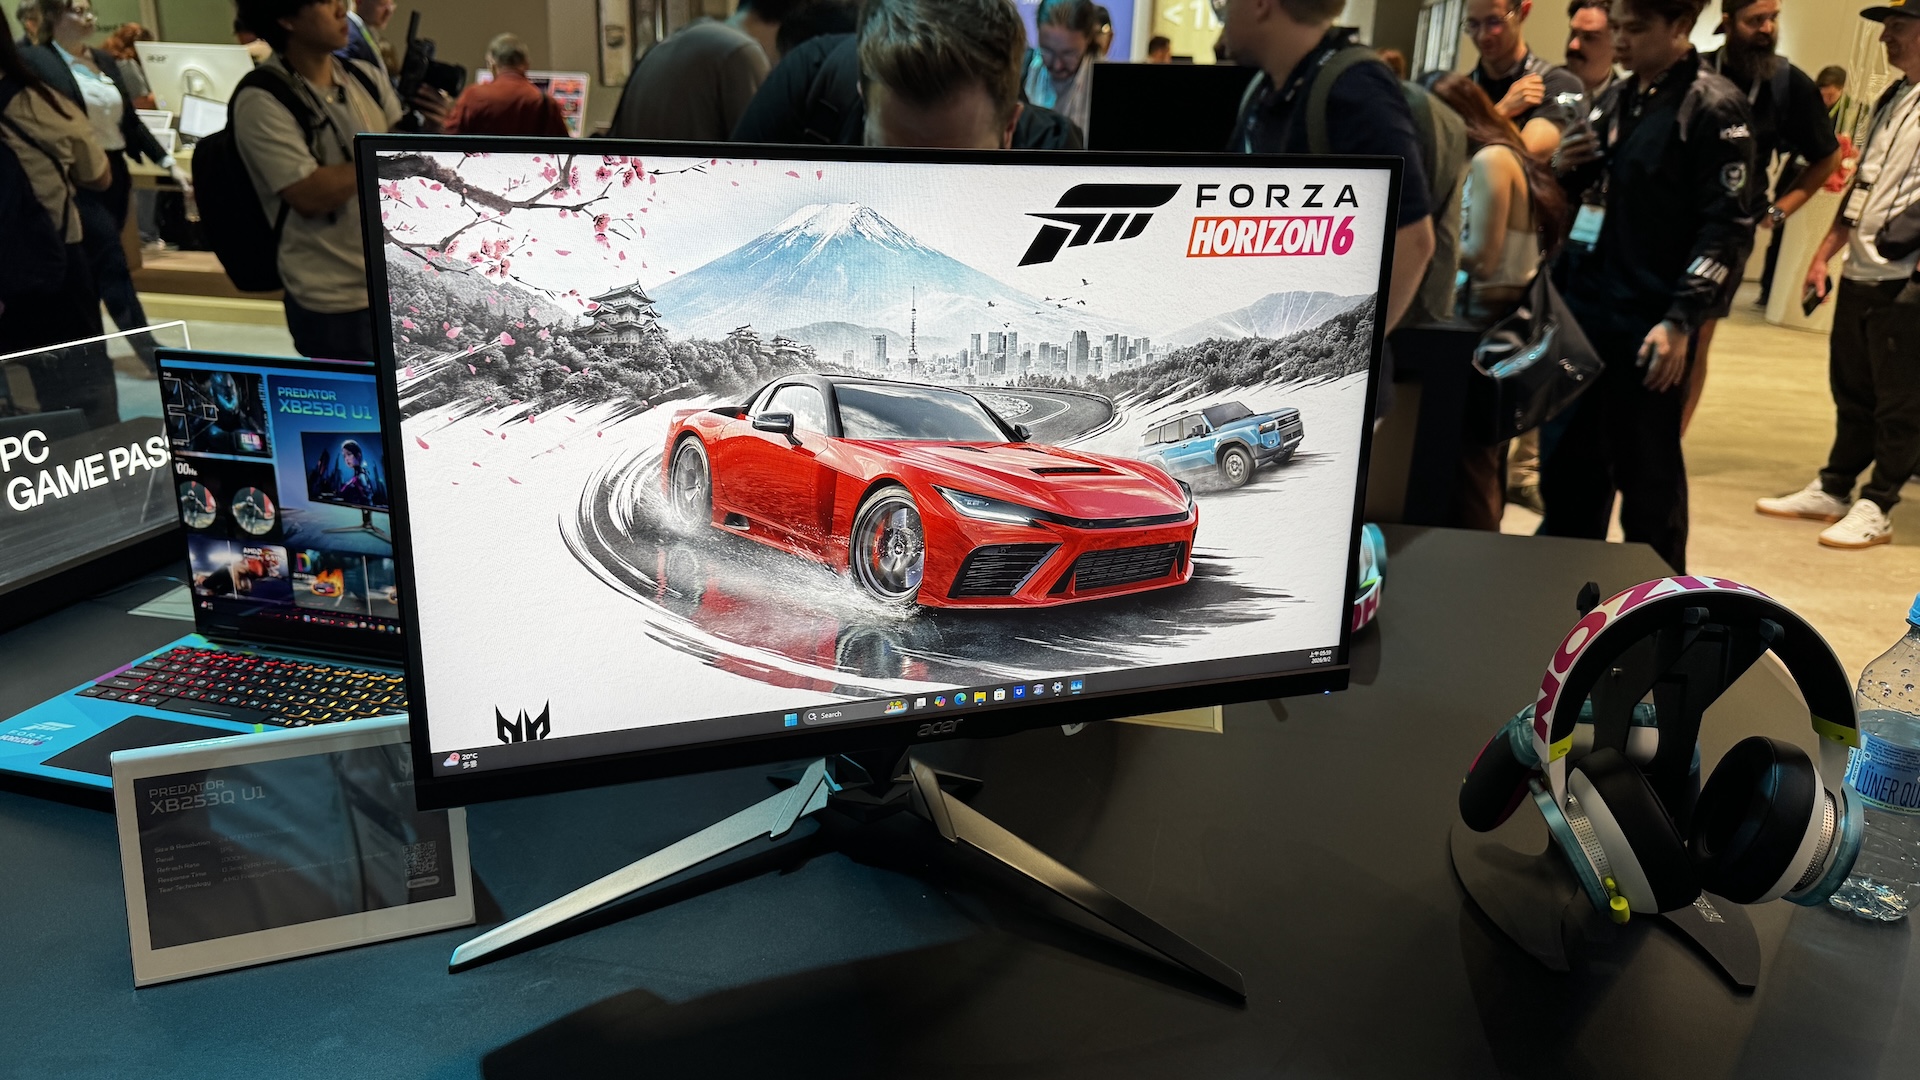
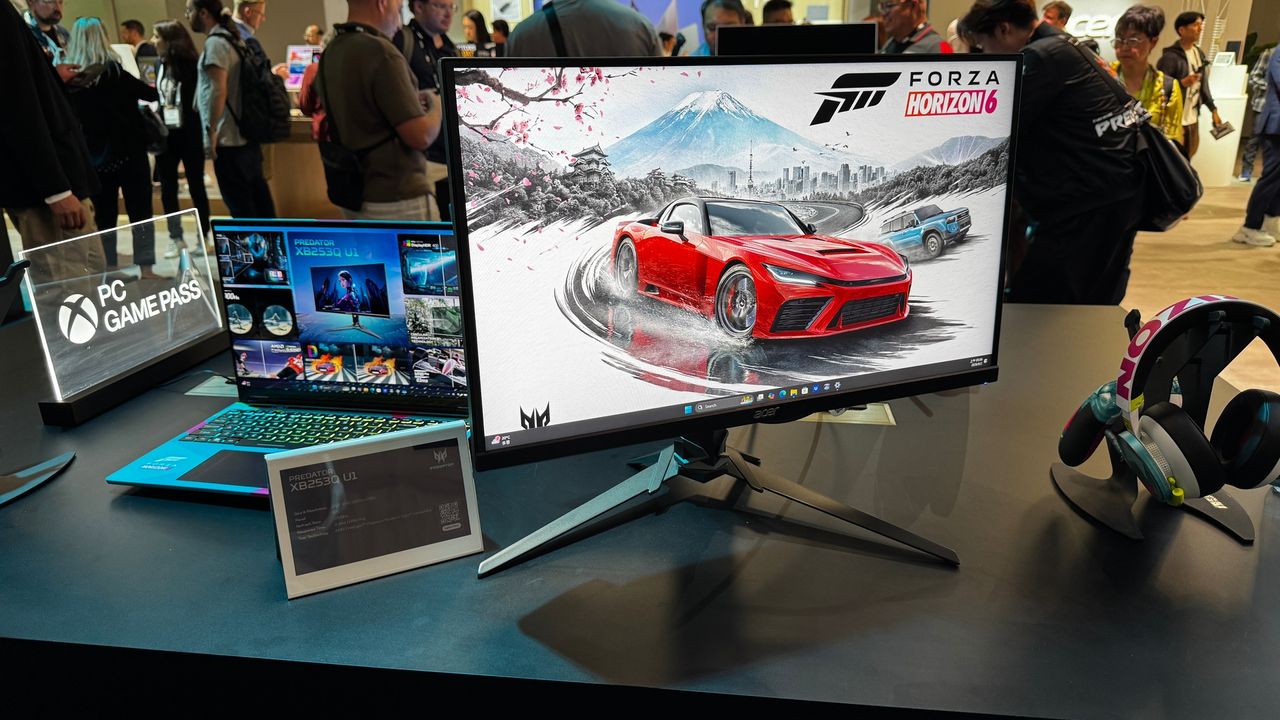
Finally, we come to the Predator XB253Q U1, which is the smallest of the announced monitors, with a 24.5-inch diagonal. But don't let its small size fool you, the Predator XB253Q U1 is the most performant of the bunch, and is aimed squarely at the elite eSports gamers. The monitor has a native 1080p resolution with a maximum refresh rate of 1,000 Hz from its IPS panel.

You'll find the usual support for AMD FreeSync Premium and Nvidia G-Sync, along with a 0.3 ms response time. Acer quotes typical brightness of 400 nits, while HDR mode squeezes out just a bit more at 450 nits. The added performance of the Predator XB253Q U1 doesn't come cheap, as you're looking at a suggested retail price of $1,099 when it launches.

Most of the monitors announced today will launch in Q4 2026, with a few stragglers extending the launch window to Q1 2027.

✇Tomshardware

Alienware's new QD-OLED gaming monitors boast 4K 165 Hz, 1080p 560 Hz panels — Dell’s new OLEDs target gamers who prioritize speed or crave pixel density

While gamers are definitely feeling the pricing pinch when it comes to memory and storage, some segments of the consumer tech sector are seeing more favorable trends. Advances in screen technology for gaming monitors are accelerating, while OLED prices are steadily falling. Dell is part of this trend with a pair of new Alienware monitors, the AW3226Q and AW2527HX, that take differing approaches to appeasing gamers.

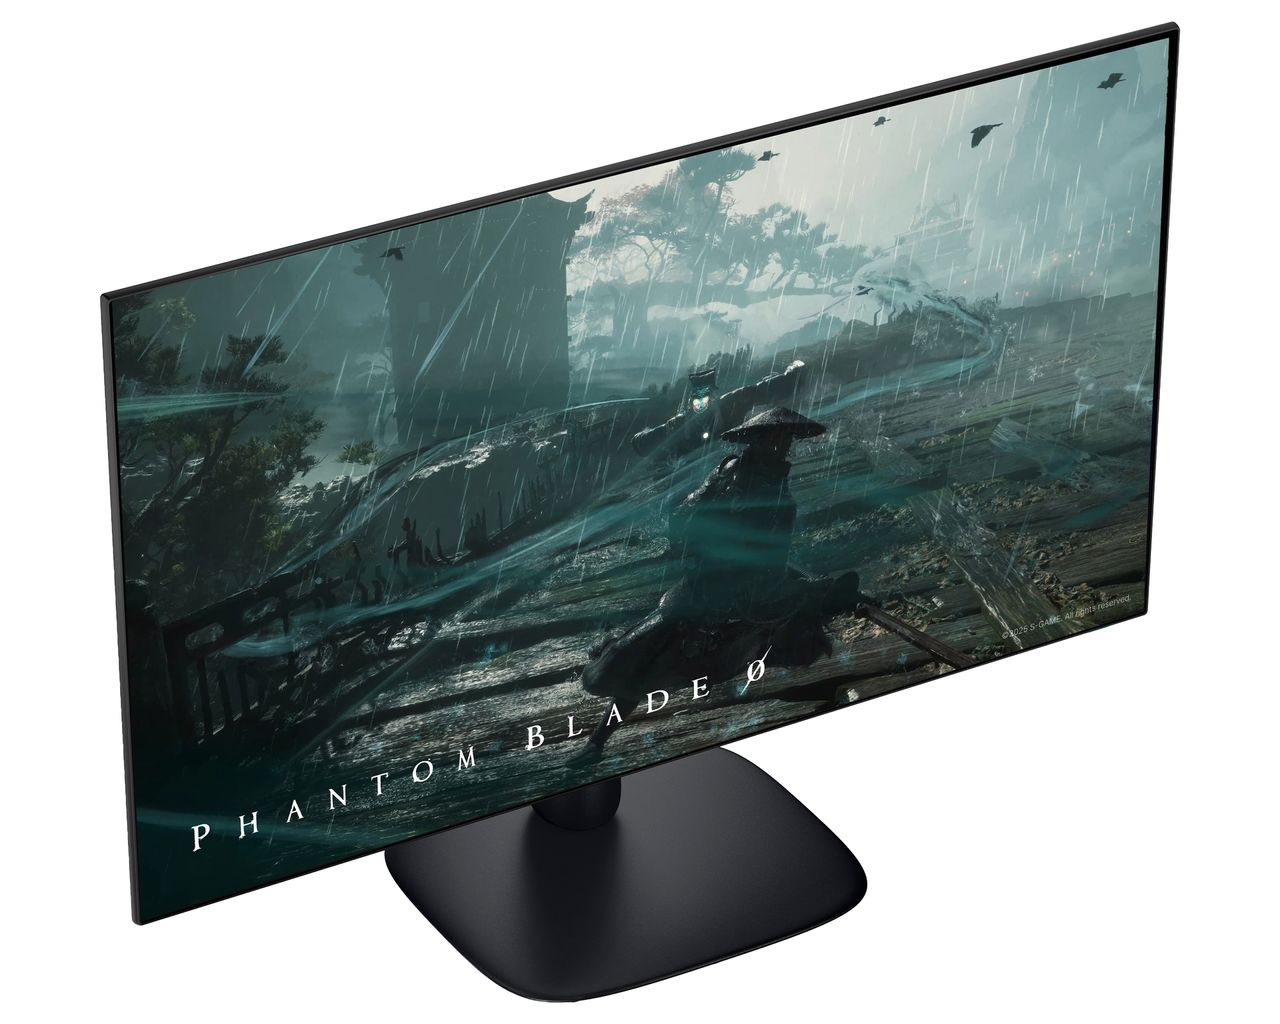
We start with the AW3226Q, which is aimed at gamers who crave higher-resolution 4K gaming over outright speed. At its heart is a 32-inch panel that uses an RGB Stripe Tandem OLED technology (previously seen on the AW3926QW that we recently reviewed). The use of a four-stack tandem layer within the panel addresses one of the few criticisms leveled against traditional QD-OLED panels: slightly blurry/soft text upon close inspection. Another added benefit is that brightness levels are higher than on previous-generation QD-OLED monitors (1,000-nit peak brightness).

Blazing-fast refresh rates aren't the goal here, since the AW3226Q tops out at 165 Hz. With that said, you do get a 0.03 ms response time, AMD FreeSync Premium Pro and Nvidia G-Sync support, VESA DisplayHDR True Black 400 and Dolby Vision compliance, and a built-in USB-C/USB-A hub.

AW2527HX

Alienware AW2527HX (Image credit: Dell)

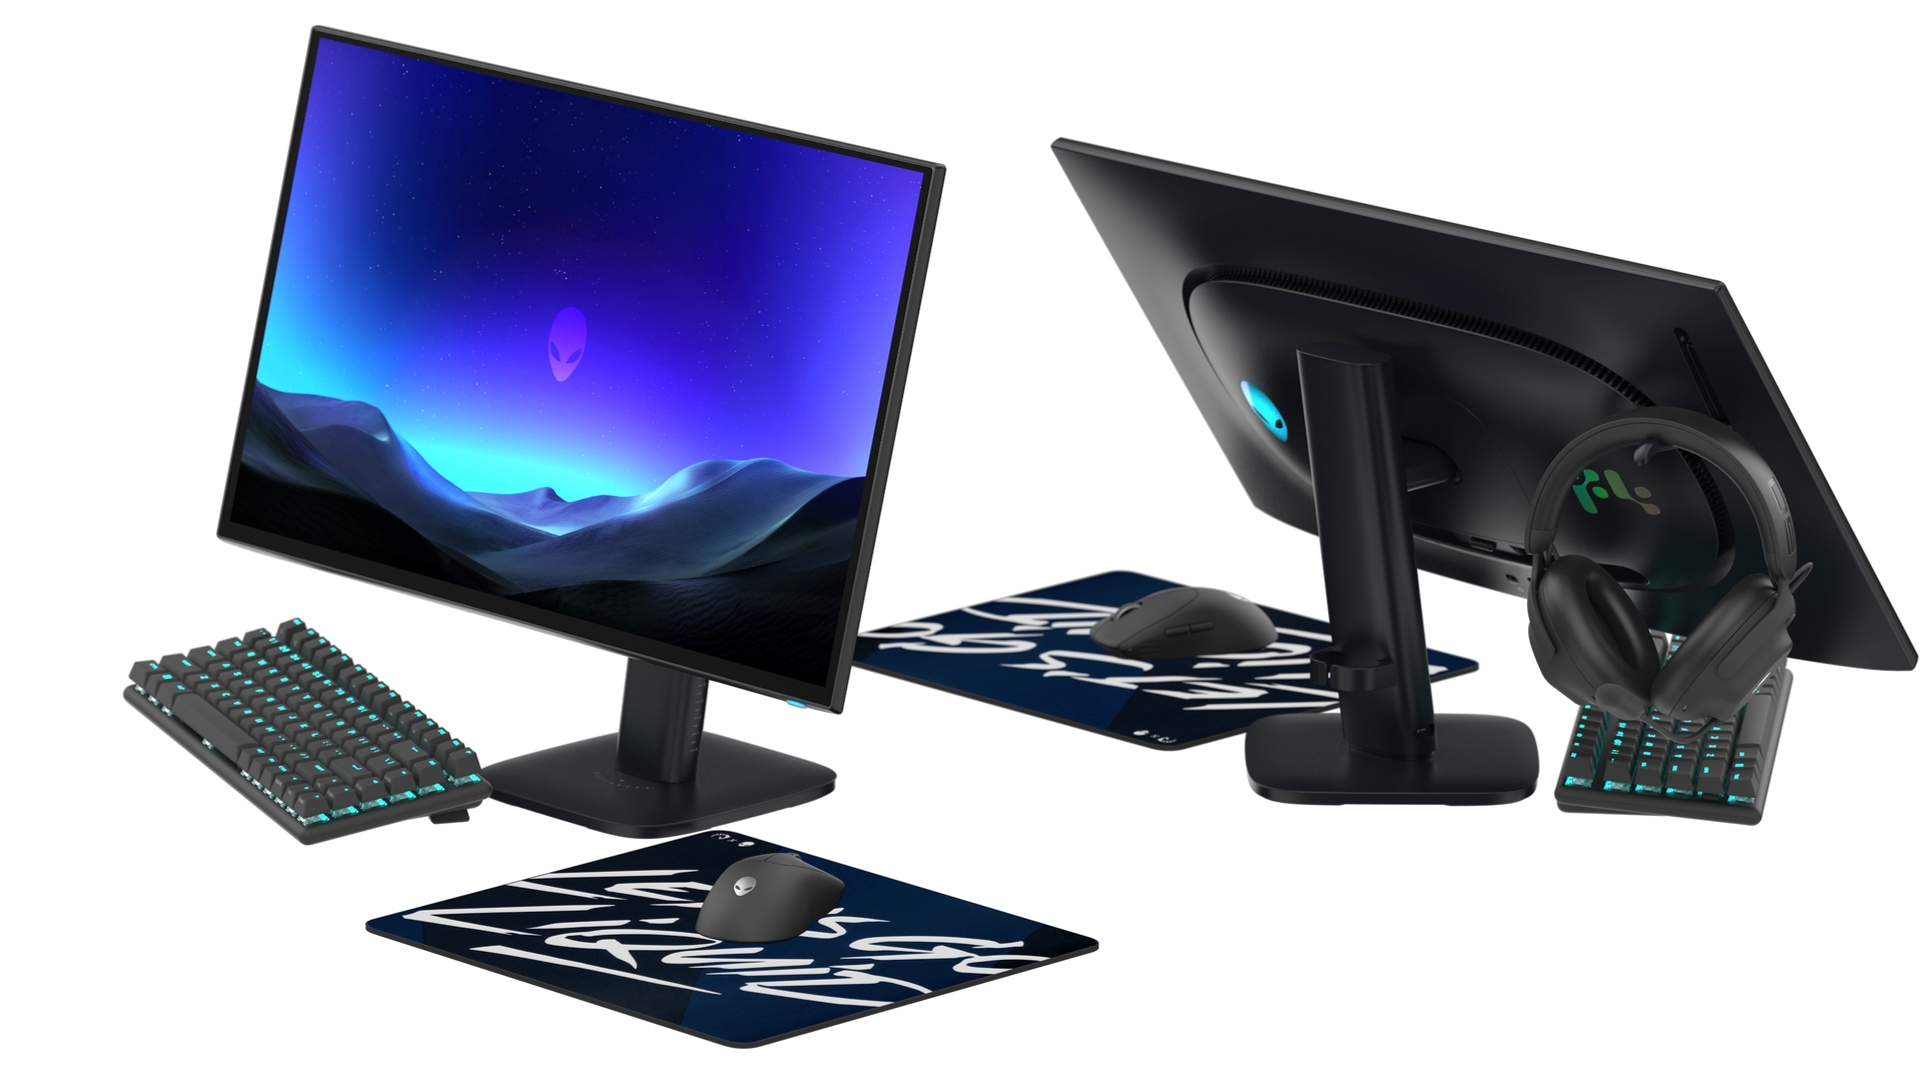
For the most discerning speed freaks, there's the AW2527HX. Instead of the larger 32-inch 4K panel's 165 Hz refresh rate, the AW2527HX uses a 24.5-inch panel with a 560 Hz refresh rate. While many of the higher-refresh-rate monitors we've seen can reach upwards of 1,000 Hz with IPS or TN panels, the AW2527HX offers the color performance and black-level improvements afforded by a QD-OLED panel. However, what you gain in speed, you lose in pixel density — the AW2527HX makes do with 1920 x 1080 resolution. With that said, you do get VESA DisplayHDR True Black 600 support, a matte panel finish, and DisplayPort 2.1 connectivity.

Alienware worked together with the folks at Team Liquid to develop the monitor, ensuring that it ticks all the major boxes for eSports gamers. There's a graphene sheet integrated into the display that helps distribute heat more evenly to mitigate pixel burn-in. An integrated stand is there to hang your headset, and there's a dedicated button that lets you switch between 4:3 and 3:2 aspect ratios depending on how you want to game. The base of the AW2527HX has even been minimized to ensure there's enough space under the monitor for your keyboard.

Both the AW3226Q and AW2527HX launch with a three-year OLED pixel burn-in warranty. Although pricing hasn't been announced yet, the former will launch this fall, while the latter is promised in Q1 2027.

✇Tomshardware

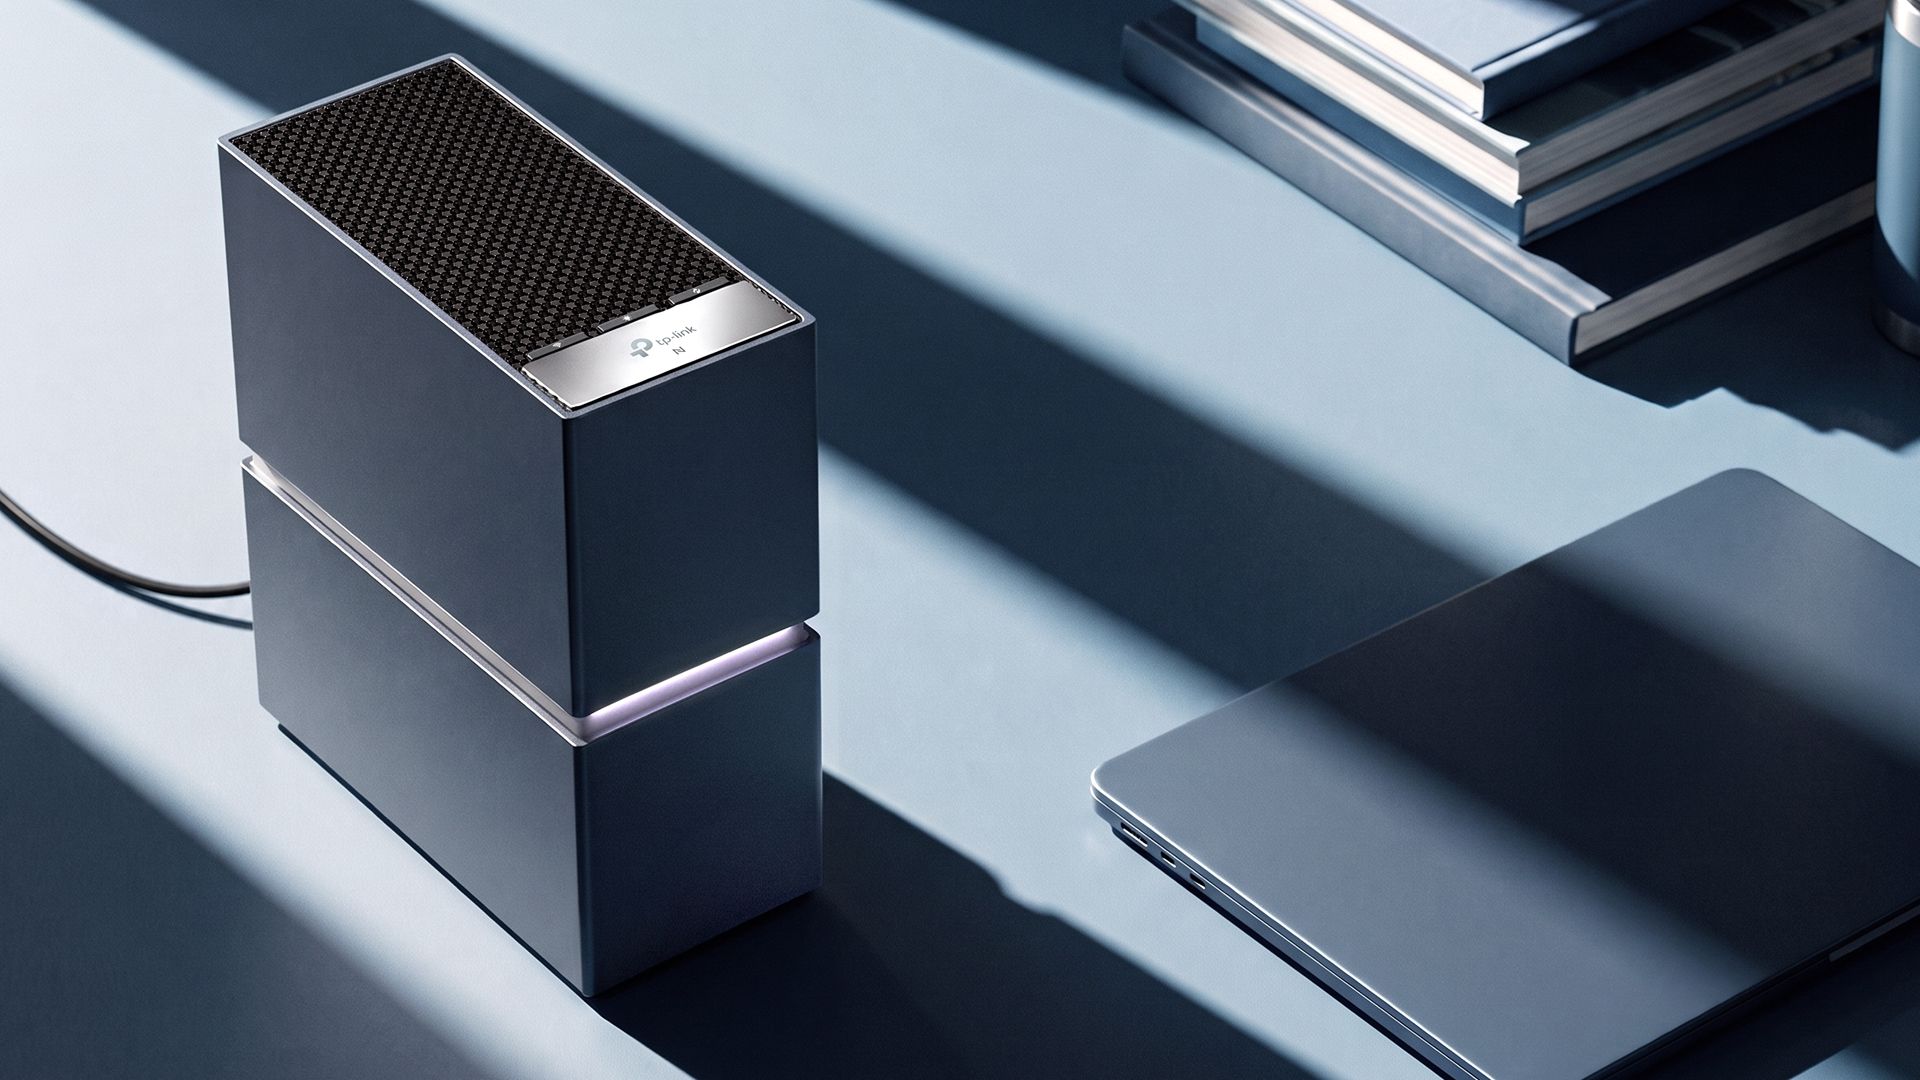
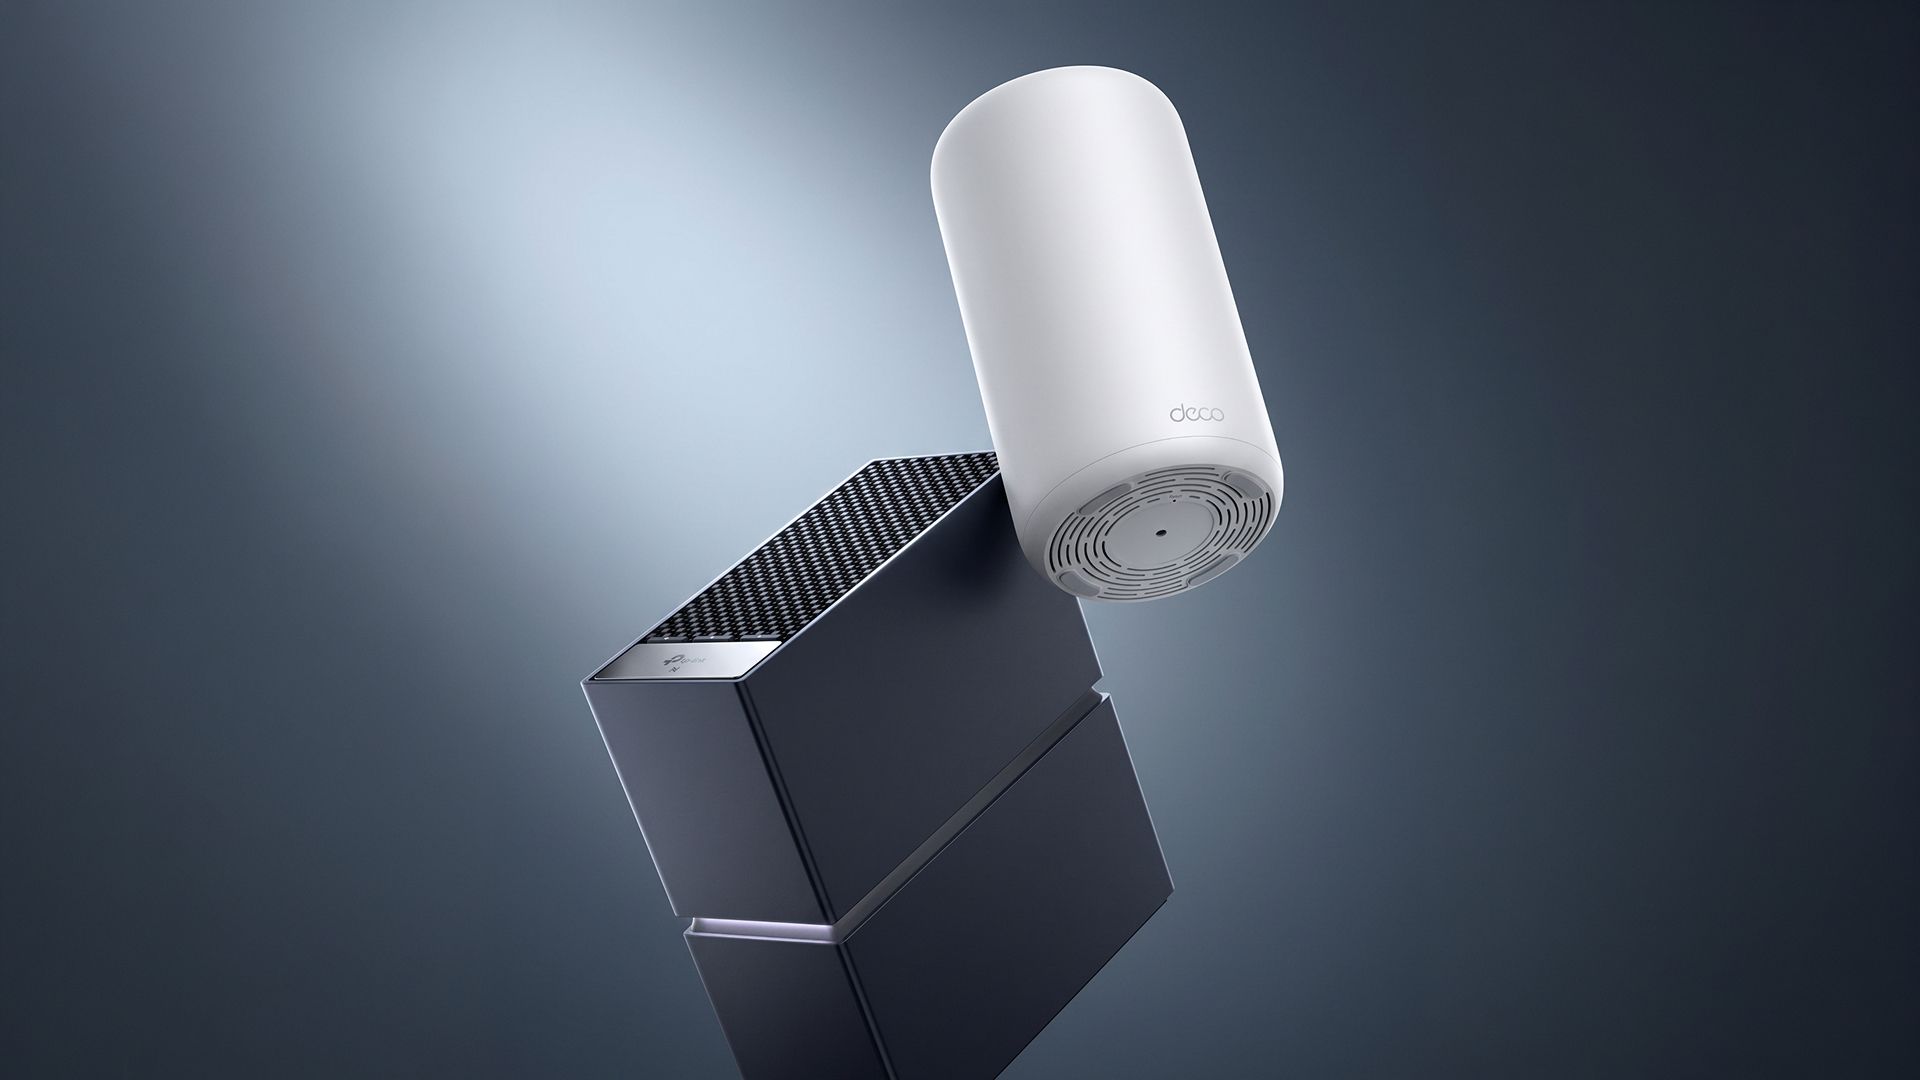
TP-Link announces its first consumer Wi-Fi 8 routers — Archer 8 Ultra preorder commences September 30, in select regions

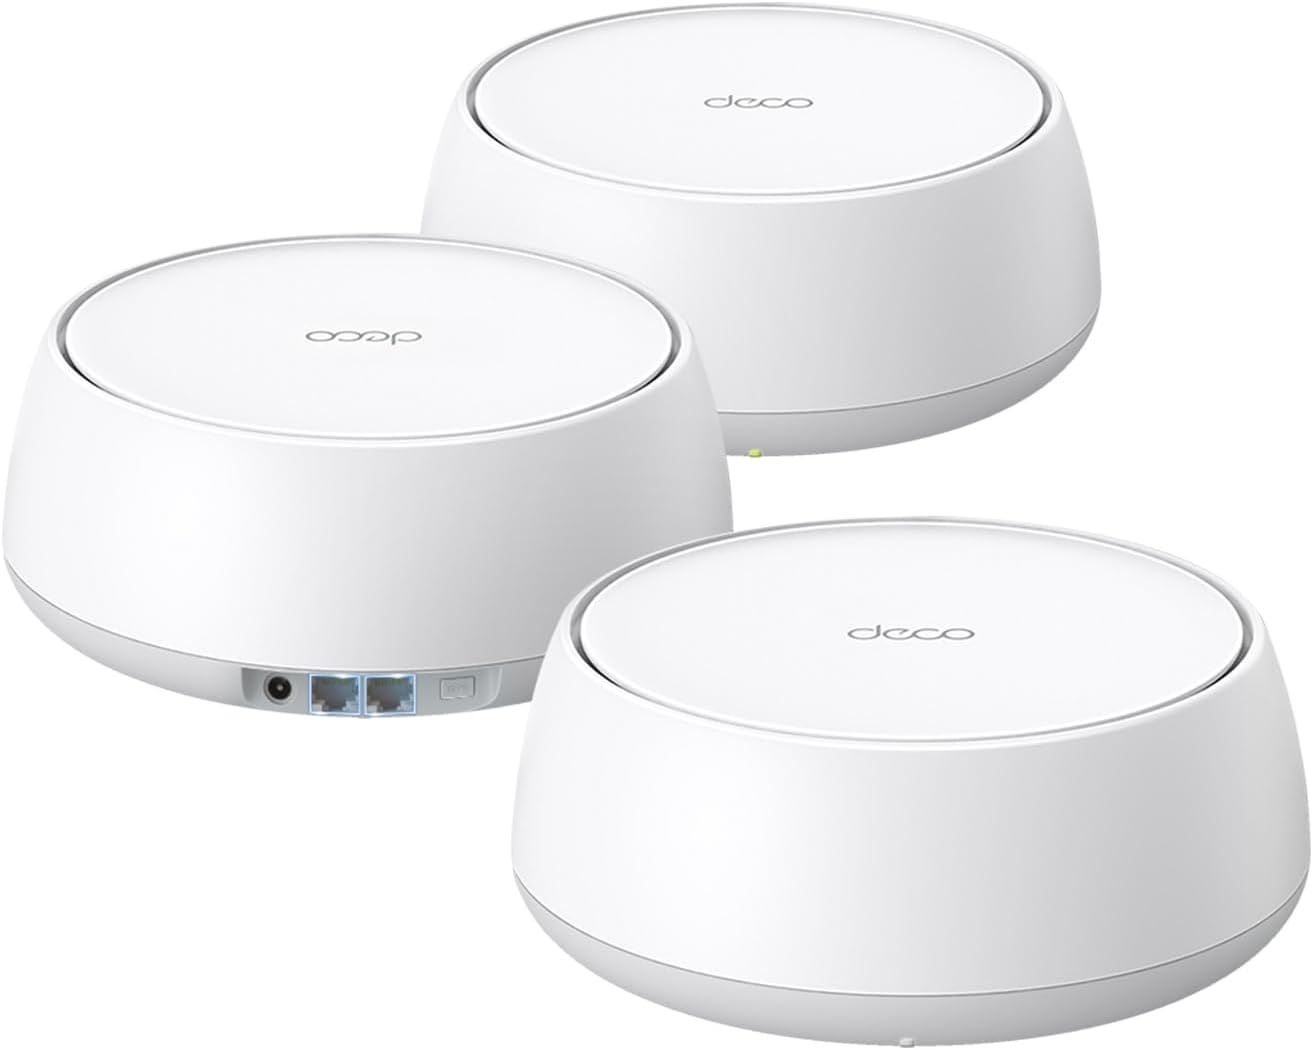
Earlier this year, TP-Link announced its intentions to launch the first members of its Wi-Fi 8 (802.11bn) networking family. At the time, the company revealed that it would first launch a standalone Archer 8 consumer router this fall, followed by a Deco 8 mesh router. And right on cue, TP-Link stated today that the Archer 8 Ultra BN19000 tri-band router will launch on September 30.

TP-Link is going light on the details at this time, but this is what we know so far. The Archer 8 Ultra BN19000 will come equipped with 18 internal antennas and deliver up to 19 Gbps aggregate wireless speeds. In addition, it will have 10 Gbps wired connectivity, though we don’t know whether that includes WAN and LAN ports or just the latter.

For users who require broader coverage in larger homes or offices, the Deco 8 Ultra BN22000 tri-band mesh router offers aggregate speeds of up to 22 Gbps and includes 10 Gbps wired connectivity. TP-Link typically sells its mesh systems in two- or three-pack configurations, and the Deco 8 Ultra BN22000 3-pack covers up to 9,800 square feet. Unfortunately, the Wi-Fi 8 mesh system won’t be available until Q1 2027, according to TP-Link.

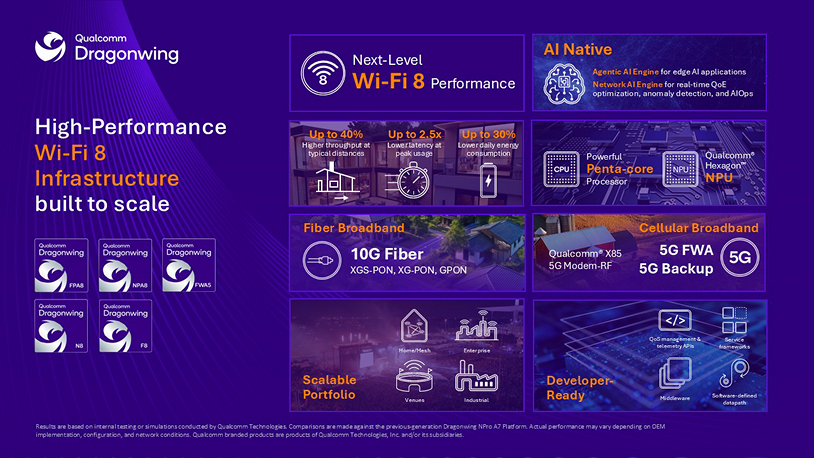
TP-Link plans to expand its Wi-Fi 8 portfolio by Q2 2027 with a new Roam 8 travel router, along with range extenders and PCIe/USB client adapters. Although we don’t know which specific chipsets will power Archer 8 Ultra, Deco 8 Ultra, and other unannounced Wi-Fi 8 devices, the company says its products will use hardware from Broadcom, MediaTek, and Qualcomm.

Wi-Fi 8 is shaping up to be more of a quality-of-life improvement over Wi-Fi 7 than a substantial theoretical speed improvement. Put simply, Wi-Fi 8 hardware devices should be able to come closer to fulfilling the real-world performance metrics that Wi-Fi 7 devices originally promised.

To this end, TP-Link says that its so-called StabilityEngine leverages core Wi-Fi technologies including Enhanced Long Range (ELR) and Distributed Resource Units (DRU). These features together help improve wireless connectivity, primarily for low-power IoT devices that are typically positioned at the edge of your home’s wireless coverage. There are also additional technologies at play, such as Unequal Modulation (UEQM) and Modulation and Coding Schemes (MCS), to ensure uninterrupted wireless traffic in high-interference situations.

A new design language is also being ushered in with the Archer 8 and Deco 8 products, which was teased during TP-Link’s May 2026 announcement. “We stopped building a piece of networking equipment and started designing for the home,” explained TP-Link industrial design chief Gary Chang. “When a router’s design becomes something people want to display, it ends up exactly where it performs best.”

What remains unclear is how or when these new Wi-Fi 8 products will launch in the U.S. As of today, TP-Link has yet to obtain FCC approval to release all-new products in the country. Unlike competitors Amazon and Netgear, which received conditional approval from the FCC Covered List, the U.S. government is still playing hardball with TP-Link. For its part, TP-Link only says that preorders for the Archer 8 Ultra will open in “select regions” on September 30.

✇Tomshardware

Apple price hikes continue as Mac mini with 16GB RAM and 256GB is now $899 — 1TB storage option adds $500 to entry-level headless system

The AI-apocalypse is upon us, and regular consumers are paying that price in a big way. Apple went on a price-hiking spree in late June, leaving only iPhones and AirPods untouched. The bulk of Apple’s computing devices saw price increases ranging from a few hundred bucks to $1,300. Apple is now ushering in a new wave of price increases with the refreshed Mac mini and Mac Studio.

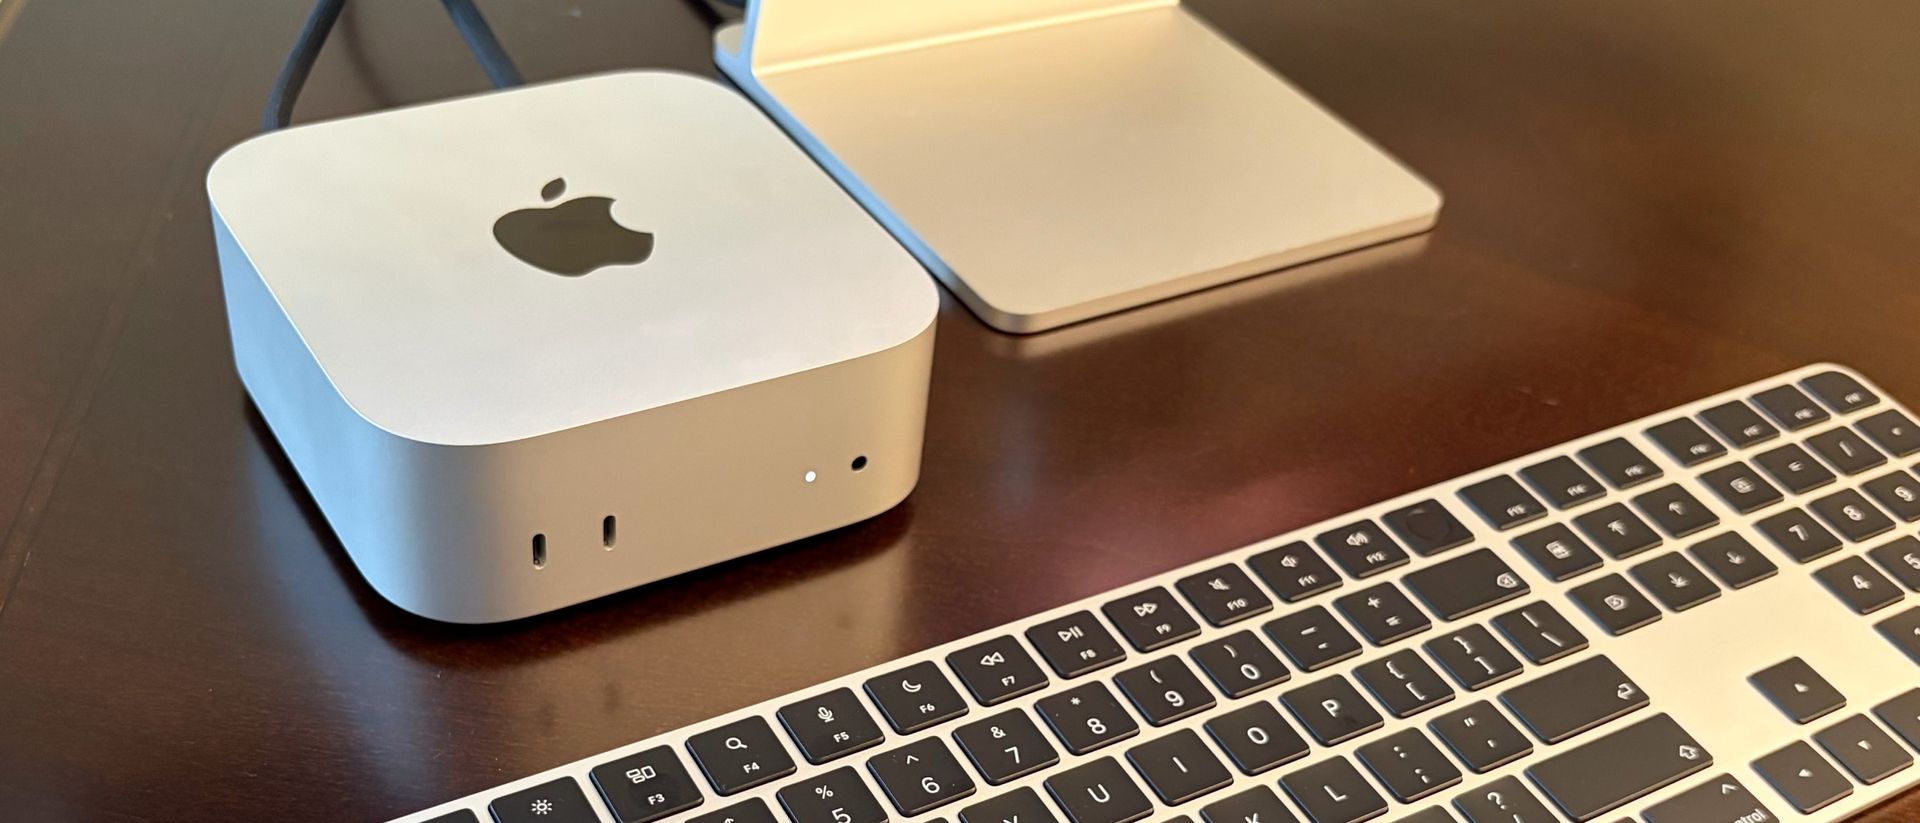
The new M6 Mac mini is now priced at $899, a $100 increase over the already inflated $799 price for the M5 version on June 25th. To put those increases in perspective, the M4 Mac mini had a base price of $599 when it originally launched in October 2024.

The new $799 base price is an even more bitter pill to swallow, given that the headless computer still comes with only 256GB of base SSD storage. One would think that the $300 price increase over the course of two months would at least lead to a doubling of the base storage, but the ongoing memory/storage shortage makes that wish unthinkable; at least in Apple’s eyes.

If you want to see more eye-watering pricing, take a look at the hardware upgrade costs for the base Mac mini. The system comes standard with 16GB of unified memory, but an extra 8GB (taking the total to 24GB) costs a whopping $200. If you want 32GB (the maximum allotment for the M6 chip), that’ll cost you an extra $400.

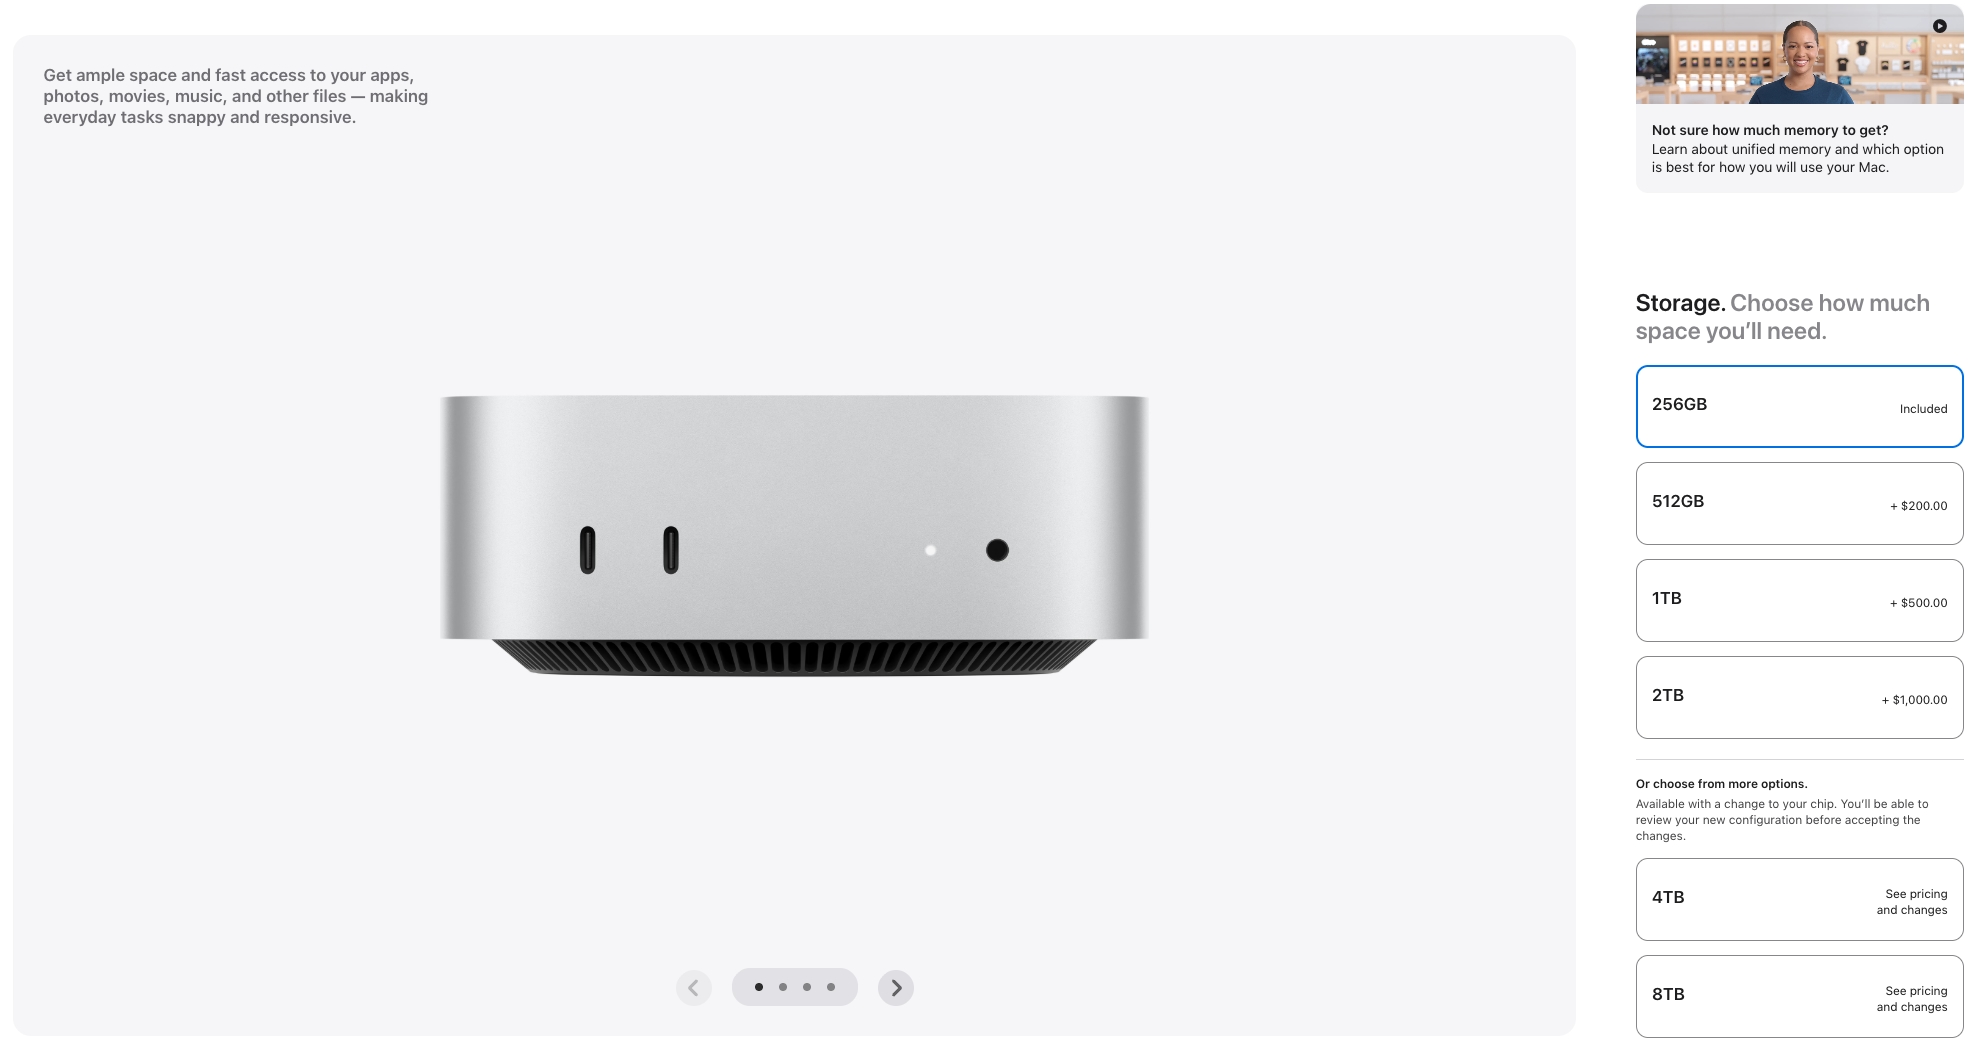
Things don’t look much better on the storage side, with an upgrade from 256GB to 512GB costing $200. The 1TB and 2TB storage options cost $500 and $1,000, respectively. Apple’s value-leader Mac mini is now in uncharted territory. A maxed-out Mac mini (M6, 32GB, 2TB) costs $2,229.

Apple Mac Mini

Apple's base Mac mini gets a price hike and more expensive storage upgrades. (Image credit: Apple)

Even the M5 Pro version of the Mac mini couldn’t escape the AI tax, as the base configuration now costs $1,699, up from $1,599 for the M4 Pro version (June 25 pricing) and a far cry from the $1,399 price of the previous generation earlier in the year. That price gets you a 15-core GPU and a 16-core GPU, while stepping up to the uprated 18-core CPU/20-core GPU version adds $200. Memory upgrades are deflating to the psyche, as upgrading from 24GB to 48GB adds $600, while the 64GB option is $1,000.

Storage options are absolutely mind-boggling: a 1TB SSD requires an additional $300 outlay, while the max 8TB SSD configuration is listed at $3,800. The range-topping configuration (M5 Pro, 18-core CPU/20-core GPU, 64GB, 8TB) costs $6,699.

If there’s any consolation, the new Mac Studio holds the line on pricing ($2,499) in its base configuration (18-core CPU/32-core GPU, 36GB, 512GB). The price stasis is somewhat surprising given the hardware upgrades, including a new M5 Max SoC and PCIe Gen 6 SSD. However, upgrades are pricey, with the 18-core GPU/40-core GPU variant of the M5 Max adding $300 to your bill. The upgraded SoC is the only way to unlock additional memory options (48GB, 64GB, 128GB).

Stepping up the Mac Studio with M5 Ultra more than doubles the base, entry price of the M5 Max config at $5,499. This gets you a 30-core CPU and 64-core GPU, while the upgraded 36-core CPU/80-core GPU is a $1,300 option. 96GB of RAM comes standard, while 256GB is a $4,000 upcharge. SSD options are equally expensive: 2TB costs $500, and 16TB costs $7,500.

No matter which way you slice it, those firmly entrenched in the Apple hardware ecosystem are paying a heavy price for memory/storage shortages. Apple customers are doubly affected, as the company’s traditionally outrageously priced memory and storage upgrades have become even more expensive, putting Apple’s previously value-driven models like the Mac mini out of reach of bargain shoppers.

✇Tomshardware

LG's native 1,000 Hz 1080p gaming monitor has a matching $1,000 price tag — preorders open for the 25-inch UltraGear 25G590B

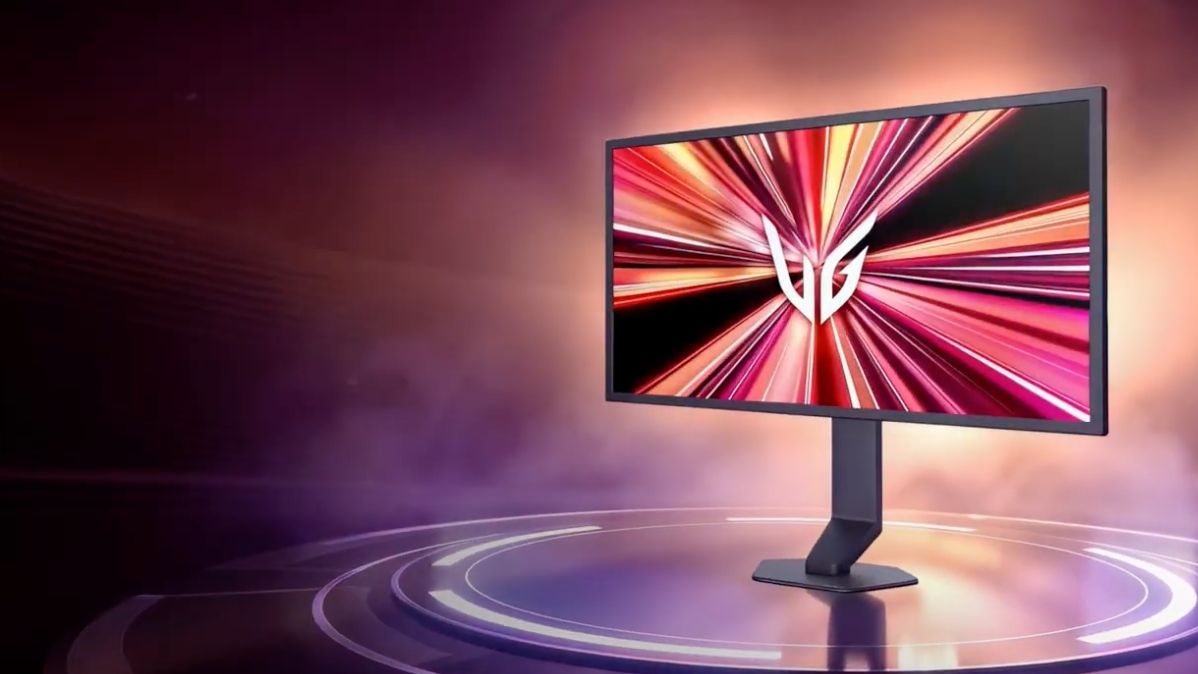
Earlier this year, we brought you news of the UltraGear 25G590B gaming monitor, which LG proudly claimed as the world’s first 1080p gaming monitor to offer a 1,000 Hz refresh rate. At the time, LG said that pricing and availability for the 25G590B would arrive in the second half of 2026, and, true to its word, we now have details. According to the company, the monitor, which is currently available for preorder, is priced at $999.99. Looking at it a different way, you’re paying $1 per Hz if you want to be the first on the block with this segment leader.

However, that’s not all; LG is throwing in a couple of sweeteners with the 25G590B if you preorder it directly from its online store before August 31. The first perk is that you’ll earn 5 percent back in MyLG rewards on a purchase, which, on a $1,000 monitor, should get you $50 to use on a future purchase. As for the second perk, you can get two years of LG Premium Care for only a buck.

We've seen monitors employ Dynamic Frequency Resolution (DFR) to hit the 1,000 Hz mark before, but only at lower resolutions. For example, the Acer Predator XB273U F6 can hit the mark at 720p resolution, as can the AntGamer ANT275PQ MAX. The ANT275PQ MAX also uses a TN panel to reach 1,000 Hz, which might be a dealbreaker for some gamers. However, the 25G590B can hit 1,000 Hz at 1080p, giving it a resolution edge over its competitors.

The 25G590B features a 24.5-inch IPS panel supporting both AMD FreeSync Premium and Nvidia G-Sync. LG has also enabled its Motion Blur Reduction Pro technology, which helps smooth out visuals at 1,000 Hz for your fast-paced gameplay. However, we’ll be eager to get our hands on the monitor to test out the tech in person.

You'll also find two HDMI 2.1 ports and one DisplayPort 2.1. The monitor is adjustable for tilt, height, and swivel, and it features LG UltraGear RGB lighting.

✇Tomshardware

Asus ZenScreen OLED (MQ16FC) portable monitor review: A great all-around performer

Asus is a well-known name in the portable monitor space, offering single-screen or dual-screen options with IPS or OLED panels. The Asus ZenScreen OLED (MQ16FC) is the company’s latest single-panel portable monitor, and it’s a winner all around.

The MQ16FC uses a 16.1-inch OLED display with a 1920 x 1200 resolution, features an integrated kickstand, and has excellent color performance for well under $300. The MQ16FC is even good enough to be considered a shoo-in among the best portable monitors.

Design of the Asus ZenScreen OLED (MQ16FC)

I’ll start off by saying that I really like the design of the MQ16FC. It has a 16.1-inch OLED panel with a glossy finish. That display is trimmed with extremely thin bezels all around. The top and side bezels are roughly the same size, while the bottom is about twice as thick (although still slim for a portable monitor).

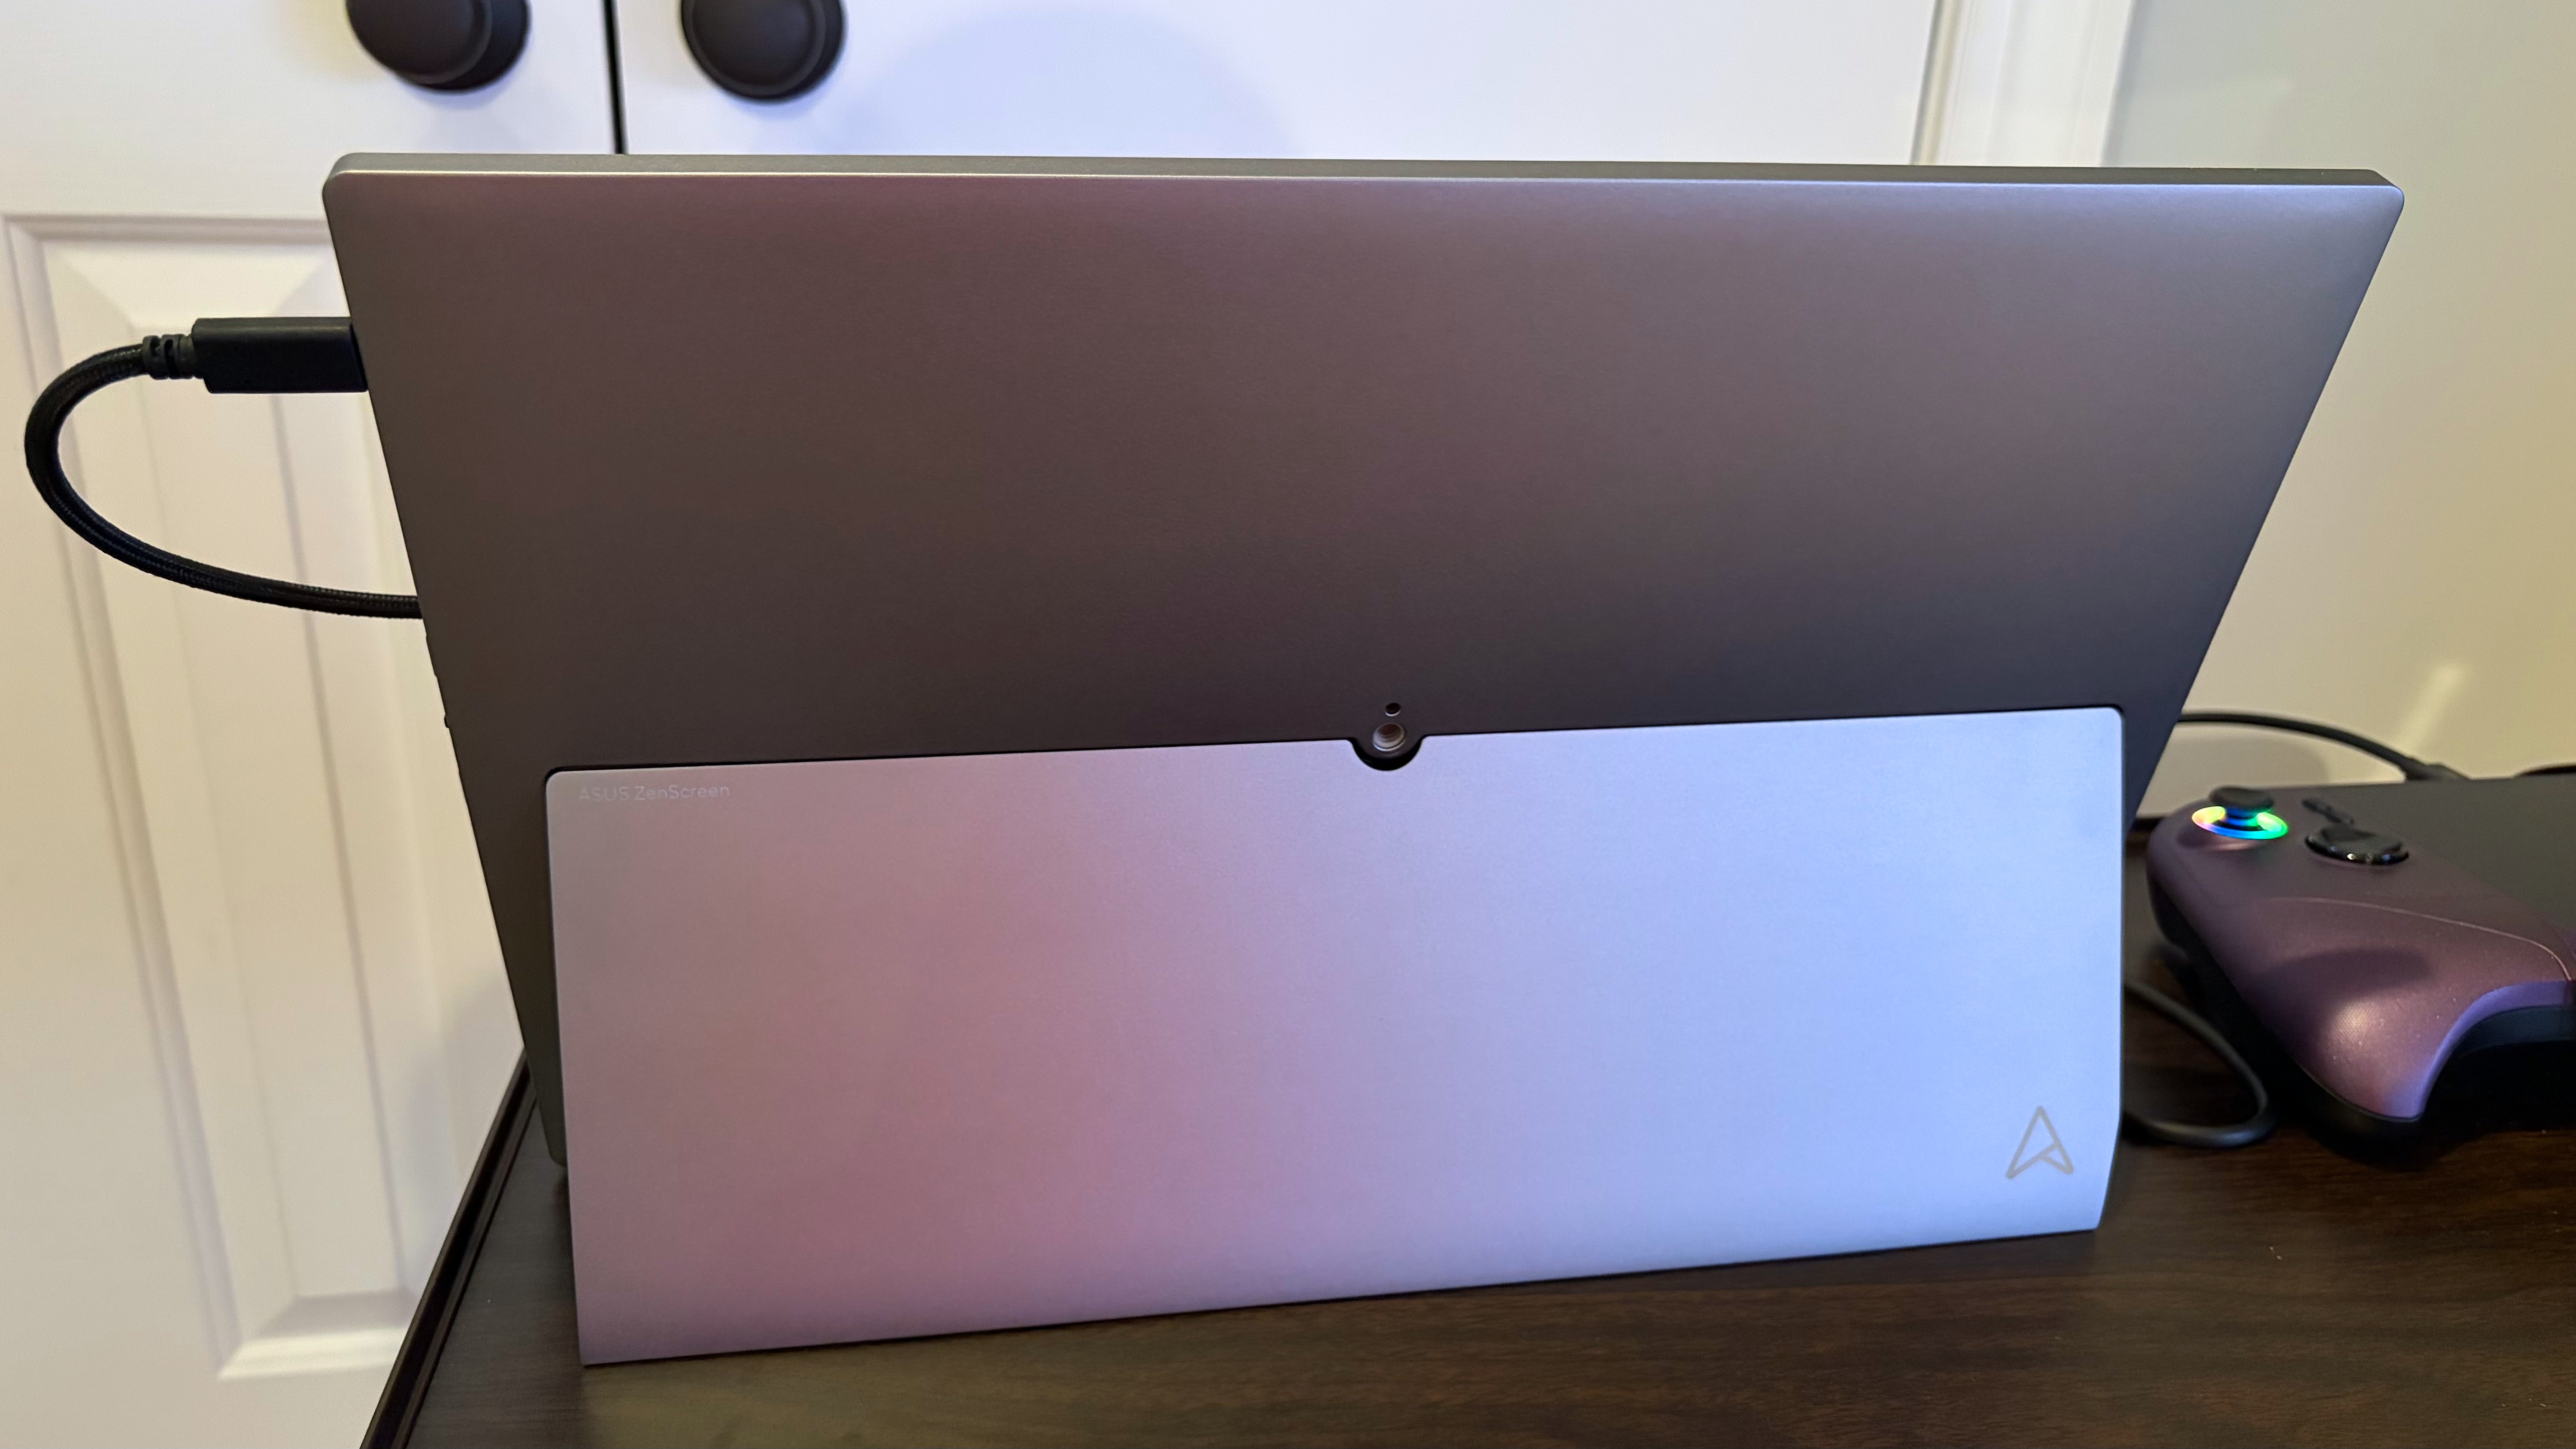
The entire enclosure for the MQ16FC is made of aluminum, which contributes to the minimal weight (1.5 pounds) and sturdy build. But my favorite exterior feature of the monitor is its kickstand, which pivots about halfway up the back. The hinge is stiff enough to keep the monitor at your preferred viewing angle, and tiny rubber feet on the bottom of the monitor keep it in place regardless of the kickstand's position. There are also rubber feet on the left side of the display for using the MQ16FC in portrait mode.

Asus ZenScreen OLED (MQ16FC)
Tom's Hardware
Asus ZenScreen OLED (MQ16FC)
Tom's Hardware
Asus ZenScreen OLED (MQ16FC)
Tom's Hardware

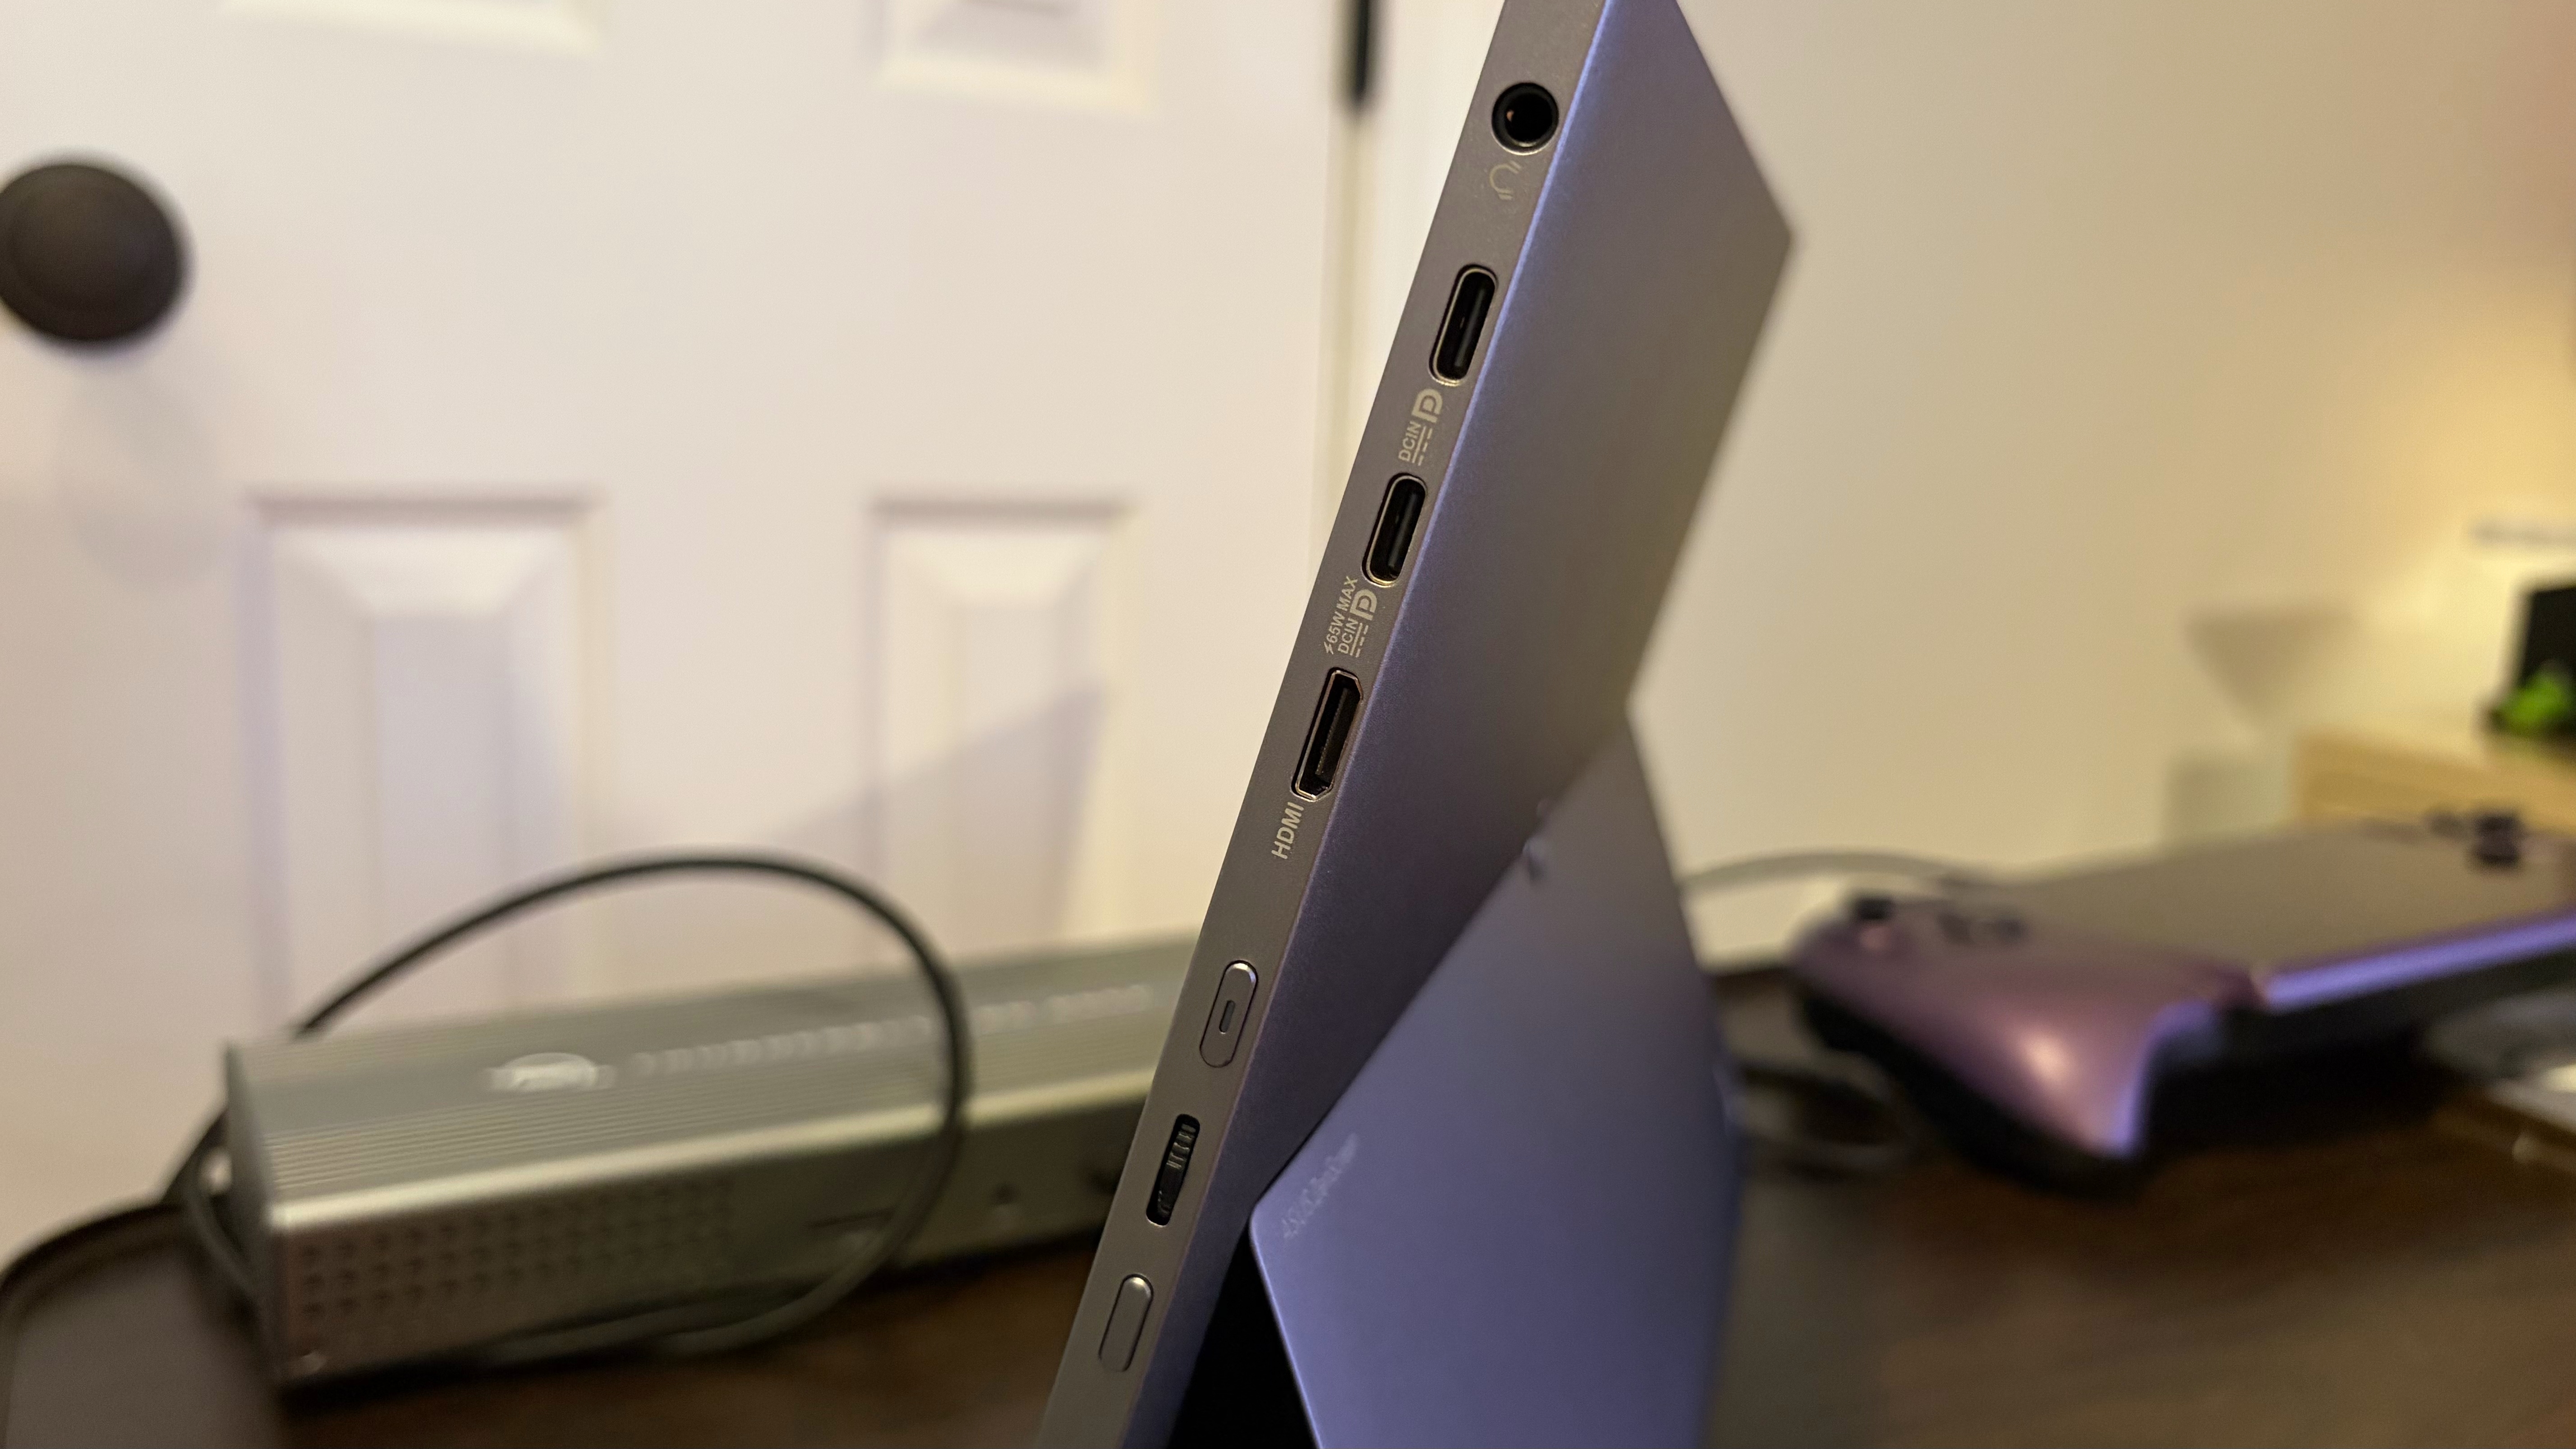
The “business end” of the MQ16FC is on the right side of the display, where you’ll find all of the ports and controls. From top to bottom, you’ll find a 3.5 mm headphone jack, two USB-C ports, a micro-HDMI port, a power button, a jog wheel for the OSD, and an action button.

One final feature of the MQ16FC is a quarter-inch tripod socket on the back of the display, just above the kickstand. The MQ16FC measures 14.13 x 9.17 x 0.35 inches and weighs 1.5 pounds. It comes with a padded cloth case, a wall adapter, a USB-C-to-USB-C cable, and an HDMI-to-micro-HDMI cable.

Asus ZenScreen OLED (MQ16FC) Specifications

Panel Type / Backlight

OLED

Screen Size / Aspect Ratio

16 inches / 16:10

Max Resolution & Refresh Rate

1920 x 1200 @ 60Hz

Response Time

1 ms (GtG)

Typical Brightness

300 nits

Contrast Ratio Typical

100,000:1

Ports

2x USB-C (DisplayPort Alt Mode), 1x Mini-HDMI

Speakers

None

Dimensions

14.13 x 9.17 x 0.35 inches

Weight

1.5 pounds

Warranty

1 year

Asus ZenScreen OLED (MQ16FC) OSD

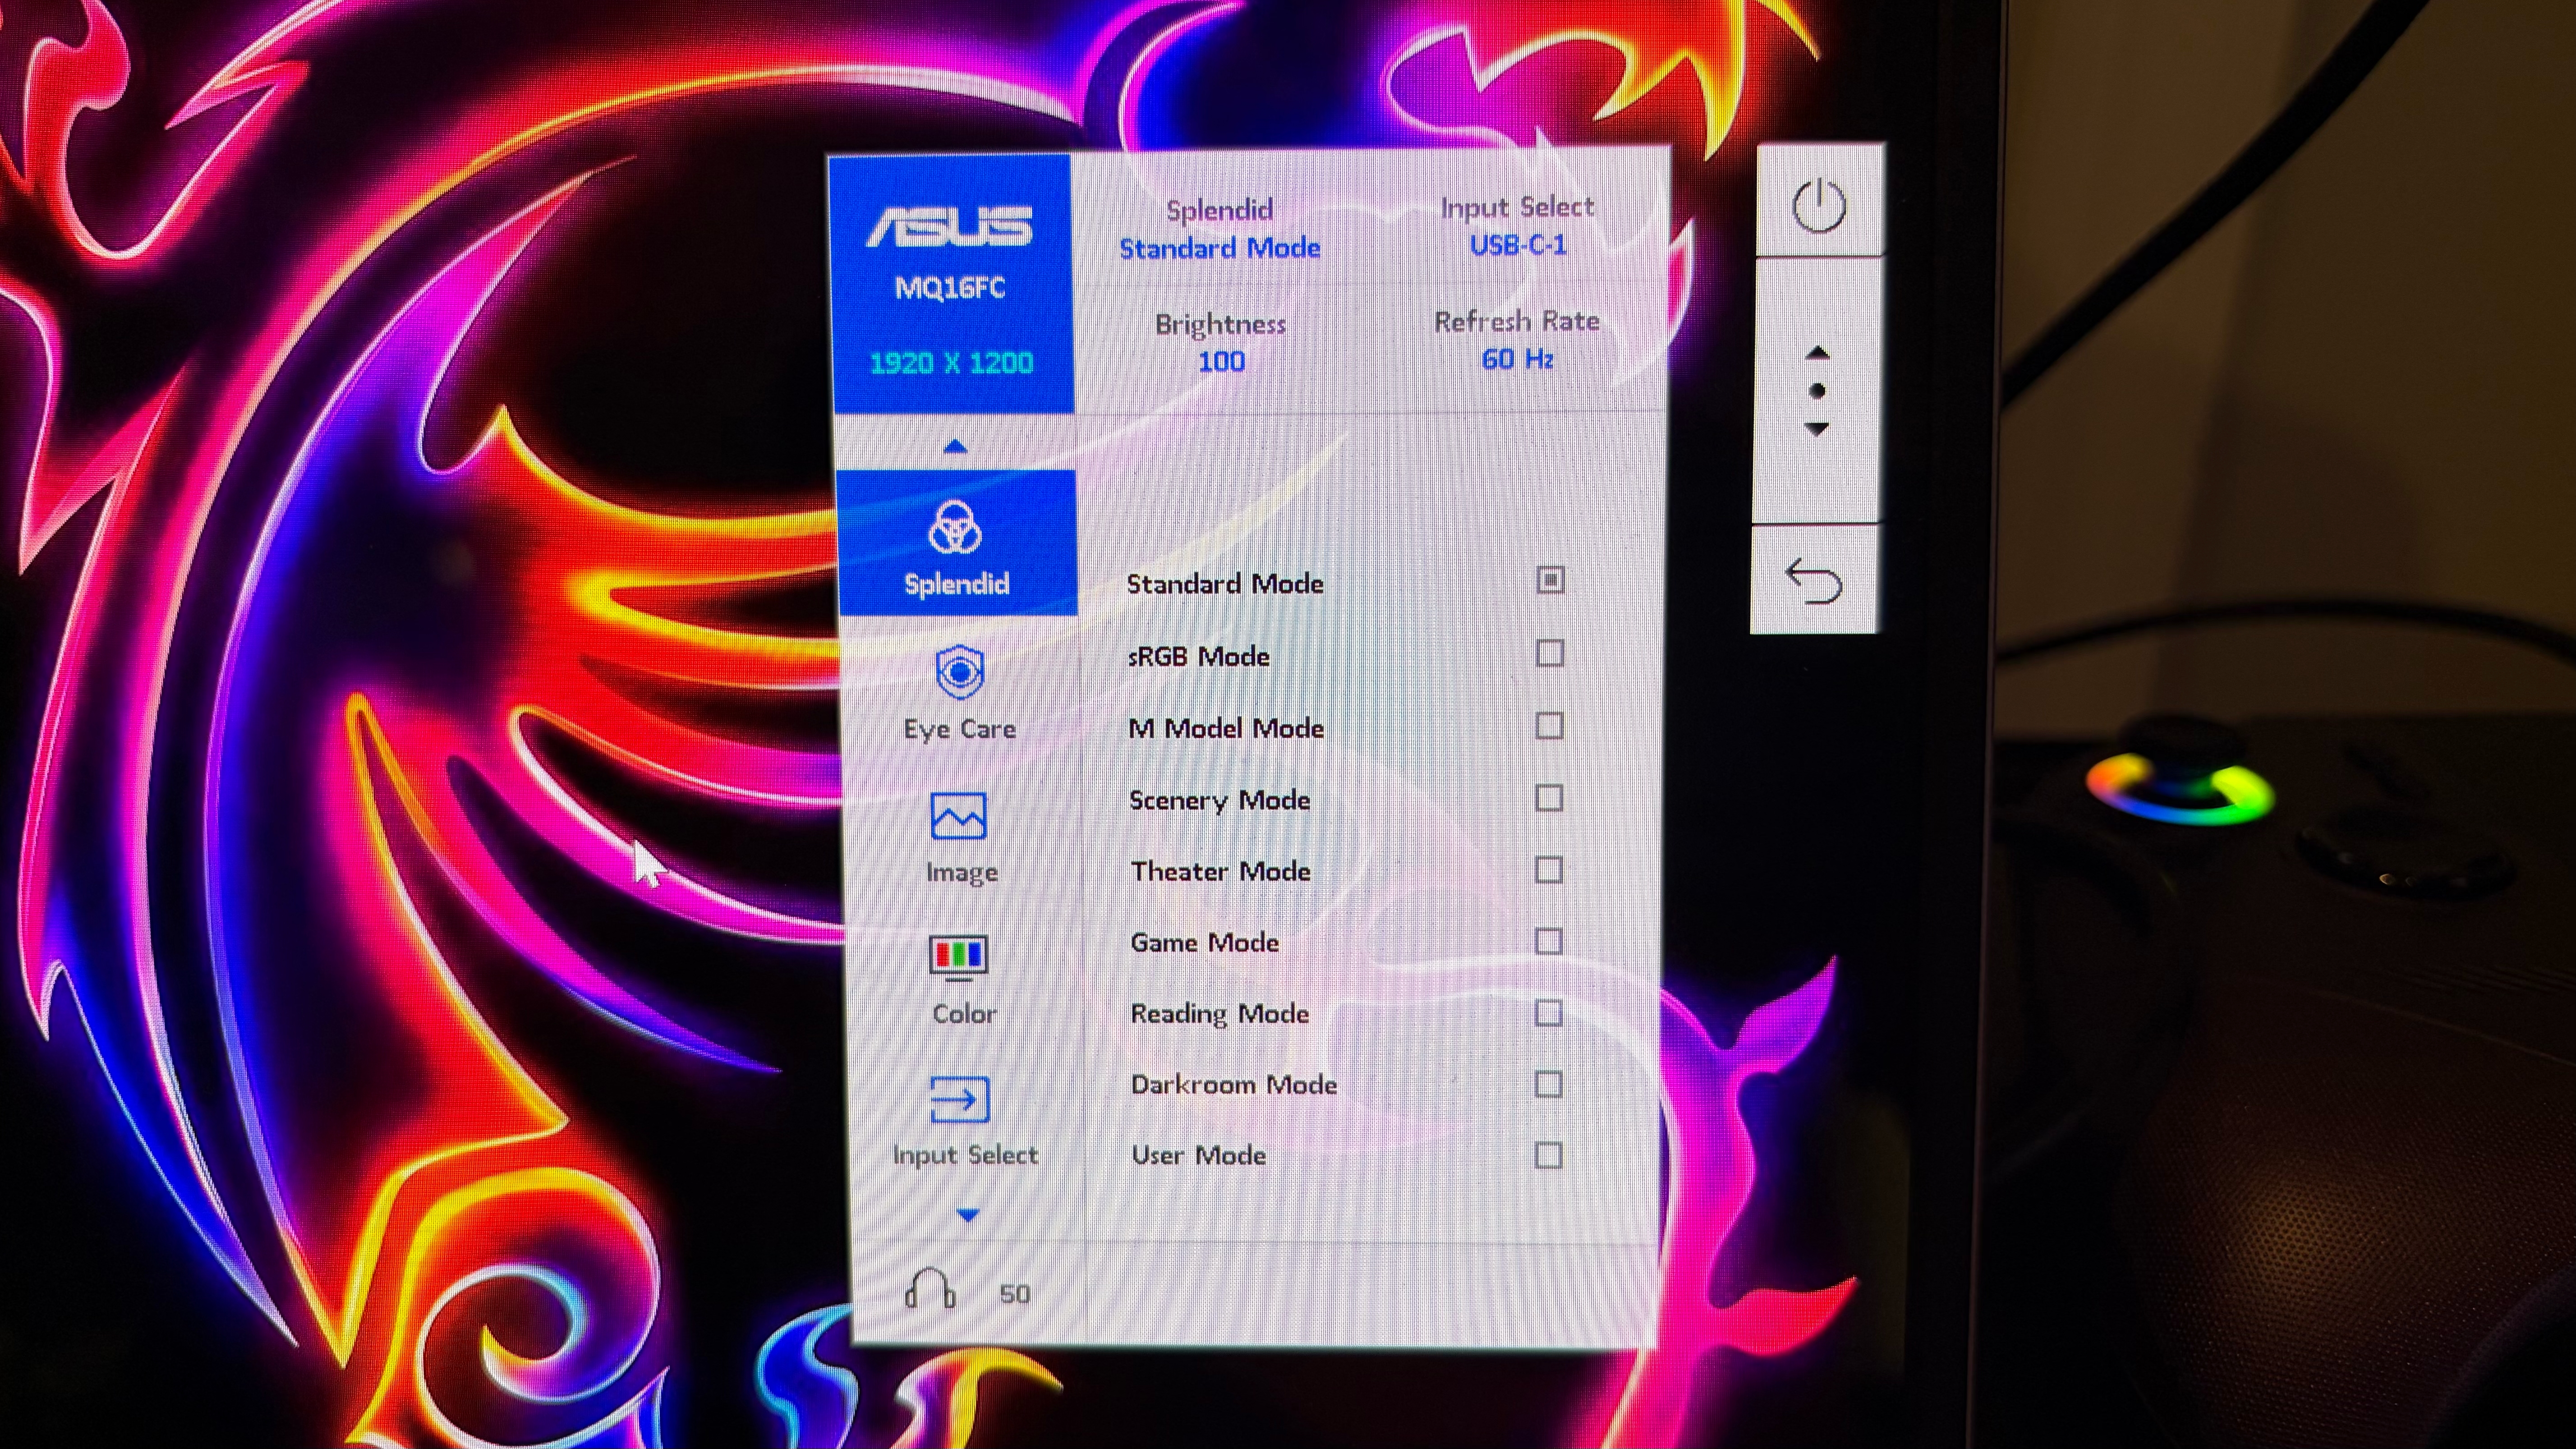
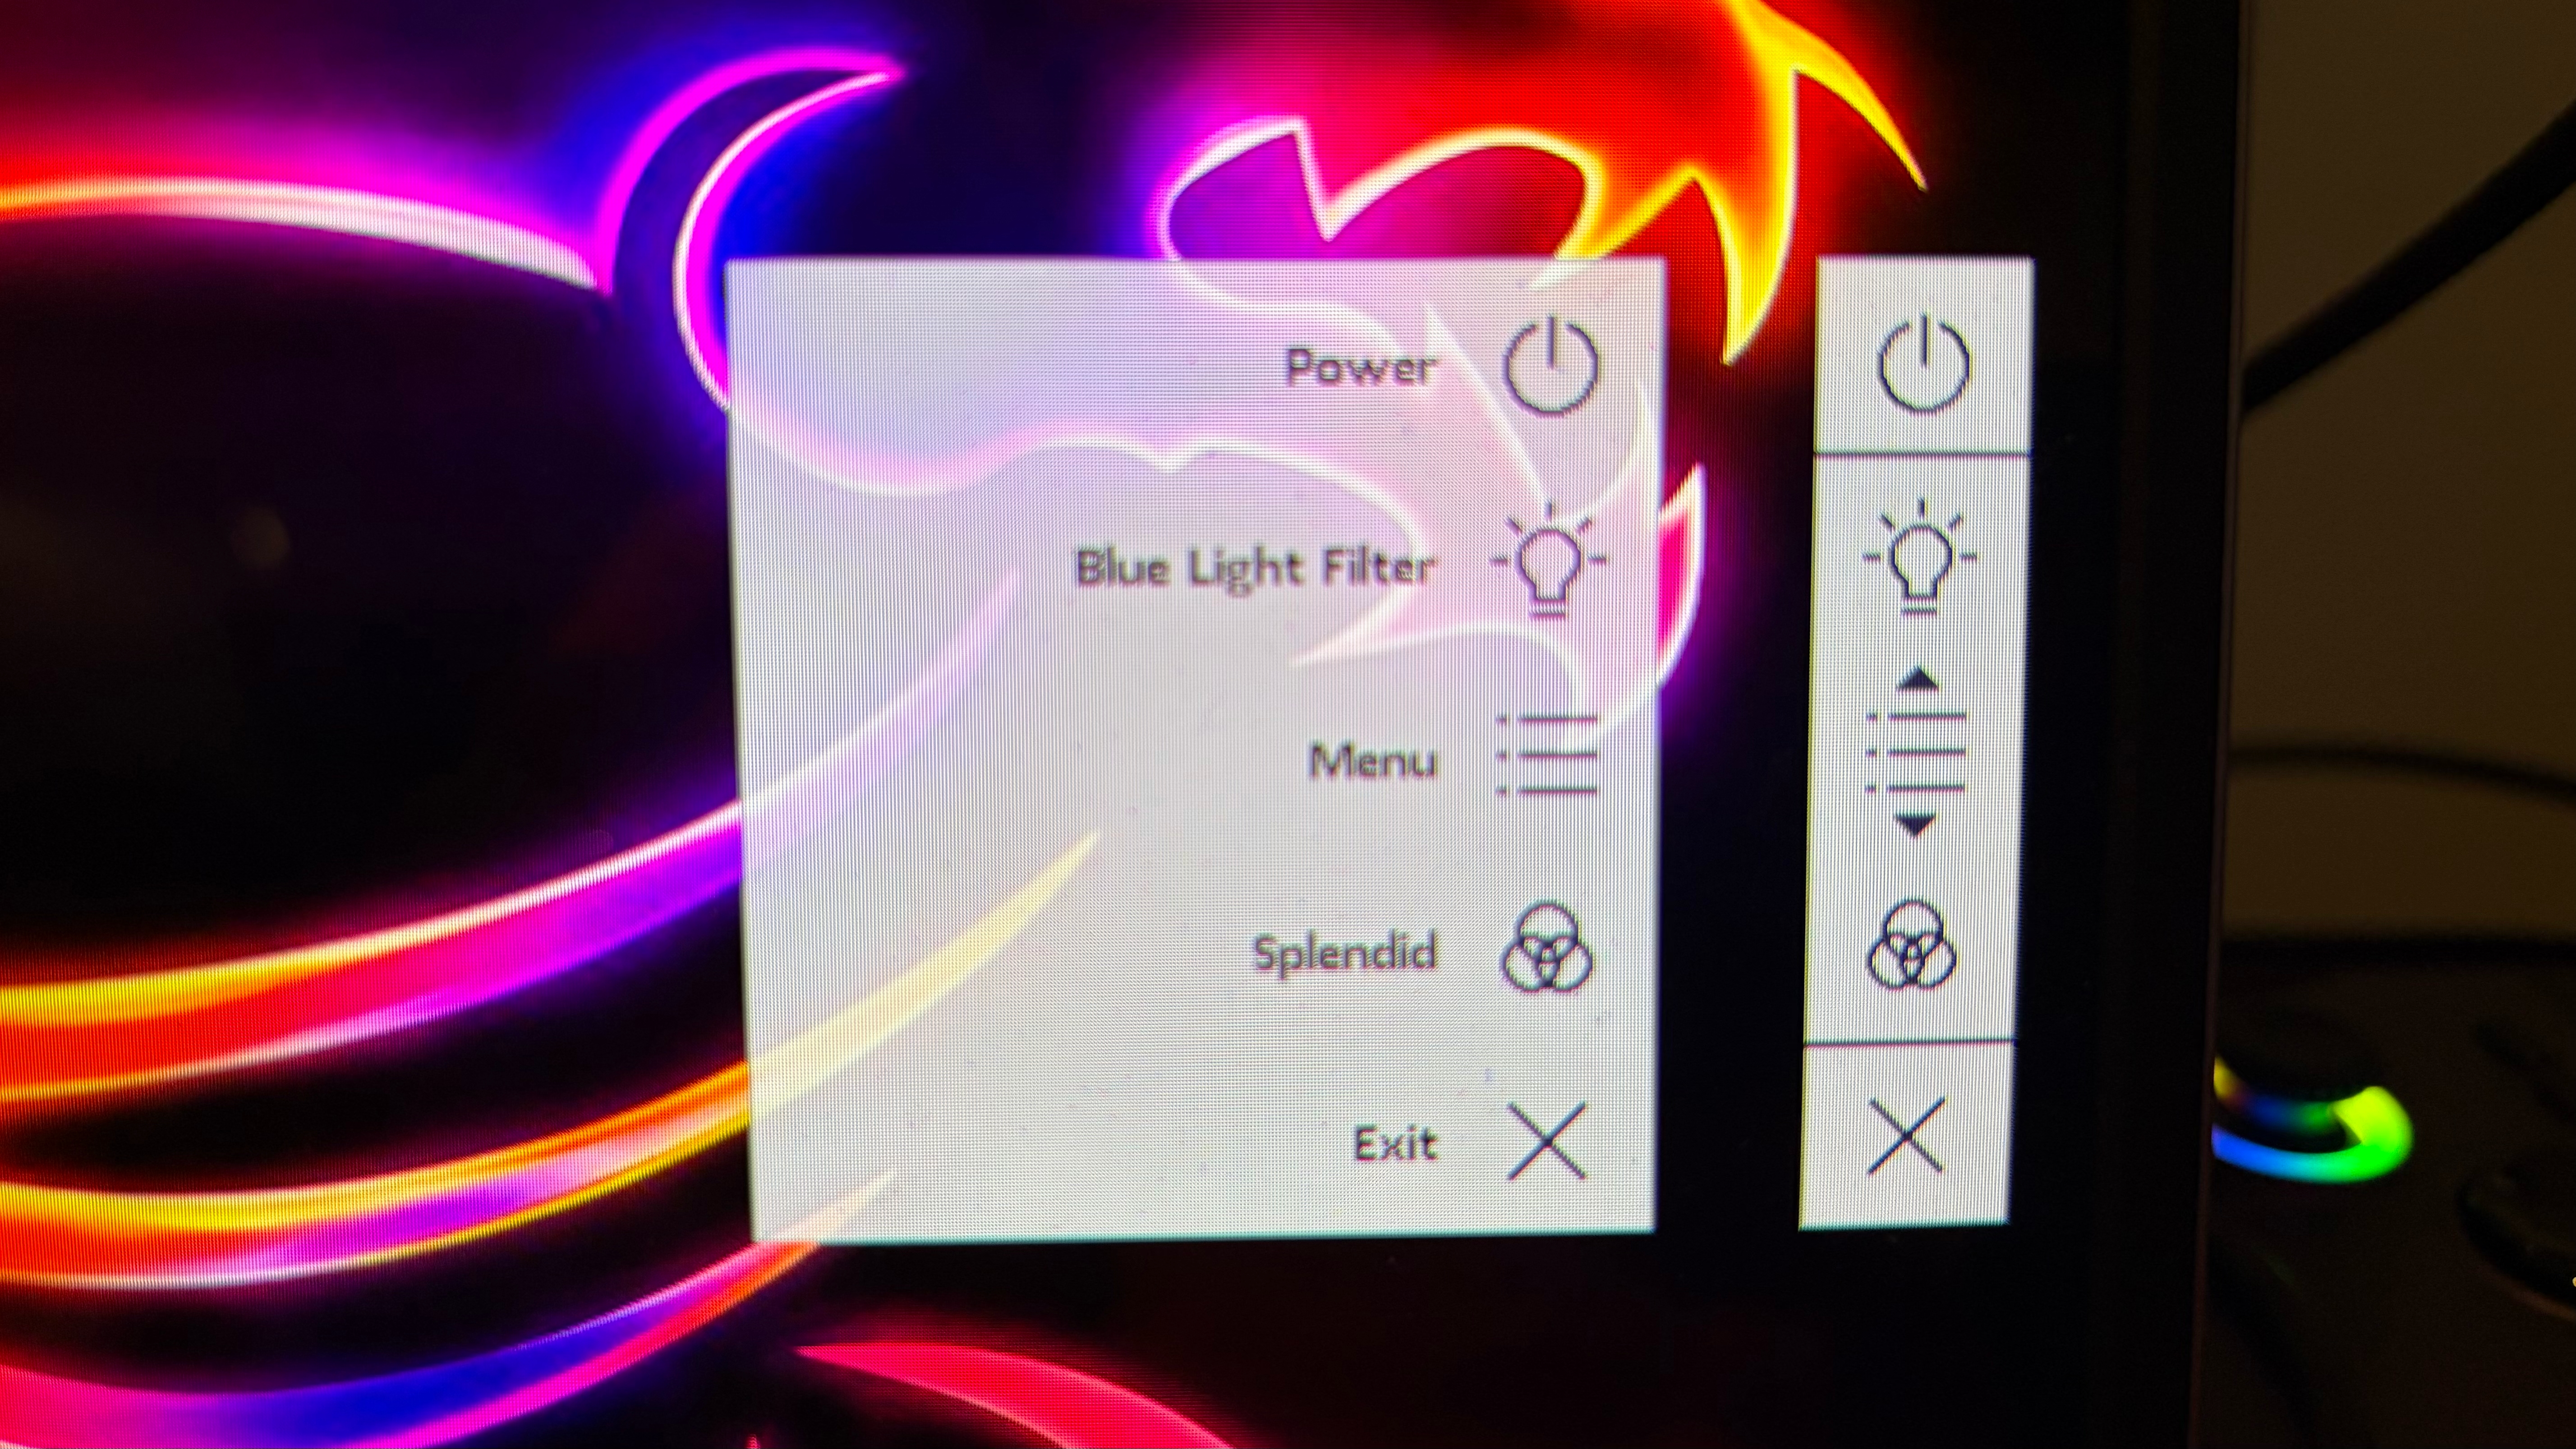
The MQ16FC features an on-screen display (OSD), which pops out from the right side of the screen when you press in on the jog wheel or the action button below it. One press opens the OSD Quick Menu, which lets you access the Blue Light Filter and Splendid display modes. However, if you press the jog wheel in twice, it brings up the full OSD.

Asus ZenScreen OLED (MQ16FC)
Tom's Hardware
Asus ZenScreen OLED (MQ16FC)
Tom's Hardware

The full OSD provides overall display information at the top, including the current Splendid display mode, display resolution, the currently selected input method (USB-C-1, USB-C-2, or HDMI), brightness level (in percent), and refresh rate. From there, you can scroll down through the various menu options, including the aforementioned Splendid (Standard Mode, sRGB Mode, Game Mode, etc.), Eye Care (Blue Light Filter, Color Augmentation), Image (Brightness, Contrast, etc.), Color (Gamma, Color Space, Color Temperature), input select, and Settings (auto rotation, power settings, OSD layout, etc.).

Asus ZenScreen OLED (MQ16FC)

(Image credit: Tom's Hardware)

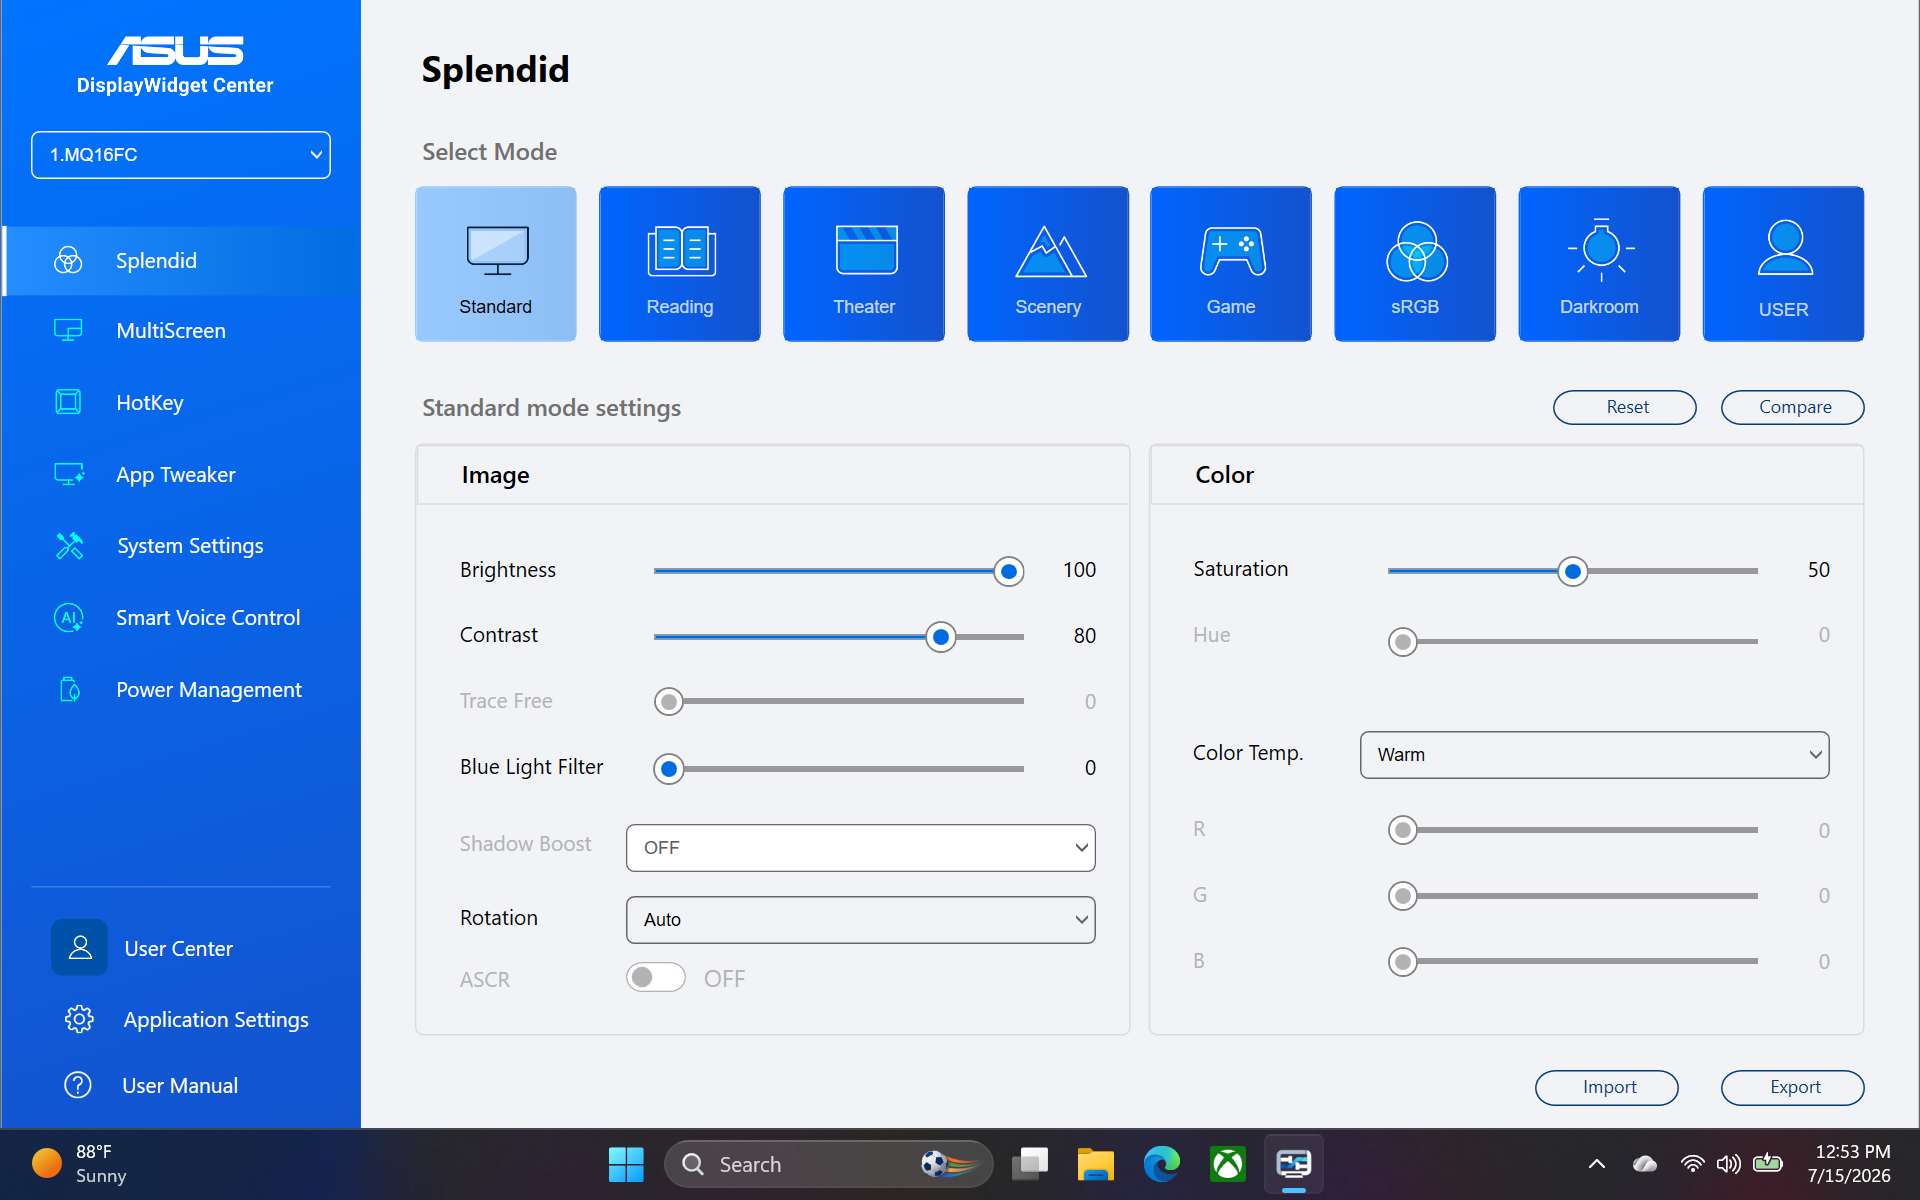
If you prefer, you can install the Asus DisplayWidget Center app for Windows, which provides even easier access to Spendid picture modes, color, and image settings.

Display Performance on the Asus ZenScreen OLED (MQ16FC)

The MQ16FC features a 16.1-inch OLED panel with a 1920 x 1200 resolution and 60 Hz refresh rate. Asus uses a glossy finish over the OLED panel to provide an extra "punch" of color. The glossy film does a good job of slightly enhancing colors while not completely succumbing to environmental reflections. However, the reflections that did make their way onto the screen were quickly vanquished by adjusting the display angle with the kickstand.

Color performance from the OLED display was generally excellent, with deep blacks and vibrant colors. My new go-to for testing out color performance on monitors is to watch Project Hail Mary on Amazon Prime Video. Not only is it an excellent movie, but it's an absolute feast for the eyes in so many respects. The scene featuring planet "Adrian" looked wonderful, from the flashes of red and green to the fiery orange plasma as the Haily Mary started descending into Adrian's atmosphere. Absolutely nothing can do the movie justice like seeing it in theaters, but I was still enthralled watching it on this 16.1-inch OLED.

Our instrumented tests showed the MQ16FC covering 153.2 percent of DCI-P3 and 216.2 percent of sRGB, putting it ahead of rivals like the ViewSonic ColorPro VP16-OLED and Innocn 15A1F. However, it did fall short in brightness. The MQ16FC is rated for 300 nits typical brightness, and we measured just 140 nits in Standard mode (the default). However, we were able to punch that figure up to 271 nits in User Mode, with no discernible change in DCI-P3 or sRGB coverage. Still, the MQ16FC isn't nearly as bright as the other two monitors, which each hit around 370 nits.

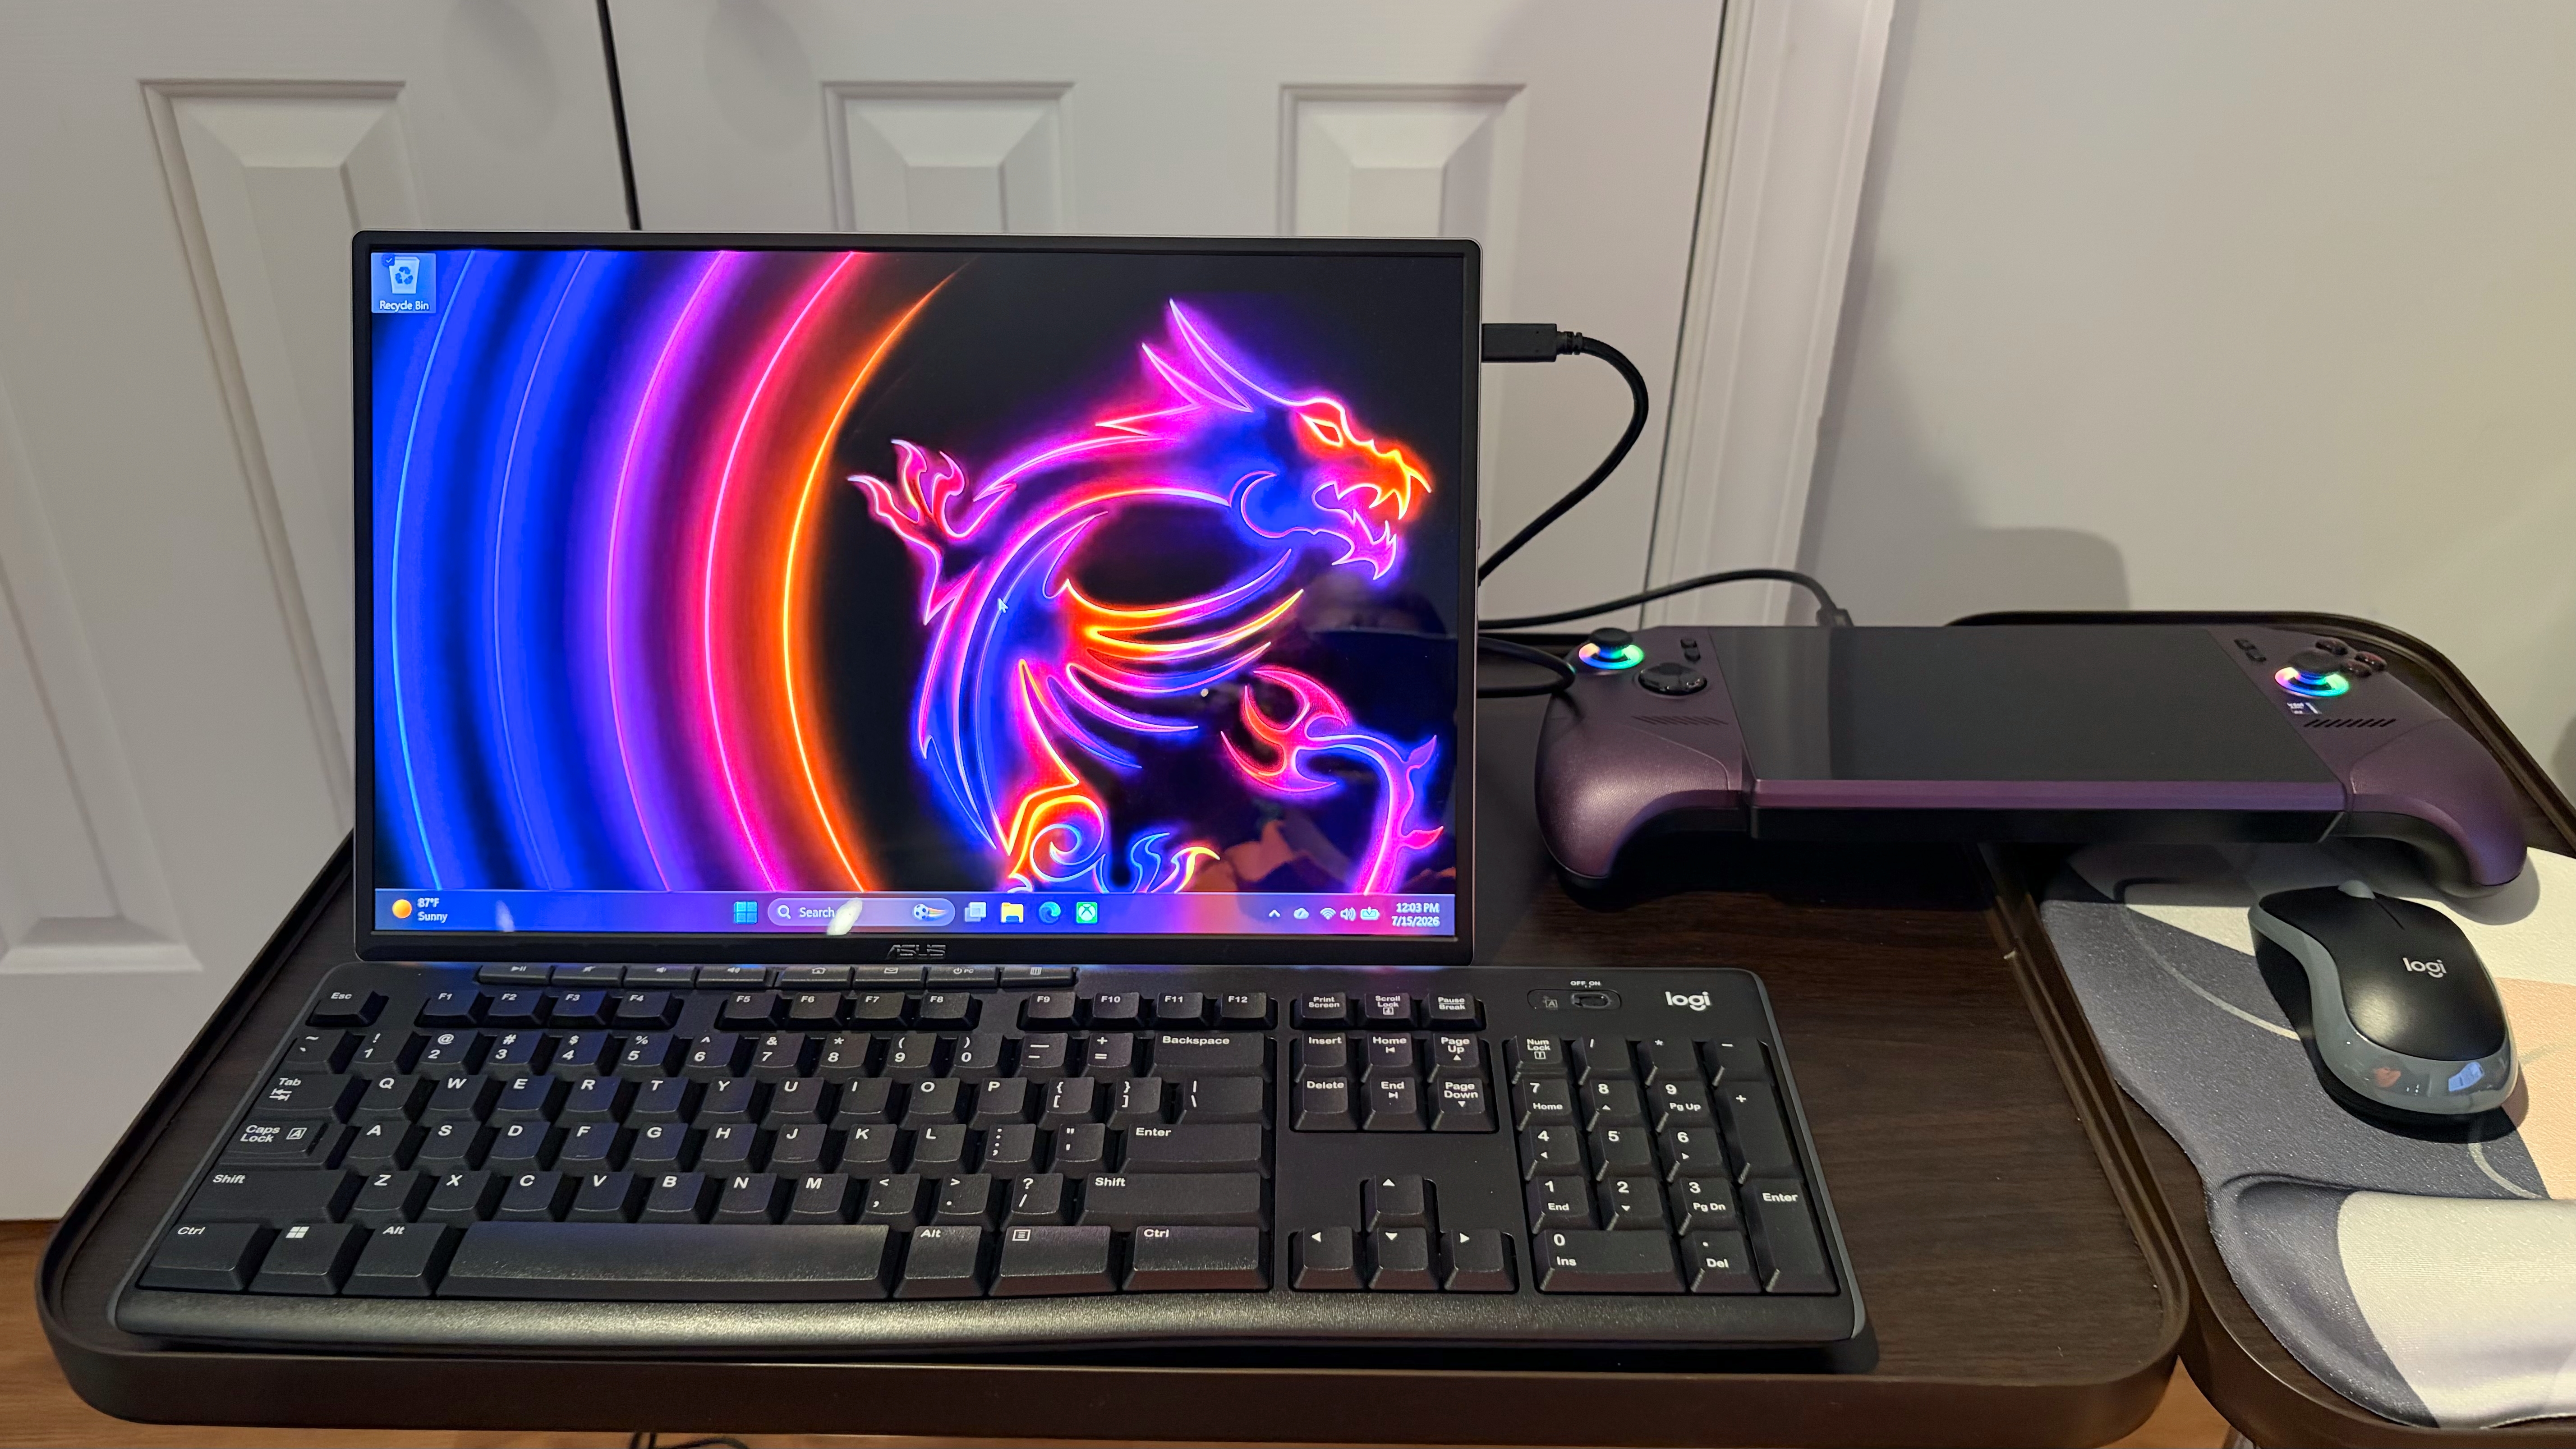
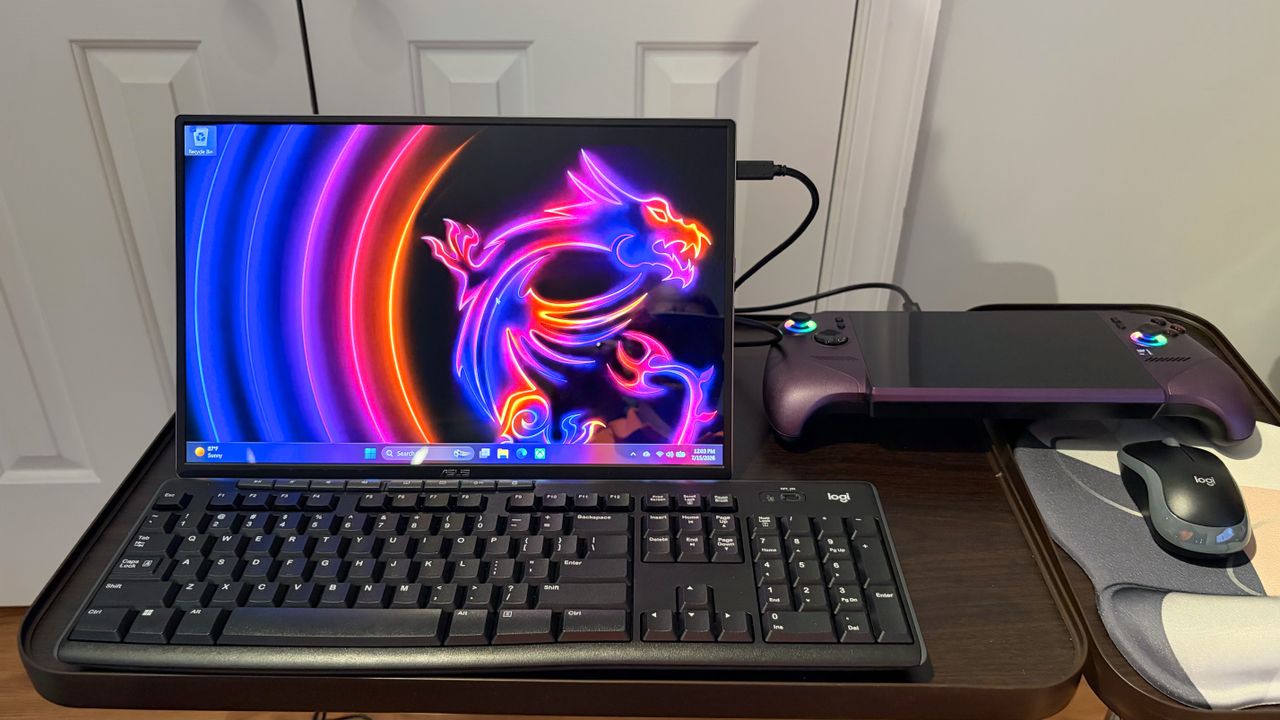
With that said, I used the MQ16FC with several different systems, from a Mac mini, to a MacBook Air to an MSI Claw 8 EX AI+. In fact, I was able to turn the Claw 8 EX AI+ into a miniature desktop system with the help of the Thunderbolt 5 dock, the MQ16FC, and a wireless keyboard and mouse. This setup allowed me to install games more easily and perform certain tasks that I find tedious on the gaming handheld's 8-inch touchscreen.

In each instance, the MQ16FC connected to the systems using a single USB-C-to-USB-C cable, delivering power and video. I greatly appreciate the flexibility of using a single cable instead of needing USB-C for power and an HDMI cable for video.

Bottom Line

The Asus ZenScreen OLED (MQ16FC) is a solidly built portable monitor with excellent color performance and a sturdy kickstand. It is also quite versatile, with a built-in tripod mount, and can be propped up in portrait mode (with support for auto-rotation). Maximum brightness isn’t as high as its peers, but I found it perfectly fine for my daily usage patterns. The only miss is the lack of speakers, but given that most portable monitor speakers are borderline trash, it shouldn’t be a huge deterrent for most people.

With a street price of $274, the MQ16FC is actually priced fairly for a 16-inch OLED monitor. Given its features along with a standard three-year warranty, it’s truly a notch above the rest.

✇Tomshardware

TP-Link Deco 7 Pro BE13000 Wi-Fi 7 mesh router review: Value pricing, but average performance

TP-Link has a rather expansive family of Wi-Fi 7 mesh routers, and it can often be confusing to keep up with the growing assortment. We’ve tested several Deco Wi-Fi 7 mesh routers over the past three years, and they’ve offered class-competitive performance and a well-designed app for controlling all aspects of the network.

Today, we’re taking a look at the Deco 7 Pro BE13000, which is one of TP-Link’s tri-band “whole home mesh Wi-Fi 7” systems. It’s also a rather interesting option, as it’s exclusively available at Costco as a 3-pack. With a selling price of $399 and coverage for up to 8,100 square feet, the Deco 7 Pro BE13000 has stiff competition among the best Wi-Fi routers.

Design of the TP-Link Deco 7 Pro BE13000

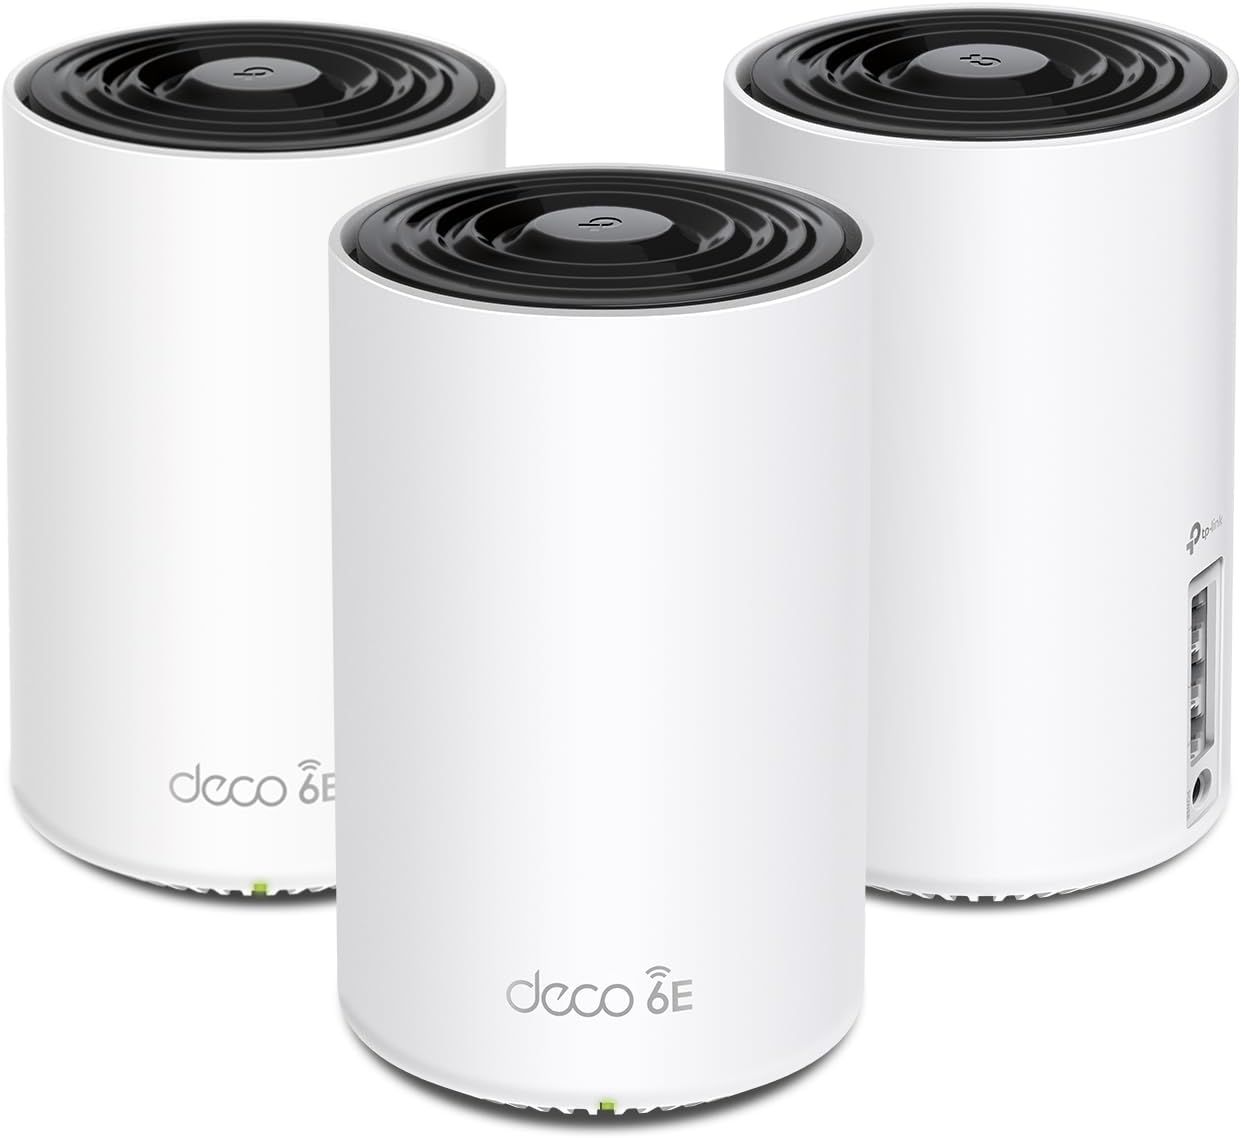
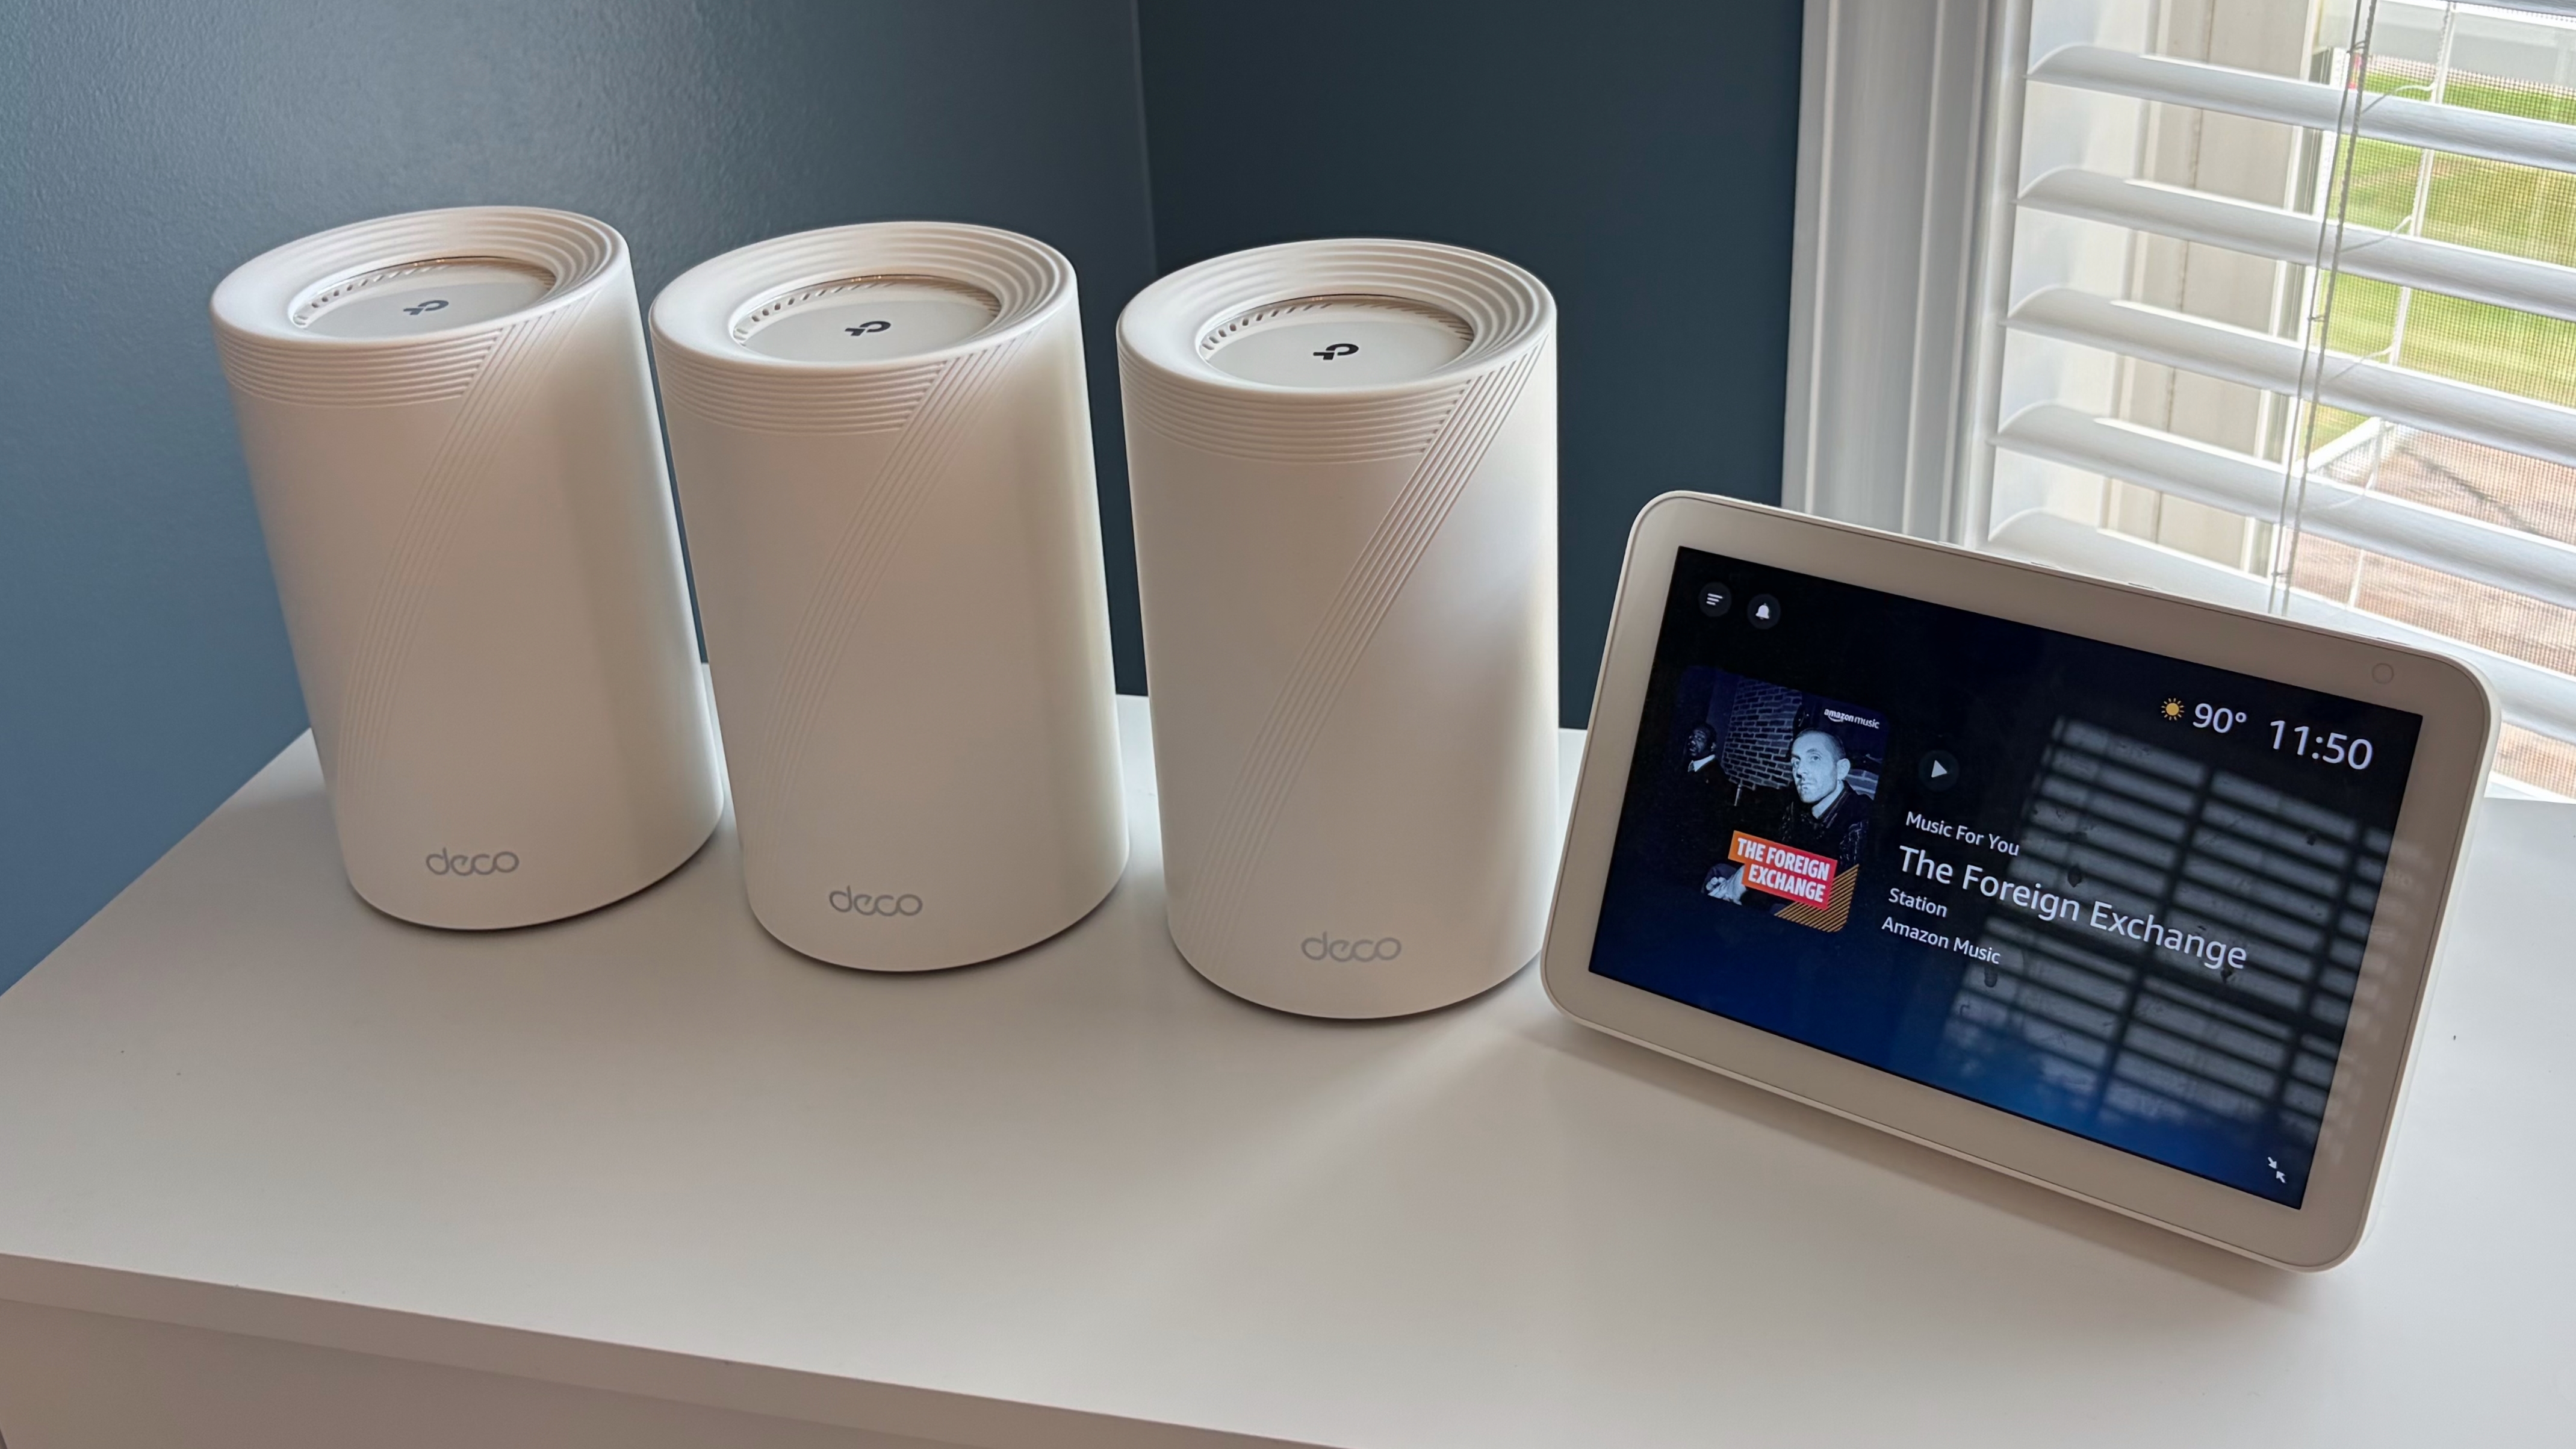
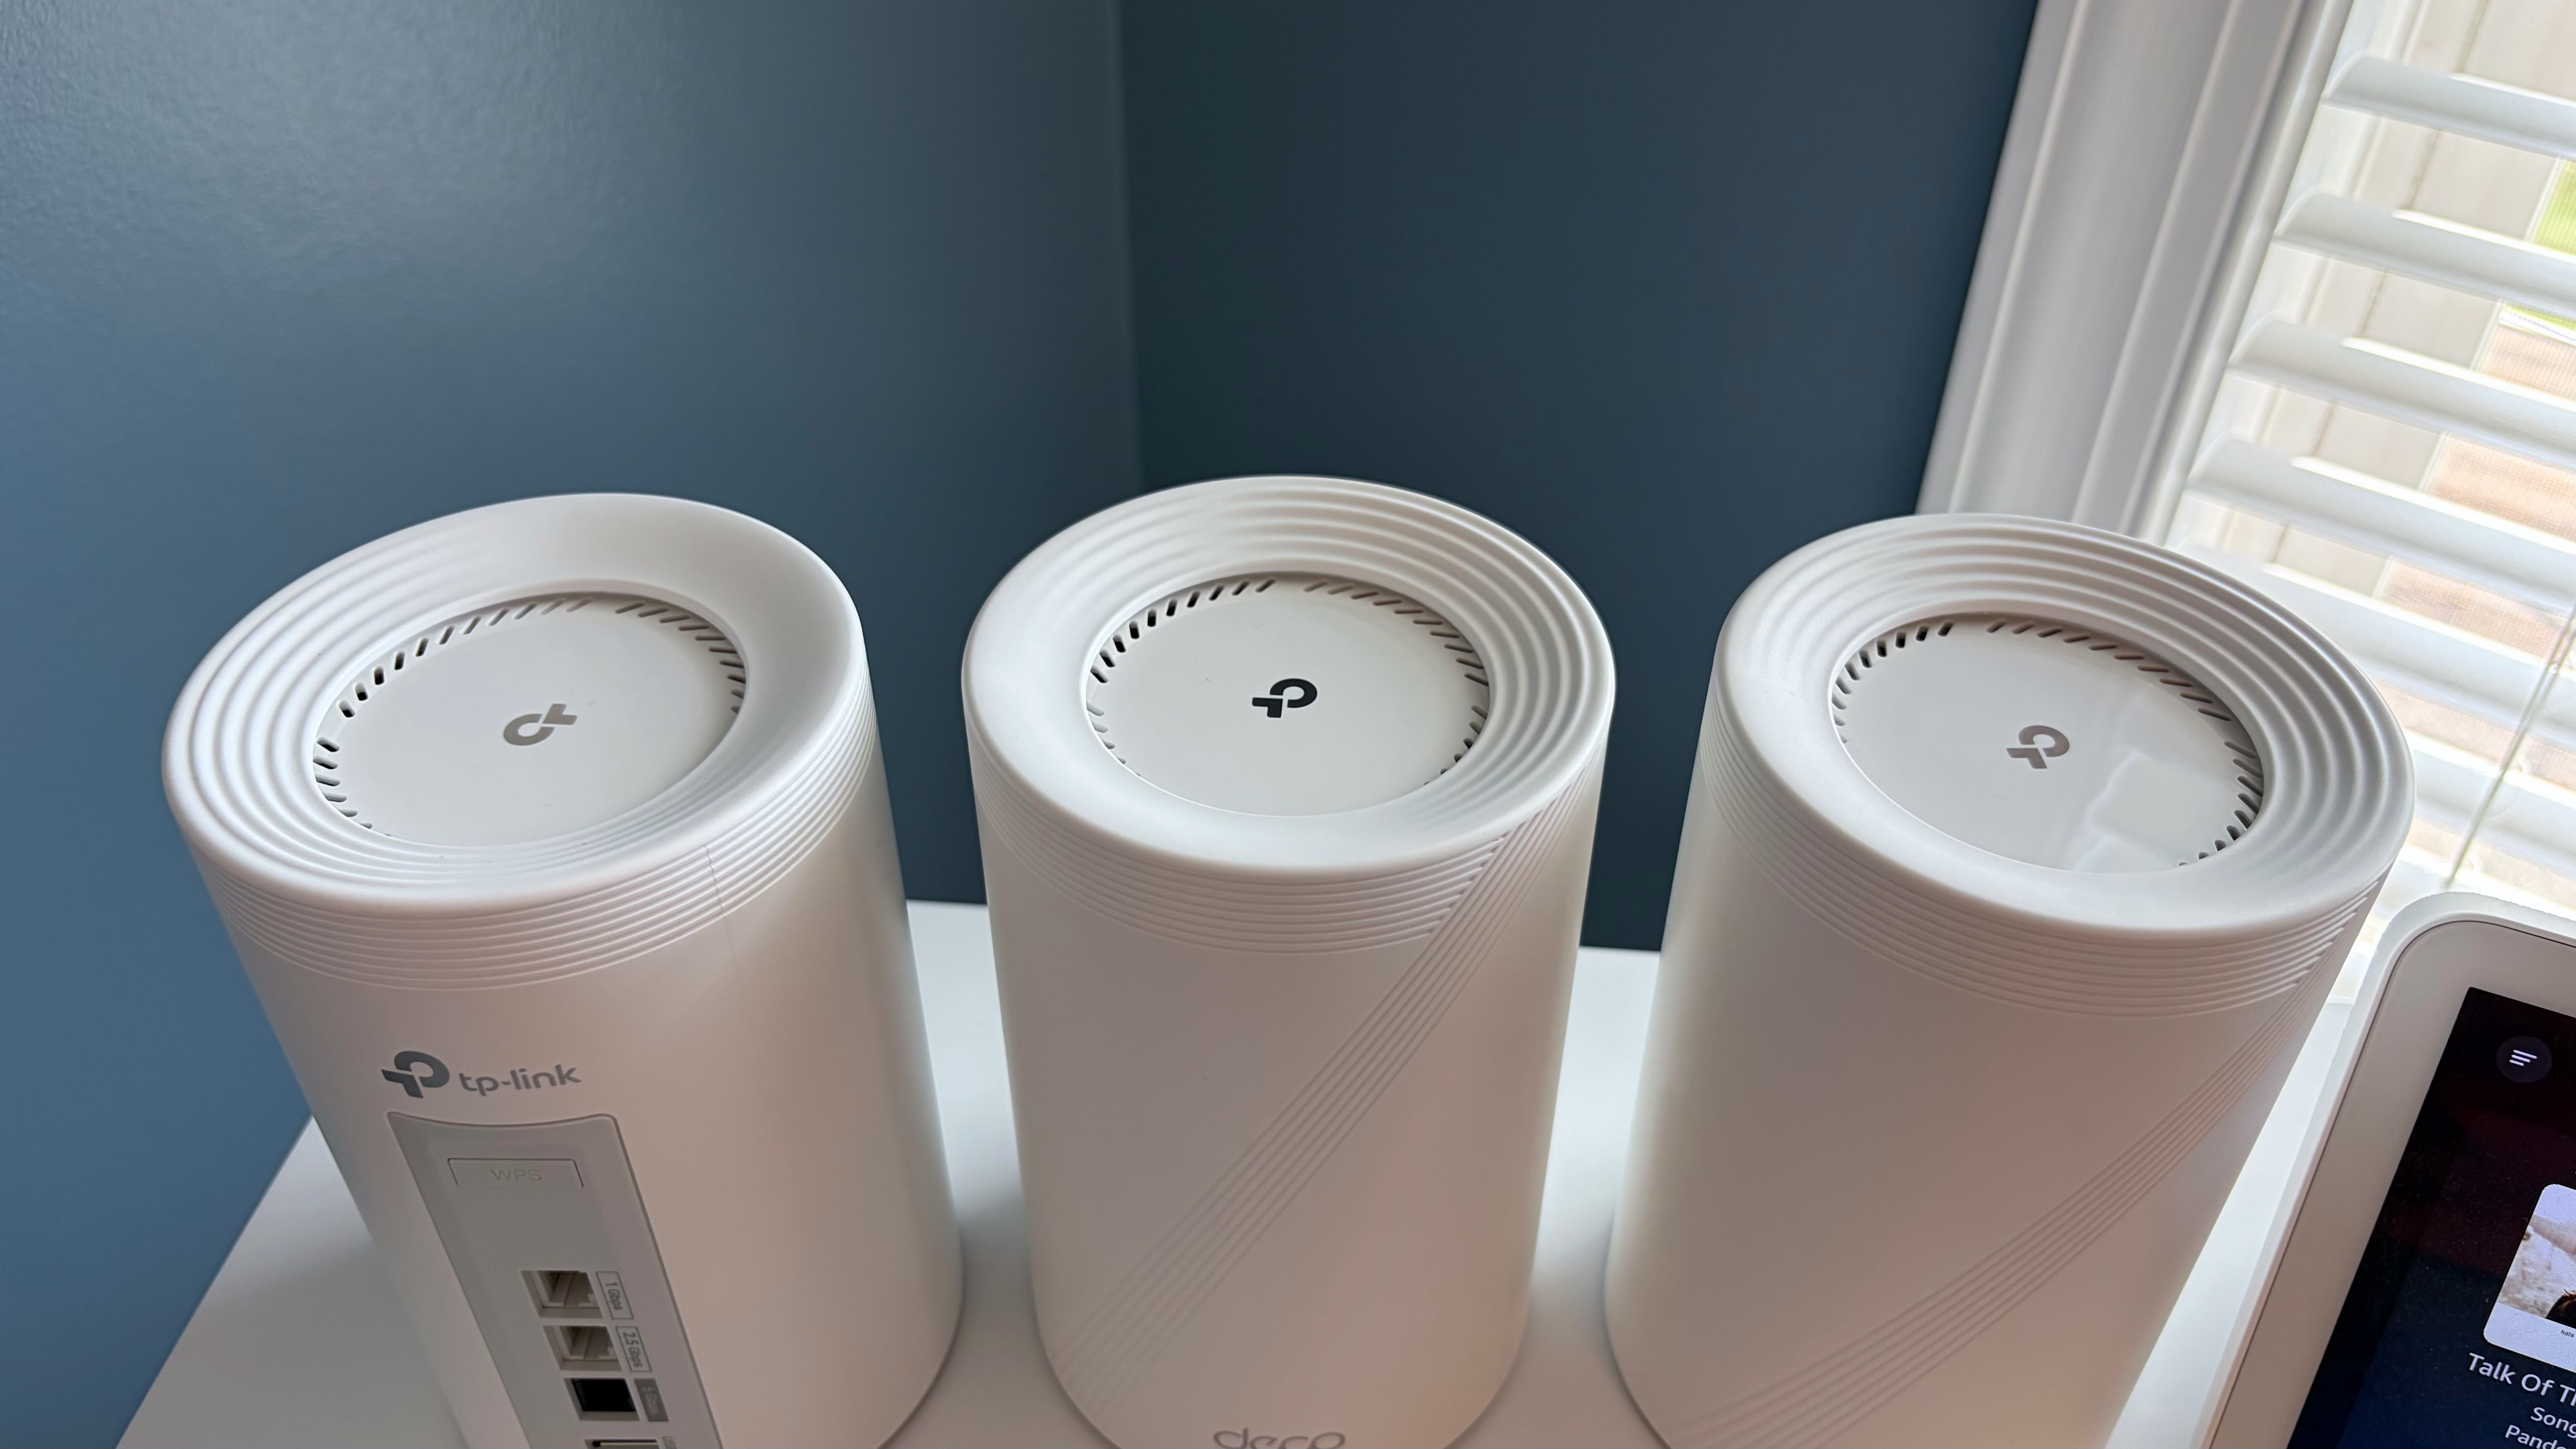
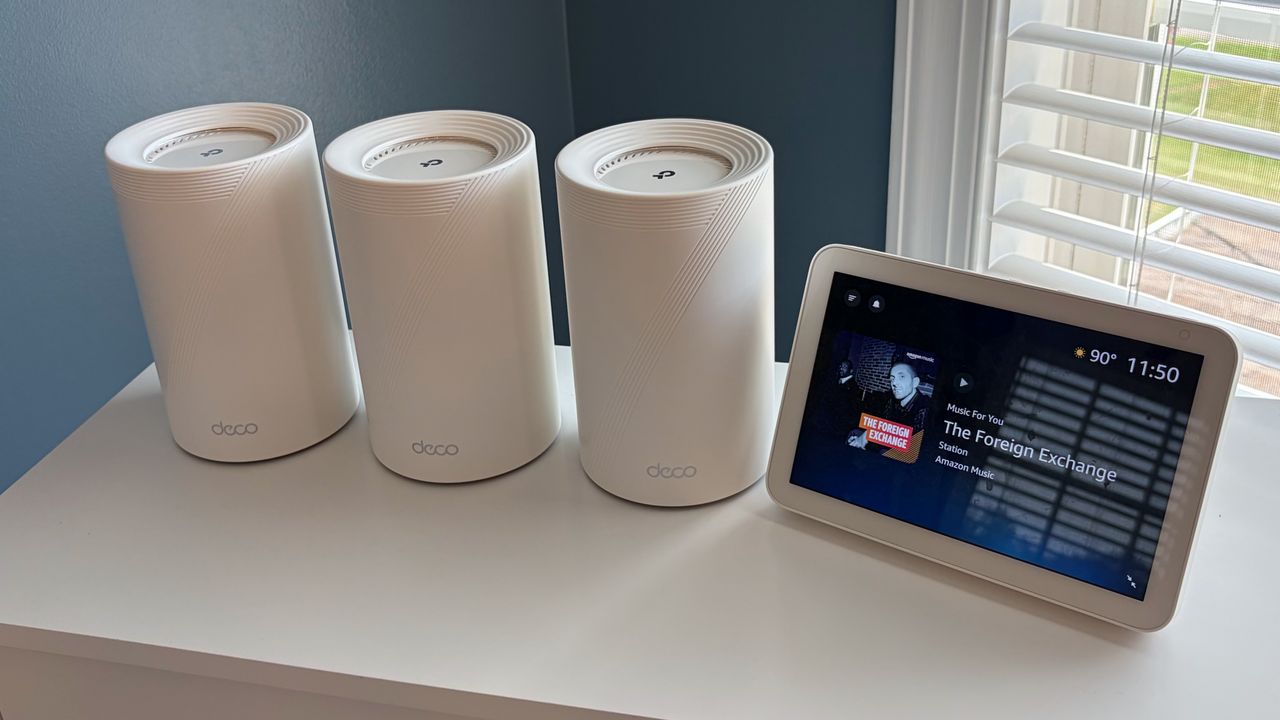
Like all other members of TP-Link’s tri-band Wi-Fi 7 mesh family, the satellites on the Deco 7 Pro BE13000 are white cylinders measuring 4.23 inches in diameter and 6.93 inches in height. A stylized “7” is molded into the plastic, and the top of the unit features the TP-Link logo under a clear circular cover. Looking down, the molded concentric circles give the impression that the logo suggests a splash in a puddle of water.

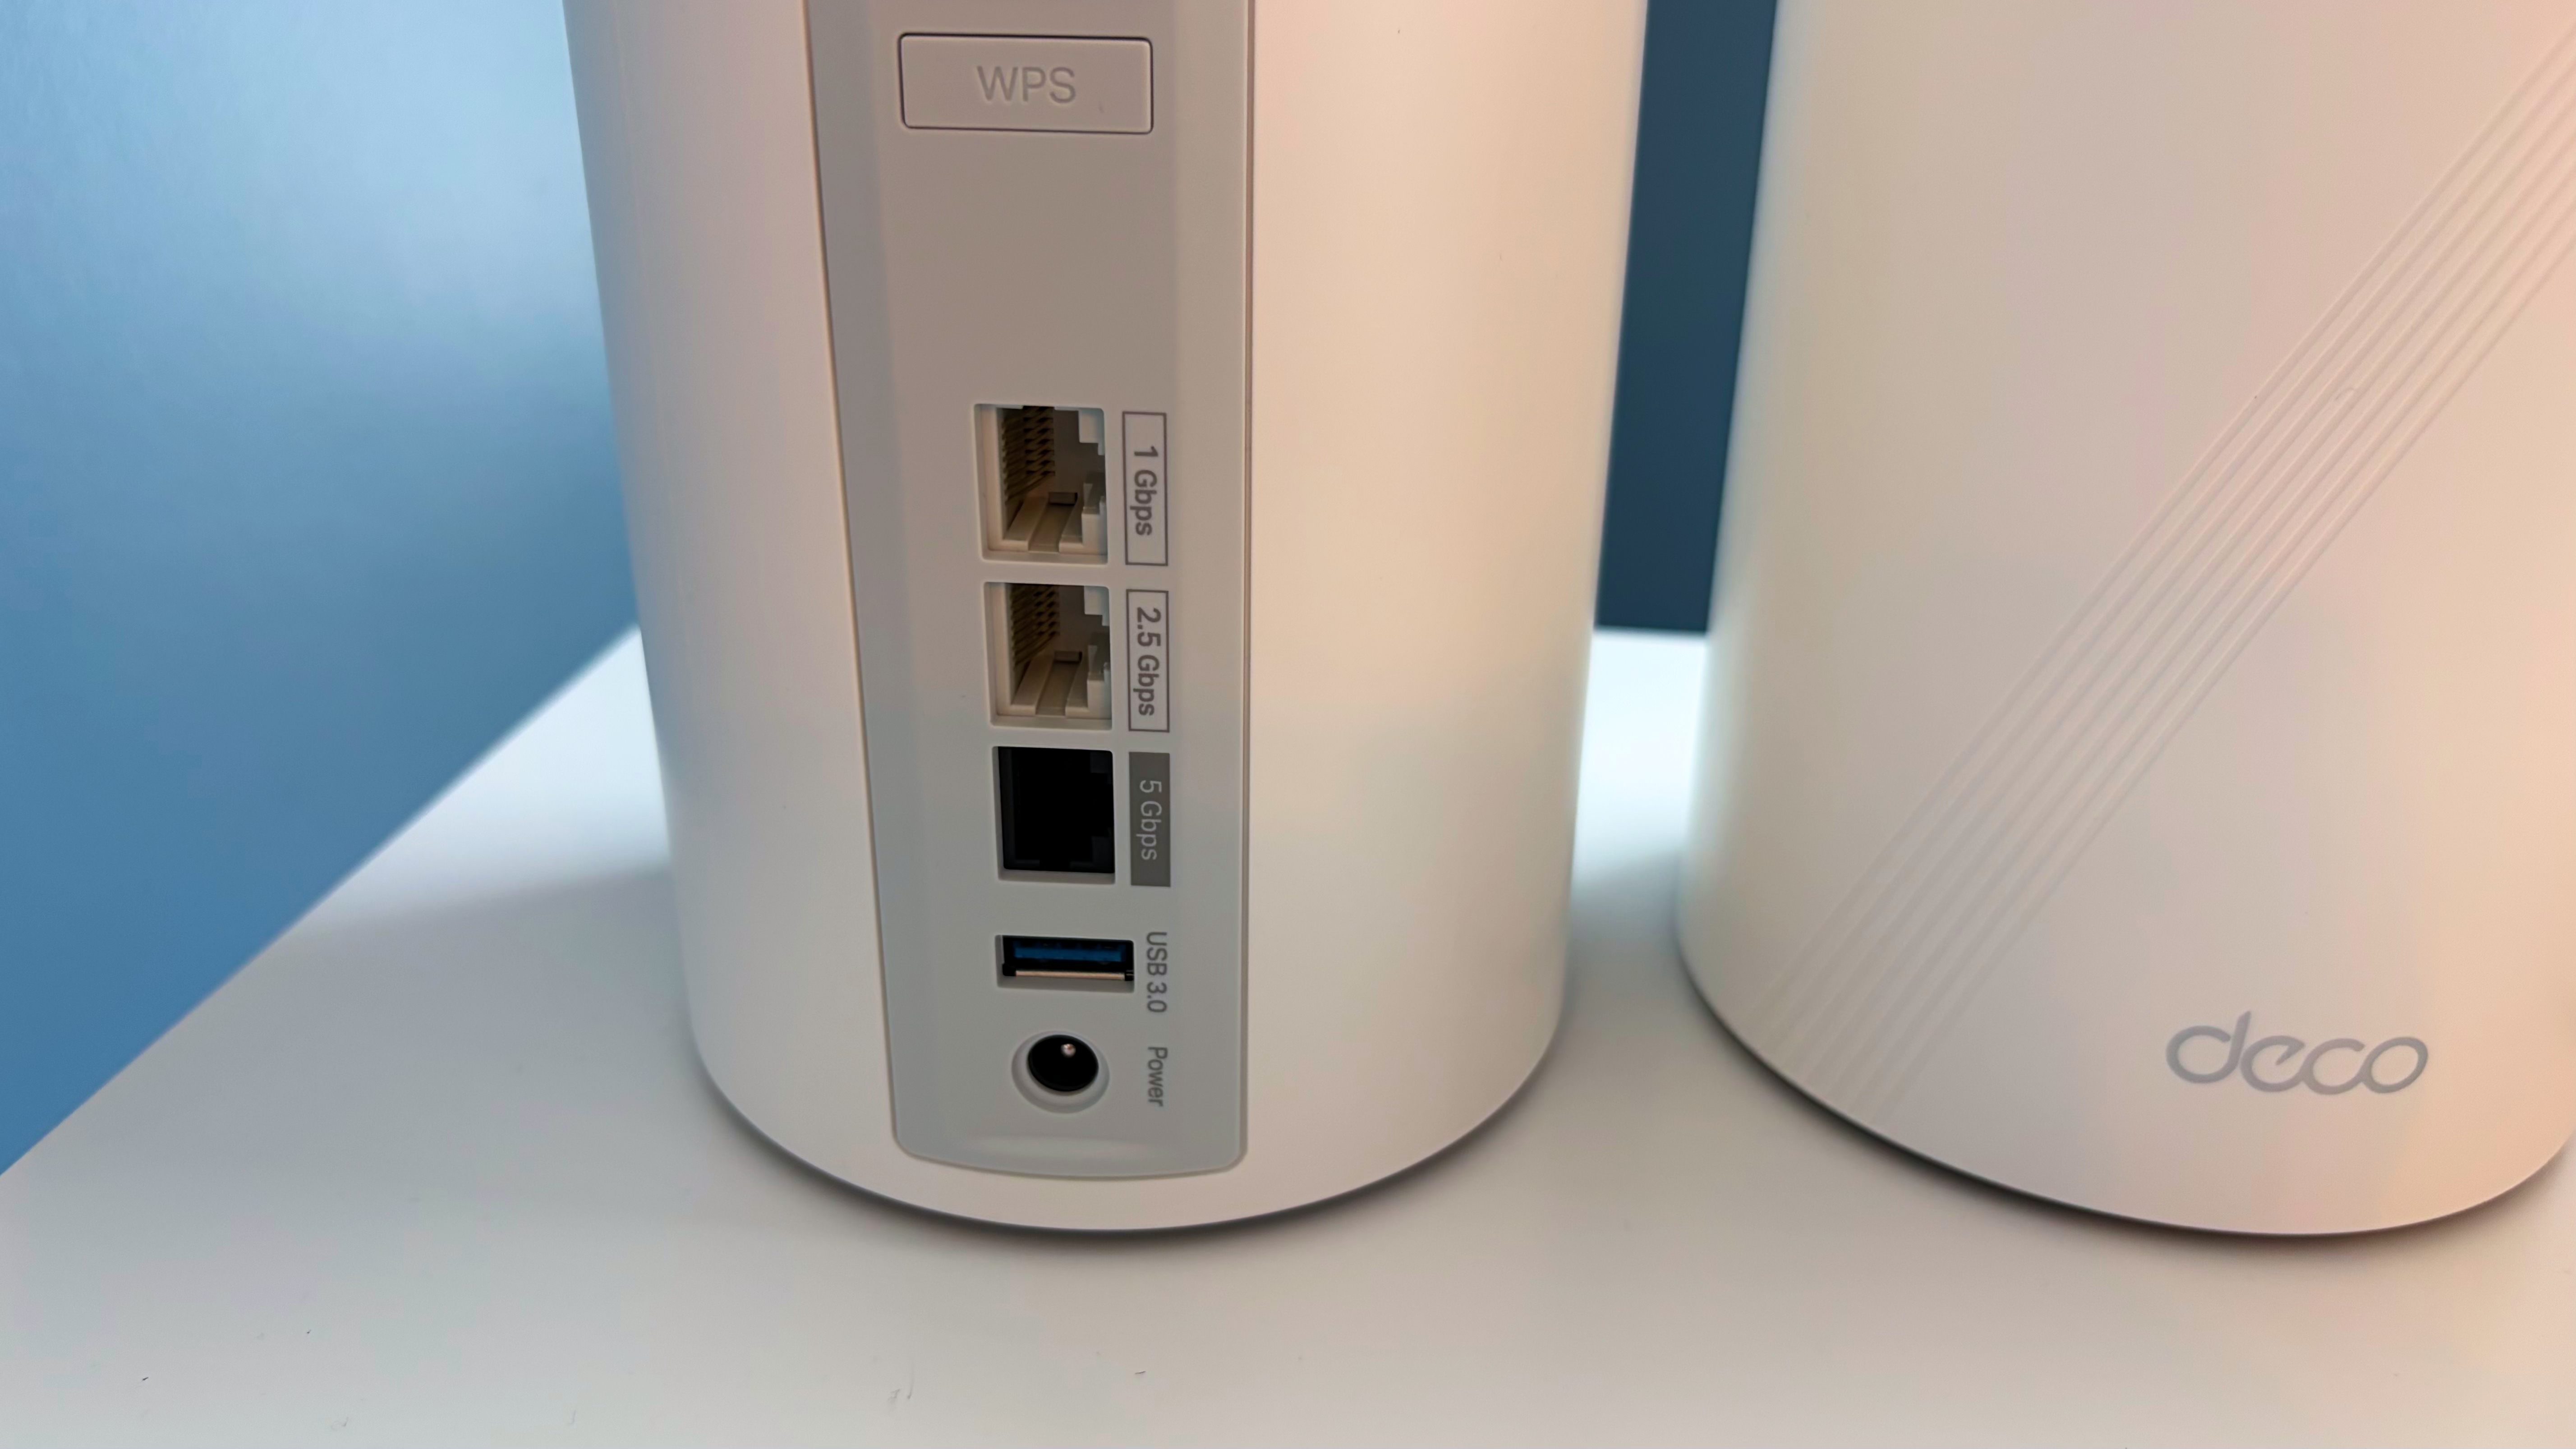
Beneath the stylized 7 on the front of the satellite, there’s “deco’ branding, and below it is a status LED. It blinks blue during setup, is solid green when the satellites are online, and stays solid red if there’s a connectivity problem. Out back is where things get a bit interesting. The slightly lower-positioned Deco BE63 features four 2.5 GbE LAN/WAN ports. The Deco 7 Pro BE13000, on the other hand, only has three LAN/WAN ports, and they’re oddly spec’d. You get one GbE, one 2.5 GbE, and one 5 GbE port.

TP-Link Deco 7 Pro BE13000
Tom's Hardware
TP-Link Deco 7 Pro BE13000
Tom's Hardware
TP-Link Deco 7 Pro BE13000
Tom's Hardware

Personally, I would have preferred four LAN/WAN ports: two 2.5 GbE and two 5 GbE. At the very least, the single GbE port should have been replaced with a 2.5 GbE port. In addition to the LAN/WAN ports, there’s also a USB 3.0 port for storage. The port allotment is the same across all three wireless nodes.

TP-Link Deco 7 Pro BE13000 Wi-Fi 7 Mesh Router Specifications

MSRP

Wi-Fi Standard

# of Bands

2.4 GHz Speeds

5 GHz Speeds

6 GHz Speeds

Coverage

Ports (Router)

TP-Link Deco 7 Pro BE13000

$399 (3-pk)

Wi-Fi 7

3

688 Mbps

3891 Mbps

8647

8,100 sq ft

1x 1G, 1x 2.5G, 1x 5G WAN/LAN, 1x USB 3.0

MSI Roamii BE Pro

$349 (2-pk)

Wi-Fi 7

3

688 Mbps

4323 Mbps

5,764 Mbps

6,000 sq ft

1x 2.5G WAN, 3x 2.5G LAN, 1x USB 3.0

TP-Link Deco BE63

$349 (2-pk)

Wi-Fi 7

3

574 Mbps

4,324 Mbps

5,188 Mbps

5,800 sq ft

4x 2.5G WAN/LAN,1x USB 3.0

Setting up the TP-Link Deco 7 Pro BE13000

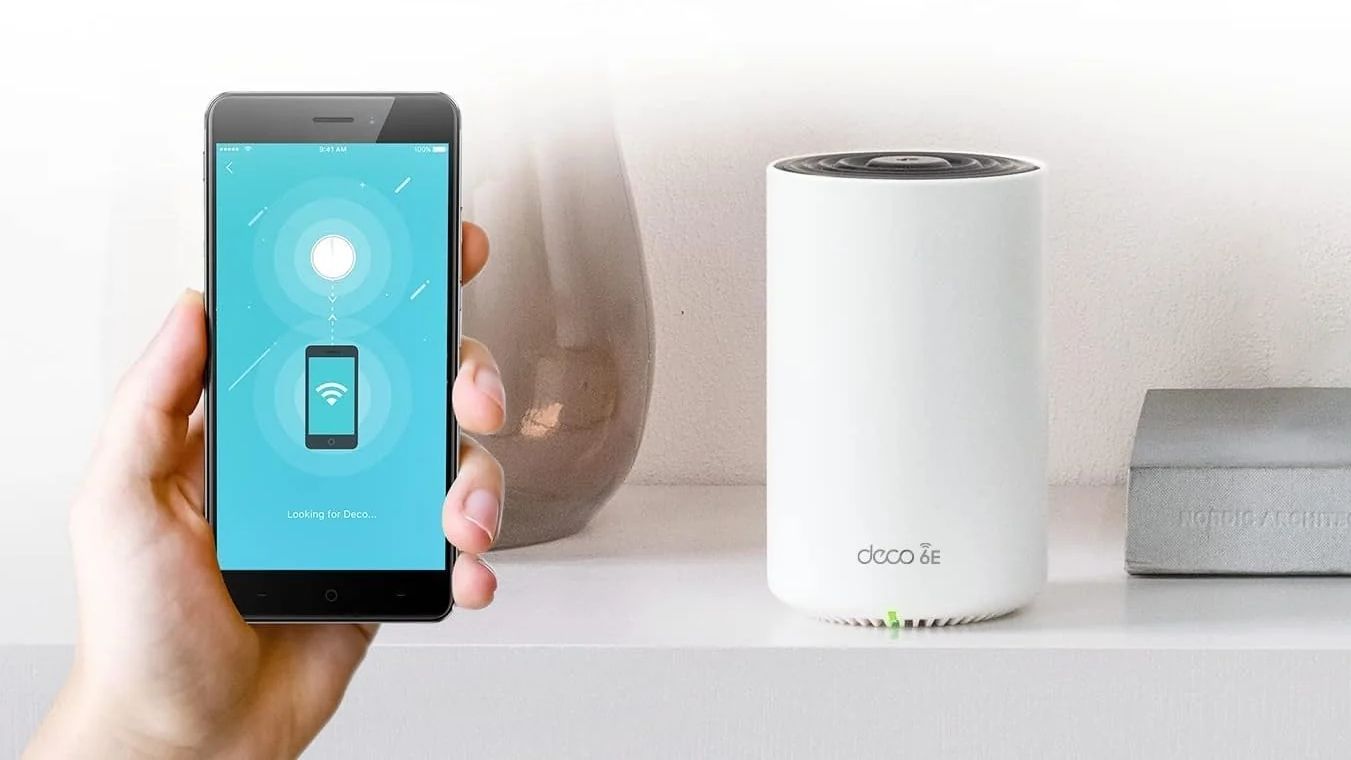
The setup process for the Deco 7 Pro BE13000 is rather straightforward and is accomplished solely via the TP-Link Deco smartphone app for iOS or Android. Before getting started, you'll need a TP-Link account, which enables remote management of your network when you're not at home.

I started the setup regimen by placing the three wireless nodes throughout my house, trying to keep them as evenly spaced as possible. Next, I plugged each node into power. Since all of the wireless nodes are identical, the first one that you plug into your modem will serve as the main router. In this case, I plugged the node in my office into my fiber modem. The setup program asked me to bring my phone close to the router, and it was quickly found; then the configuration process began.

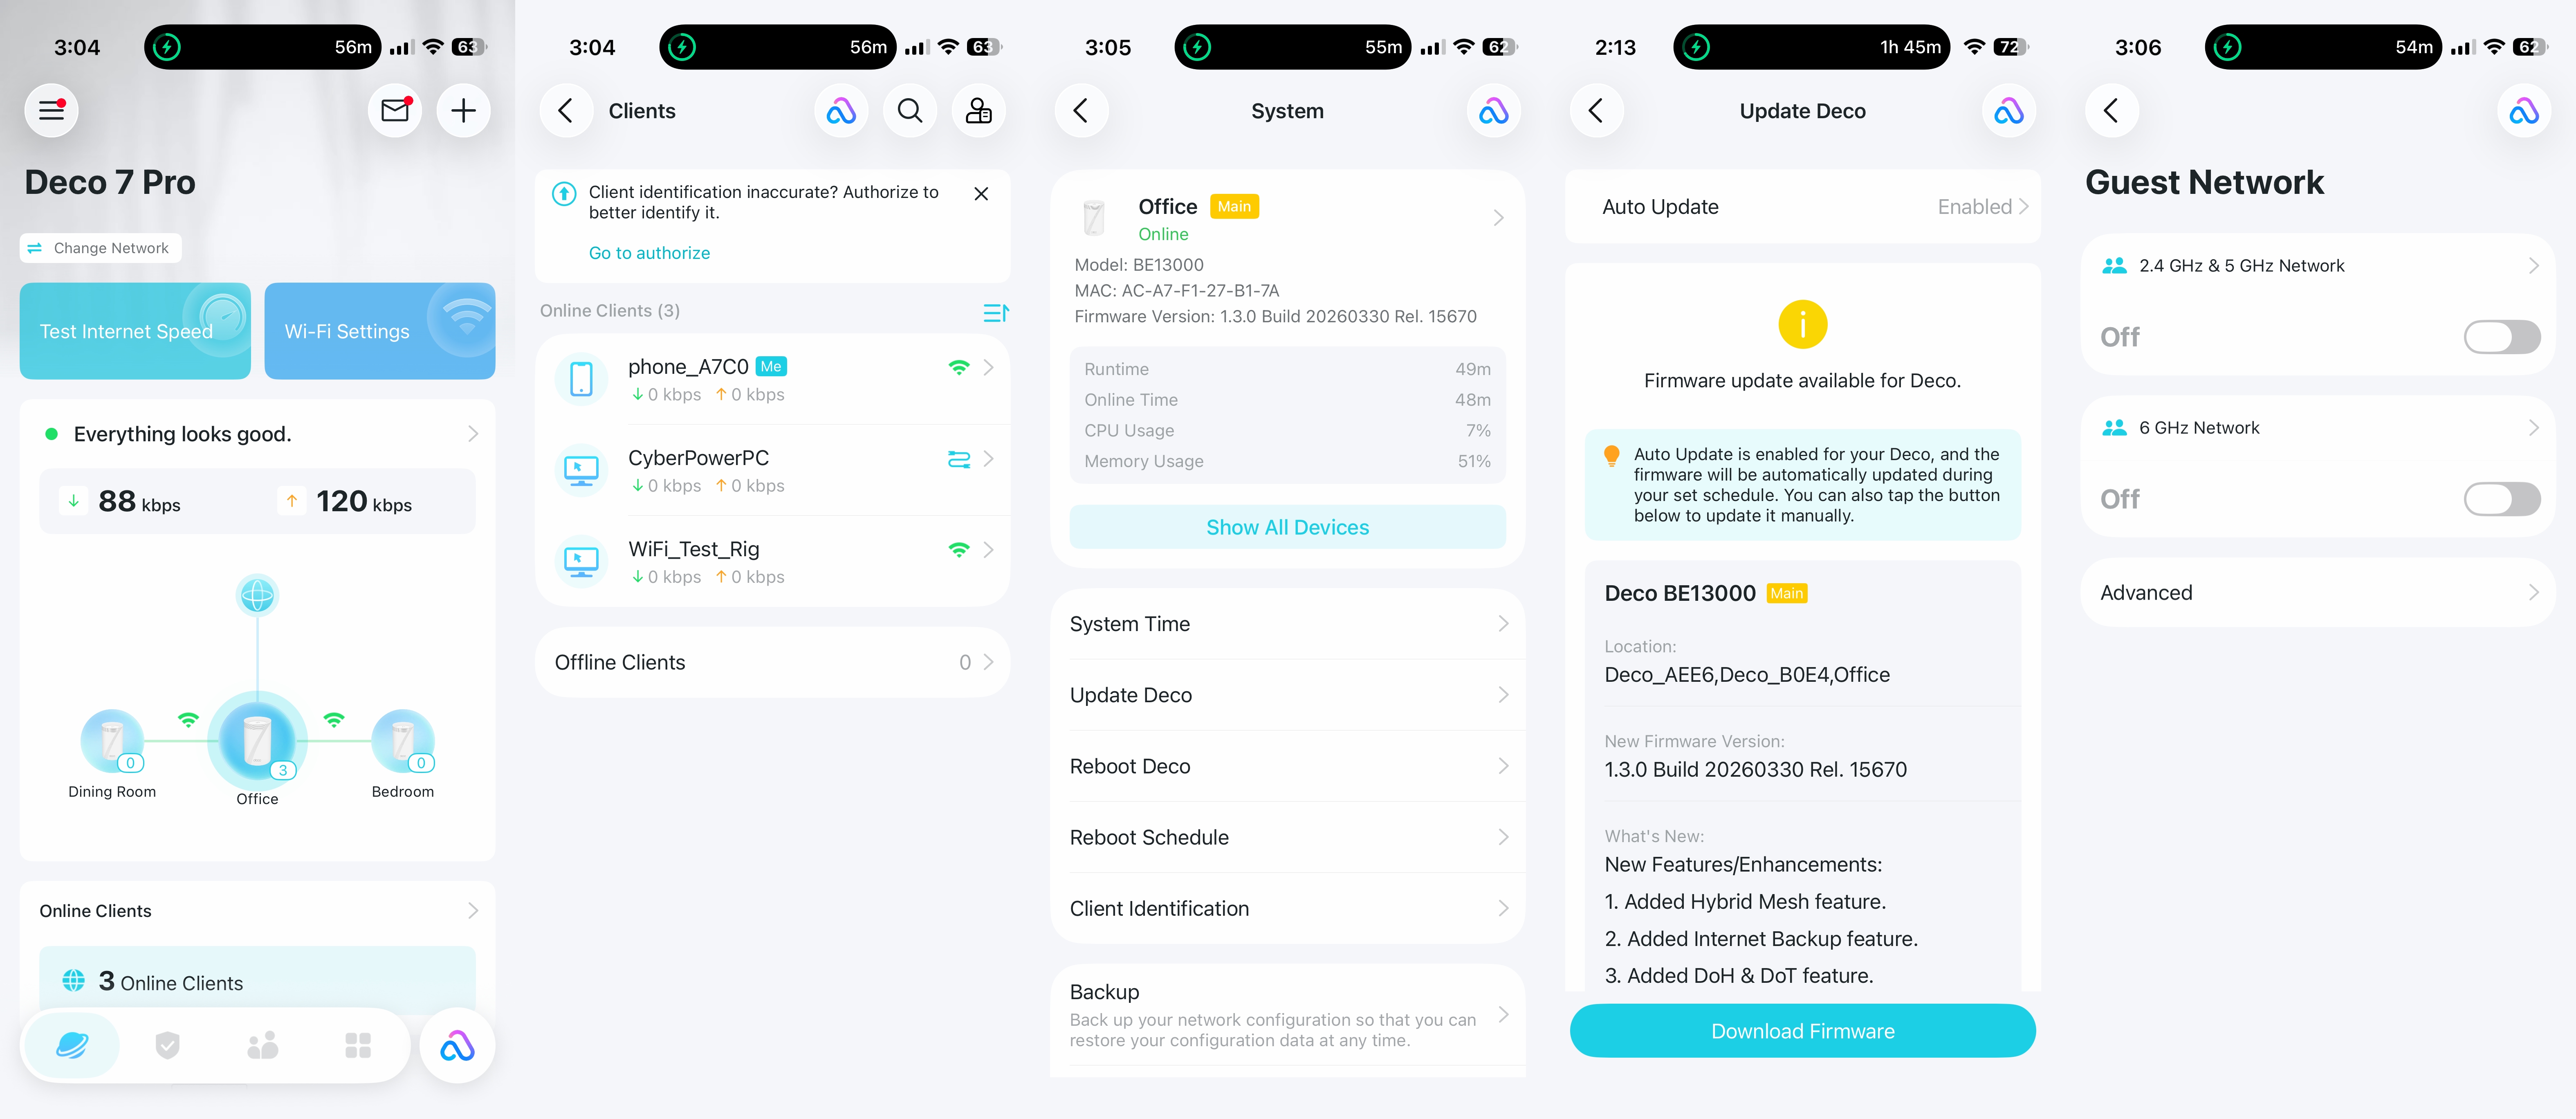
For simplicity, I created a single network, using Deco 7 Pro as the SSID. This single SSID encompasses 2.4 GHz, 5 GHz, and 6 GHz bands. You can also enable MLO, Guest, and IoT networks with further granular controls for the bands that you want to make available. For example, you can limit the Guest network to just 2.4 GHz and 5 GHz traffic (or, only one of the two) at any time. If you want to give guests access to the 6 GHz band, you can do that as well.

After completing the setup (which took under 5 minutes), the network was fully operational. I then went into the advanced settings to check for any firmware updates. One was available, so I downloaded it and installed it across the three wireless nodes.

TP-Link Deco 7 Pro BE13000 Software

TP-Link’s Deco and Tether apps continue to be among the best thought-out and well-rounded apps for wireless routers. And that’s a good thing, because the Deco 7 Pro BE13000 cannot be configured using a traditional desktop web browser – it’s exclusively controlled via the app.

The router homepage provides relevant at-a-glance information about your network. Front and center are your main router and its two satellite nodes. The diagram also shows how the satellites are connected to the main router, which, in this case, is via a 5 GHz/6GHz wireless backhaul. Current upload/download activity is shown, along with a green status light indicating “Everything looks good.” If there were an issue with your network, there would be a red status light and an explanation of what was amiss. You can also see how many devices are actively connected to the network.

TP-Link Deco 7 Pro BE13000

(Image credit: Tom's Hardware)

The Security tab offers some basic features without requiring the paid Security+ subscription. However, these are simply quick links to features that are buried in the Advanced settings tab. For example, you can control network access on a per-device basis with Network Access Control and Device Isolation. Camera Security lets you limit internet access to your smart cameras.

Upgrading to the Security+ subscription services gives you more features, including Web Protection, Intrusion Protection, Antivirus, VPN access, and password management (among other security-related features). Security+ costs $35.99/year, while the Total Security Package is $129.99/year. As I've mentioned ad nauseam, I have to applaud Asus for providing most of the features (minus the VPN) for free with its AsusWRT platform.

TP-Link offers parental controls that let you create individual profiles for your children's devices. For $17.99/year, you can enable Advanced Parental Controls, including SafeSearch, YouTube restrictions, bedtime controls, offline control, and more. However, all of these subscriptions seem a bit much for a consumer router. We should note that the Total Security Package includes Advanced Parental Controls. The More tab opens access to the full complement of network settings, from Wi-Fi settings to WPS control, firmware updates, VPN access, and Network Optimization (for optimizing your mesh network to avoid household radio interference).

TP-Link Deco Pro 7 BE13000 Performance

Our wireless client system consists of a Windows 11 Home desktop system with an MSI Herald-BE Wi-Fi 7 adapter. Our testing server was a Windows 11 Professional desktop with a 10 GbE network card connected to the 5 GbE port on the main Deco 7 Pro BE13000 router.

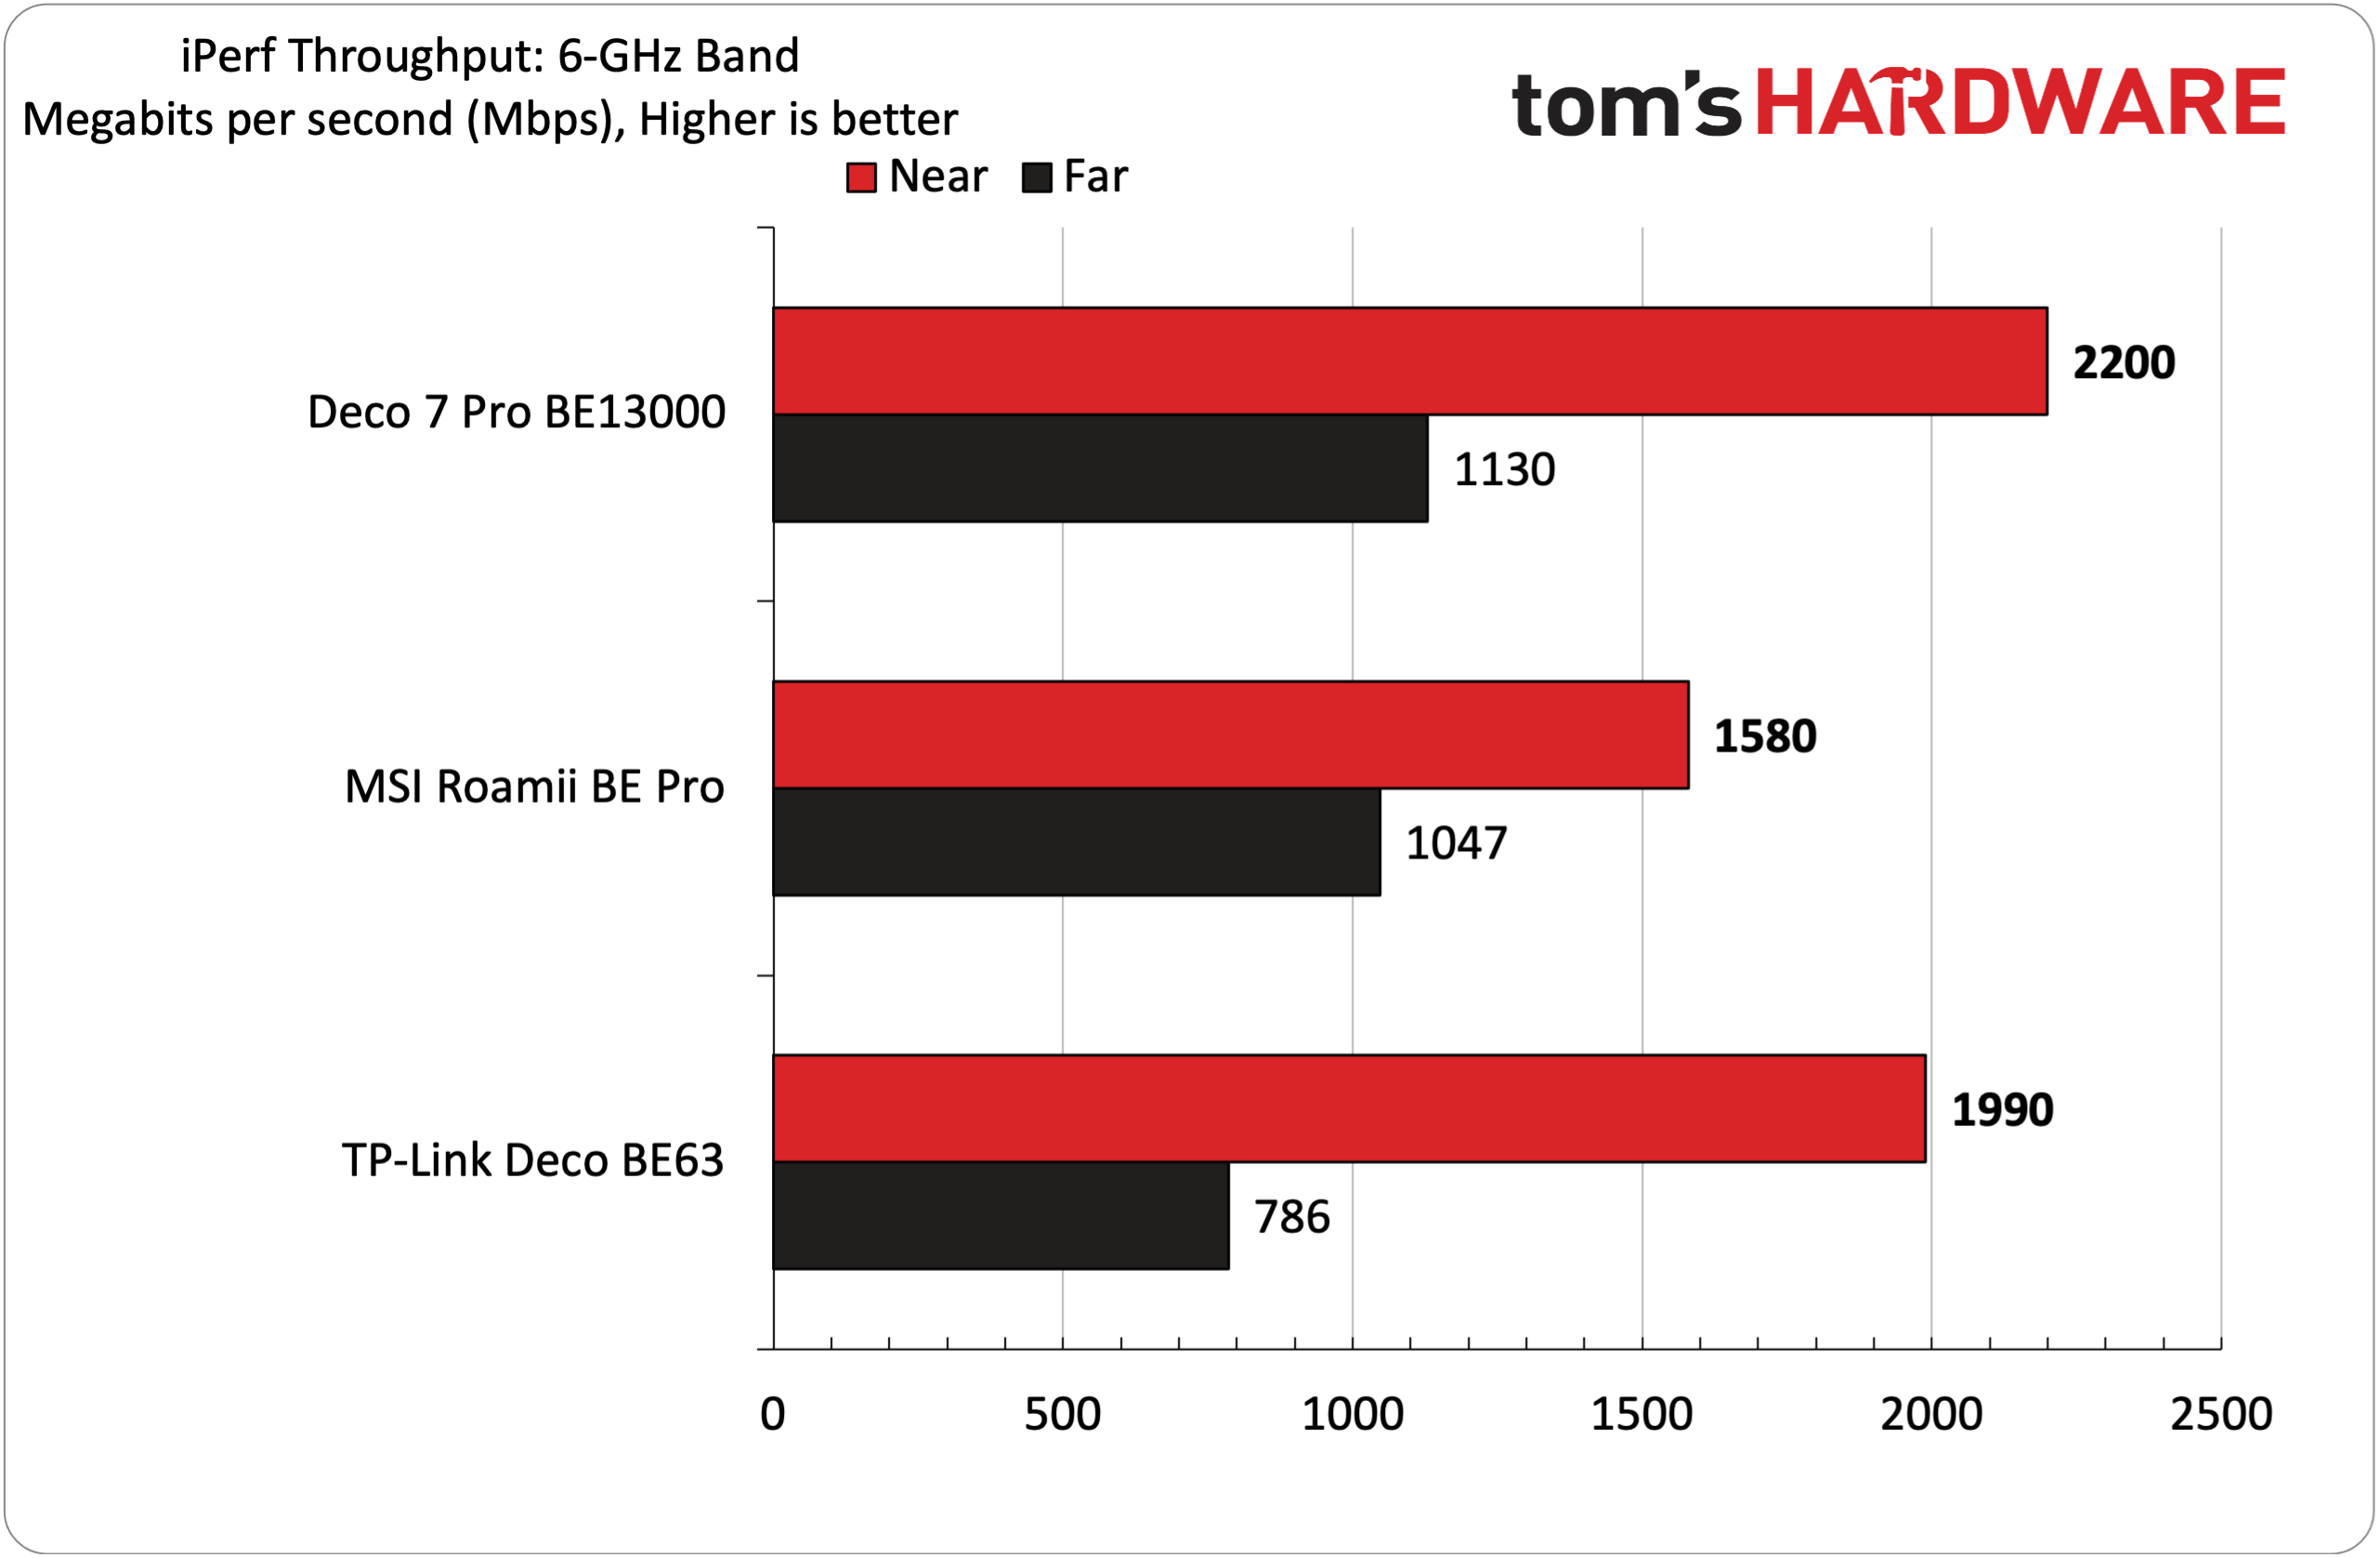
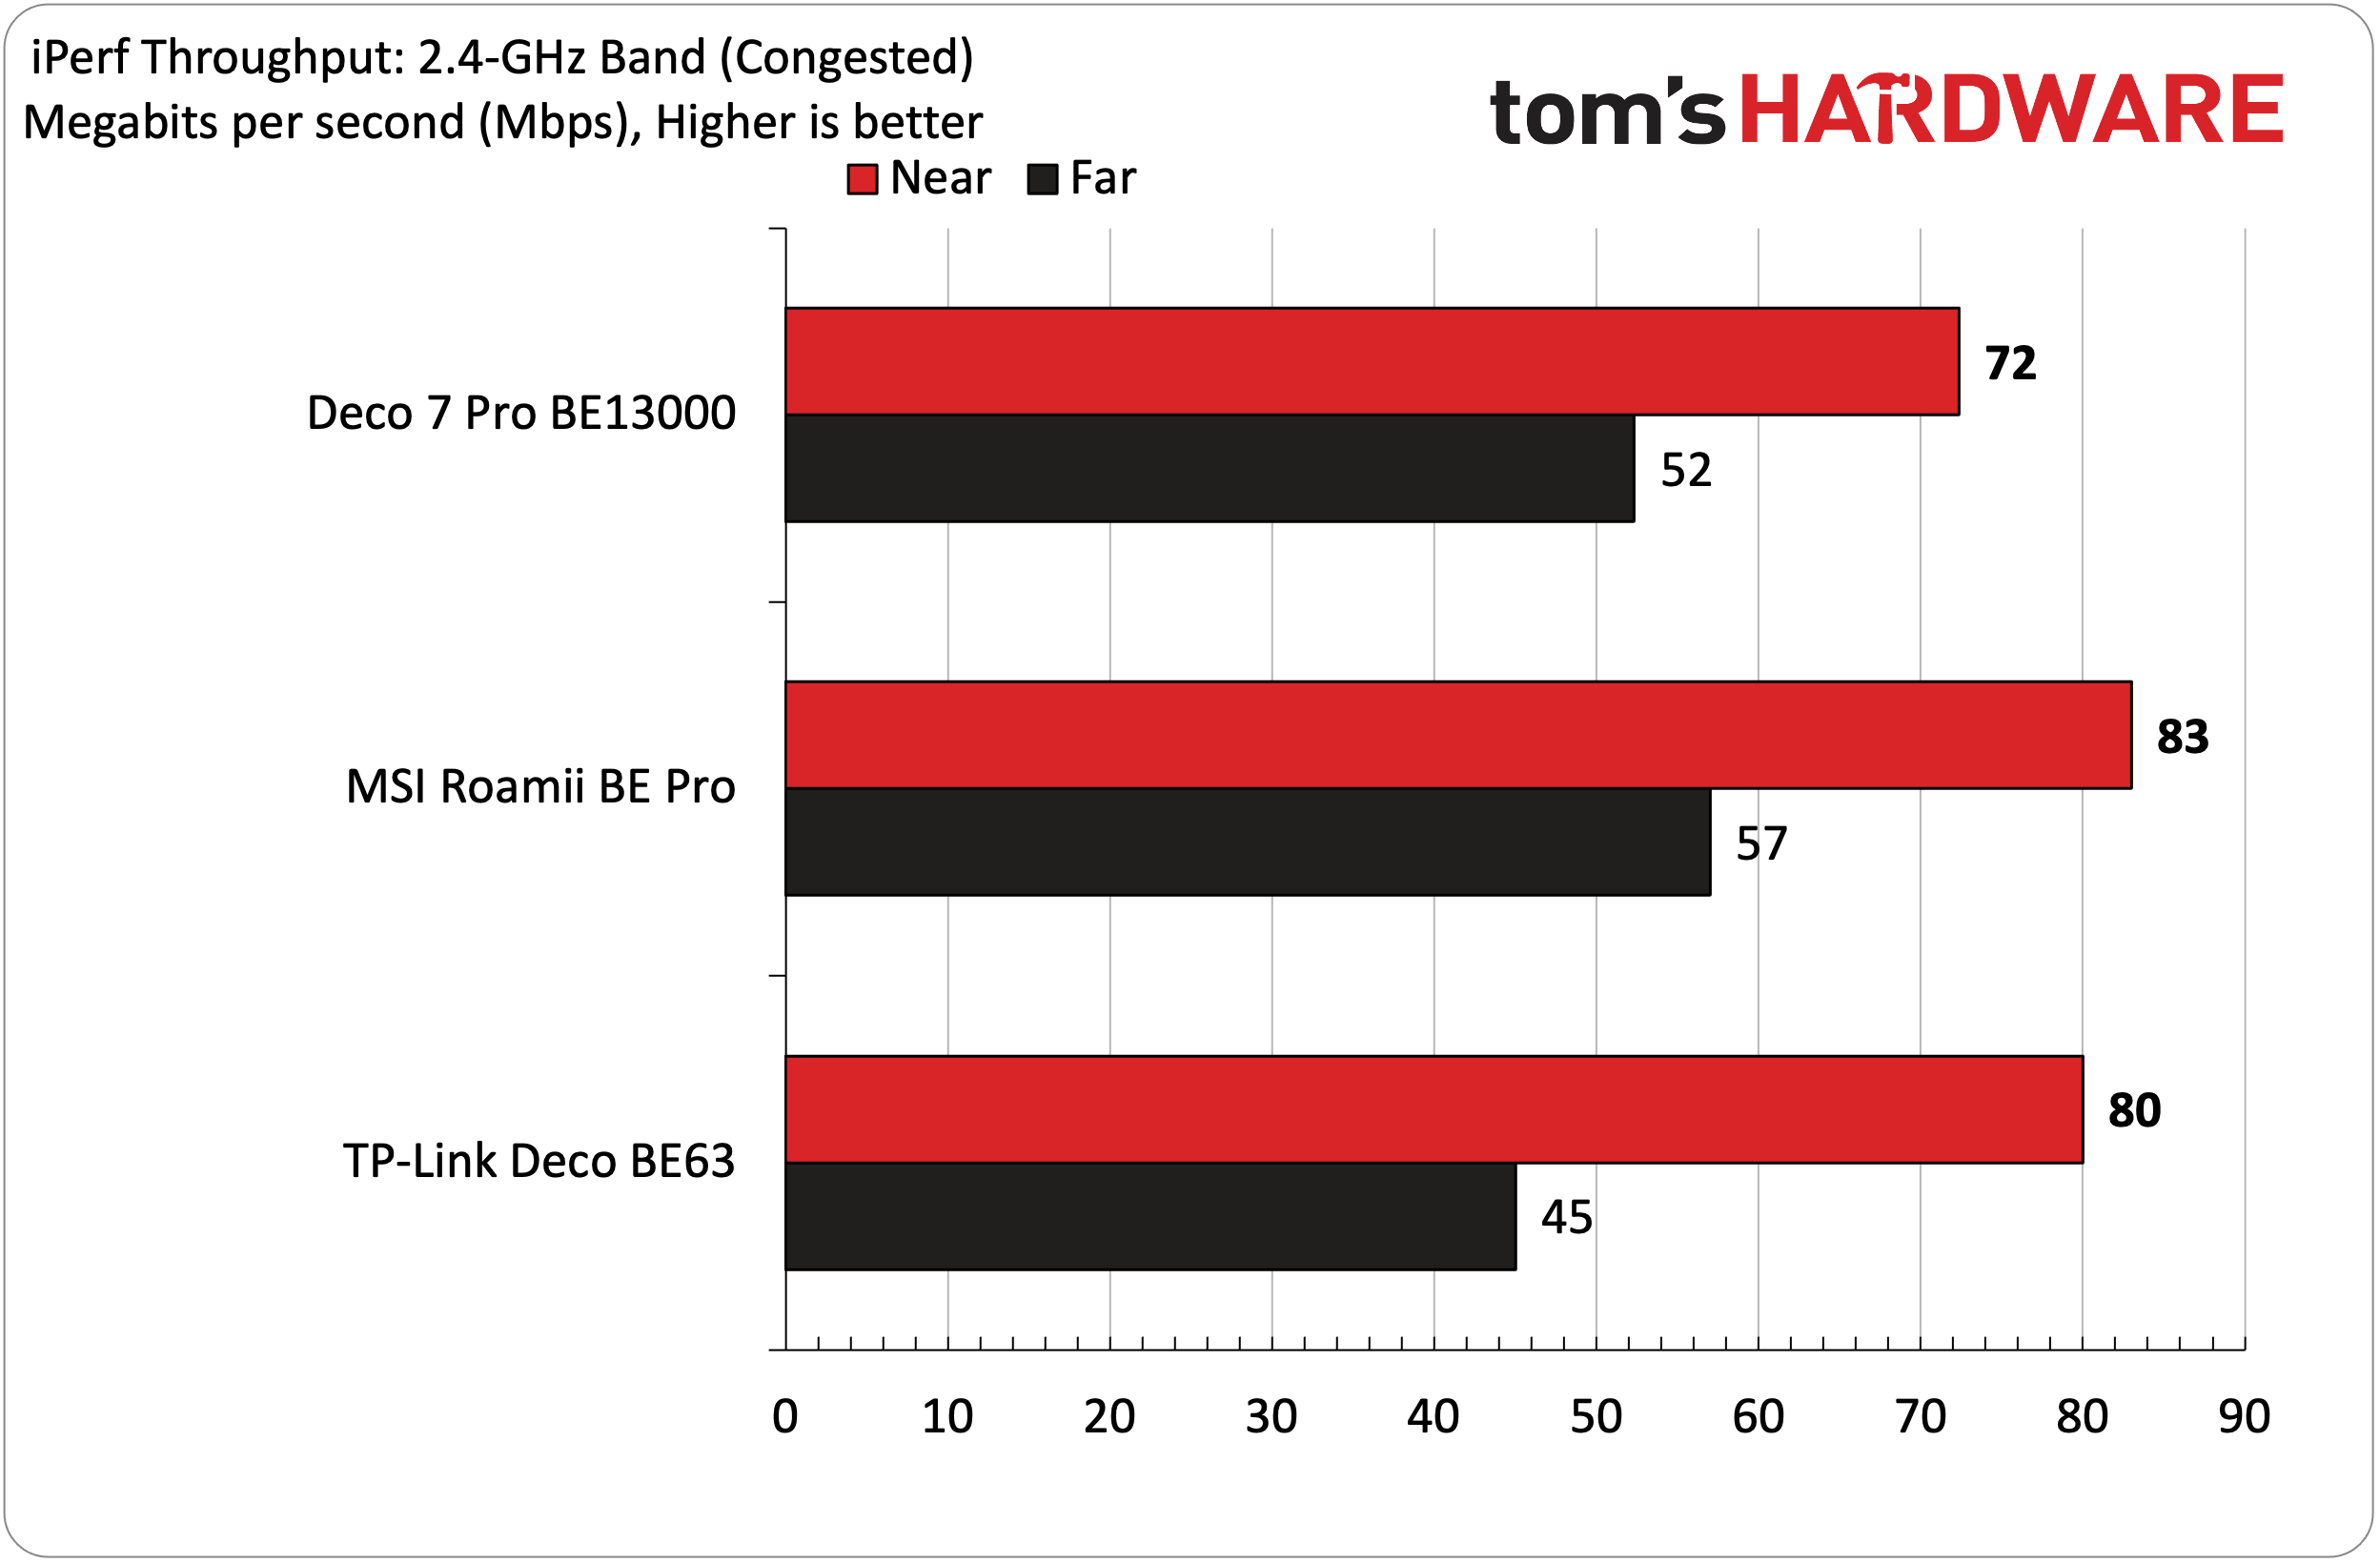
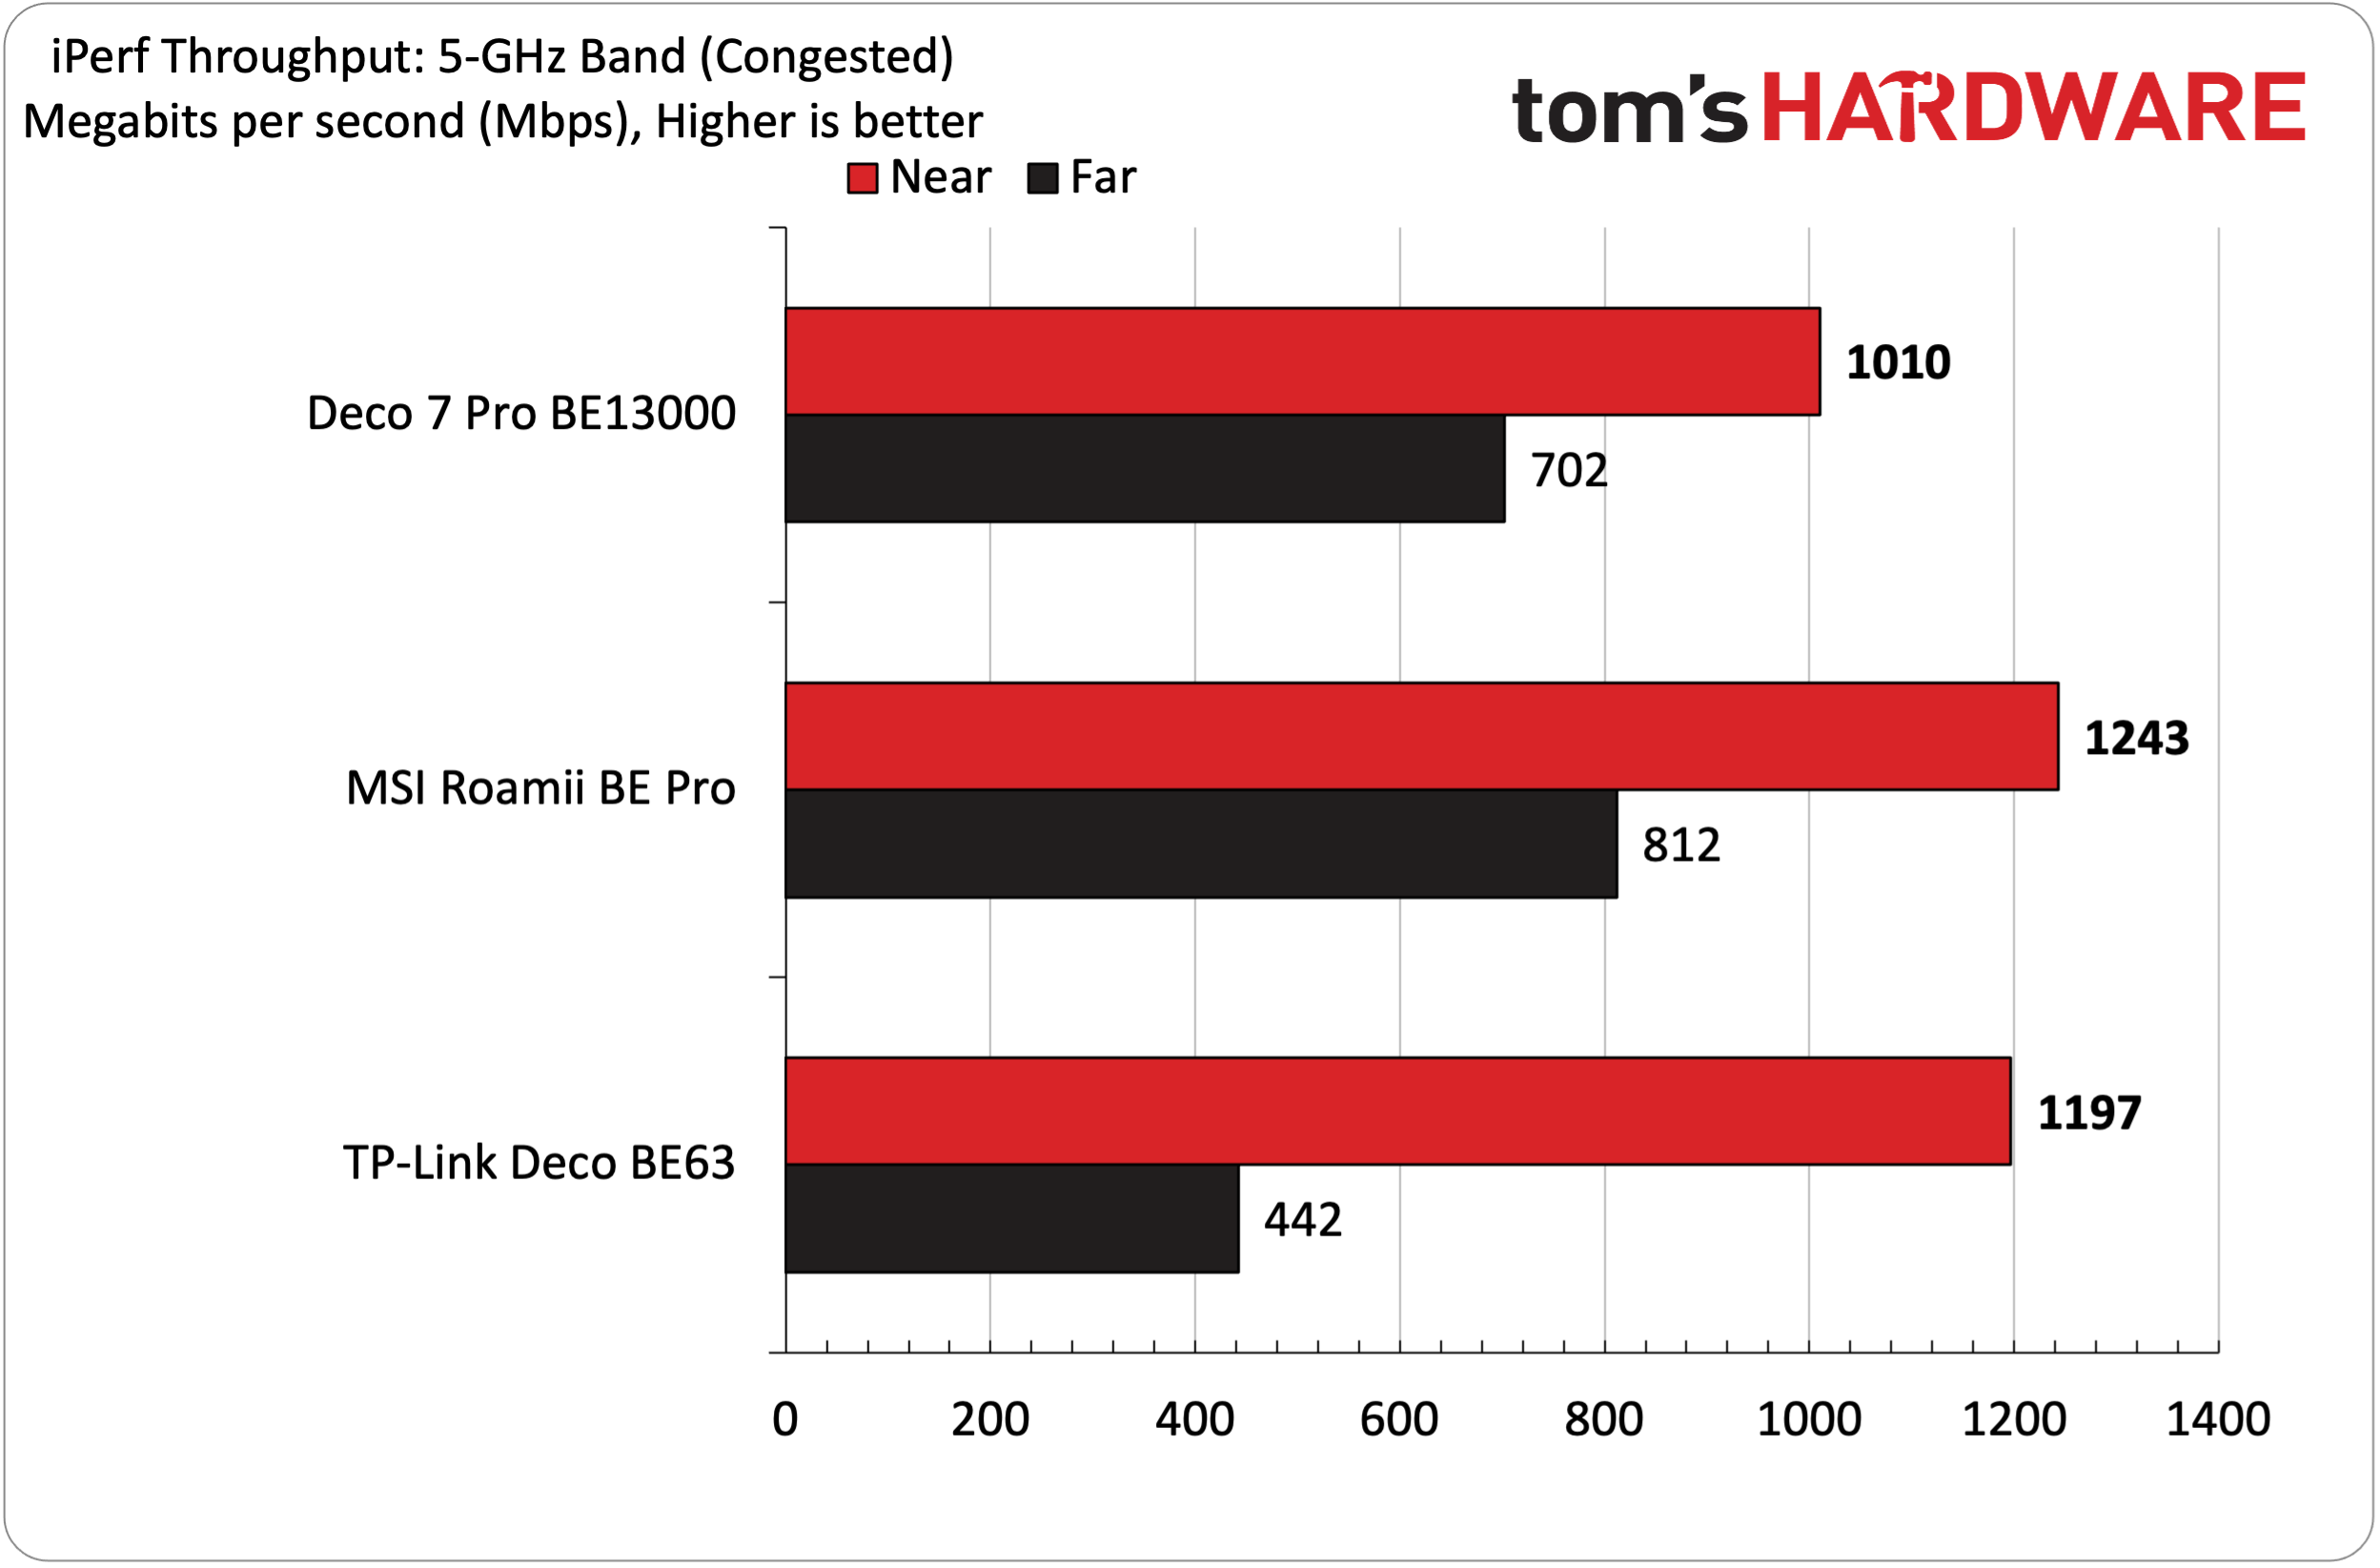
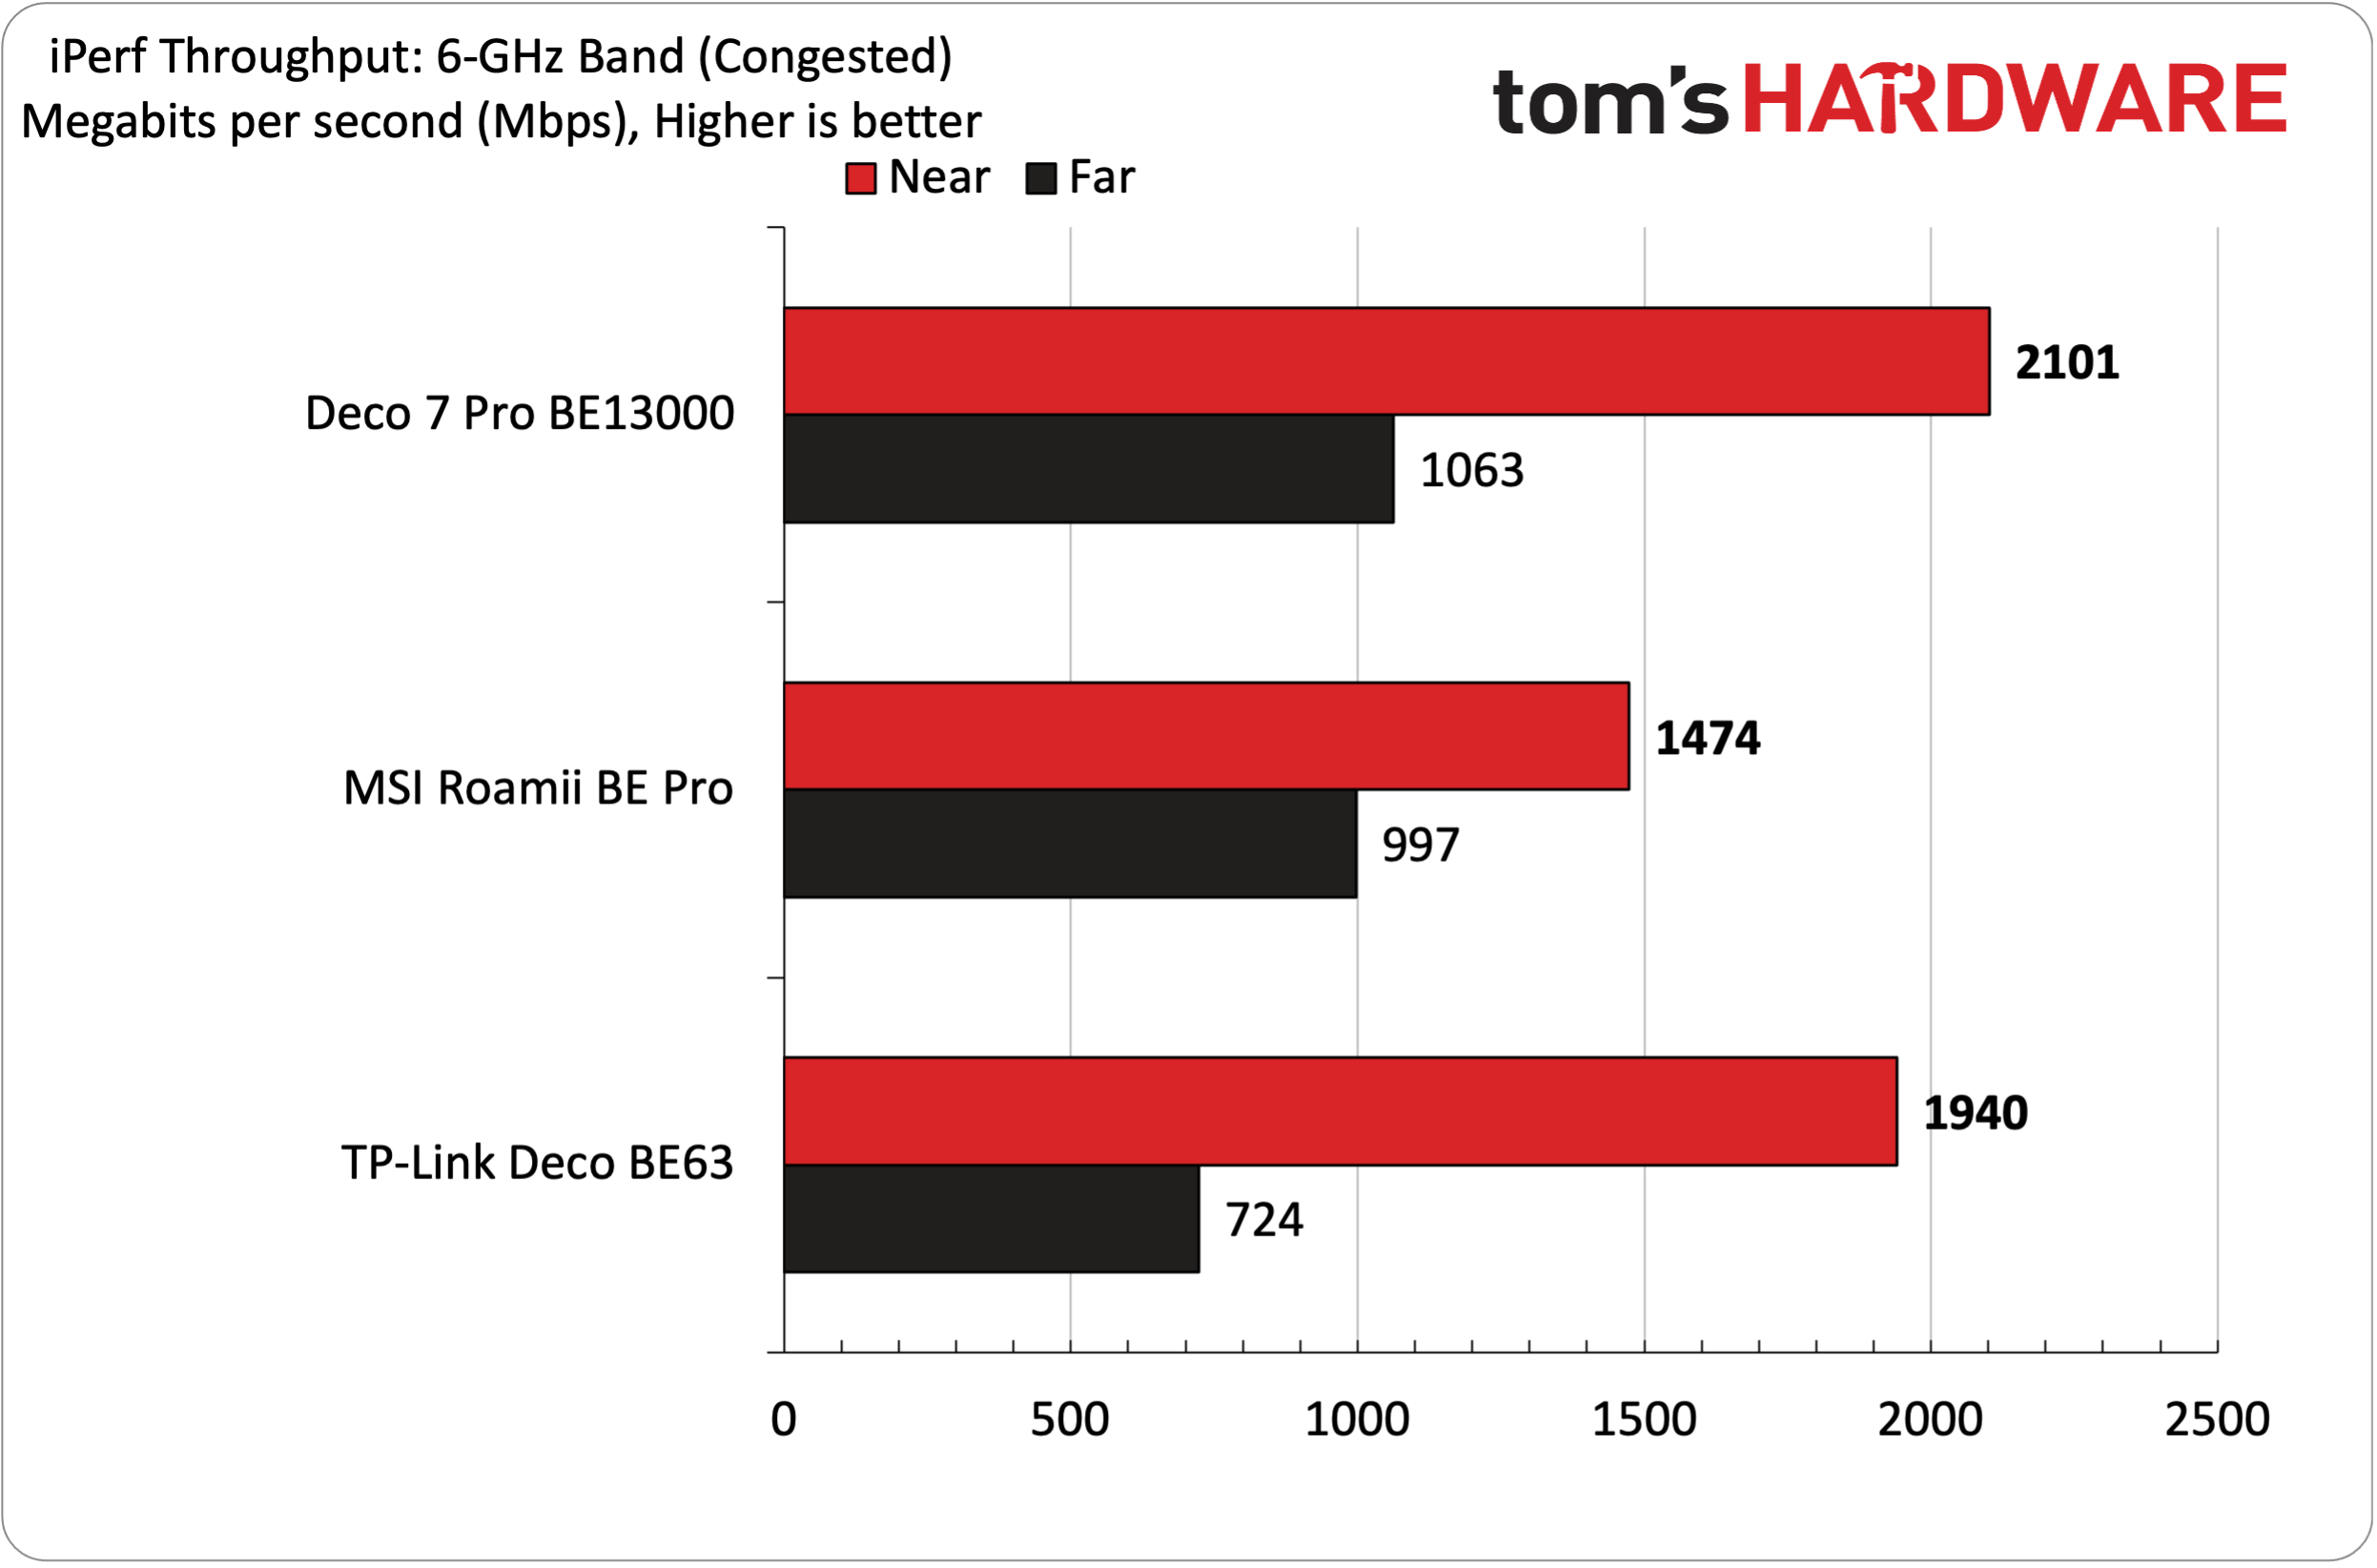
The iPerf3 tests are conducted at six feet and 25 feet (from the main router), with and without traffic across the network. In the congested traffic tests, we add six wireless clients streaming 4K YouTube videos evenly across all bands.

TP-Link Deco 7 Pro BE13000
Tom's Hardware
TP-Link Deco 7 Pro BE13000
Tom's Hardware
TP-Link Deco 7 Pro BE13000
Tom's Hardware
TP-Link Deco 7 Pro BE13000
Tom's Hardware
TP-Link Deco 7 Pro BE13000
Tom's Hardware
TP-Link Deco 7 Pro BE13000
Tom's Hardware

The Deco 7 Pro BE13000 proved to be the best performer on the 6 GHz band in both uncongested and congested testing. The router reached 2,200 Mbps at 6 feet and pulled roughly half that at 25 feet, with no additional traffic on the network. This put it comfortably ahead of the MSI Roamii BE Pro and just ahead of the Deco BE63. It was a similar situation with congested traffic, as the Deco 7 Pro BE13000 was still able to maintain over 2,100 Mbps at close range and nearly 1,100 Mbps at 25 feet.

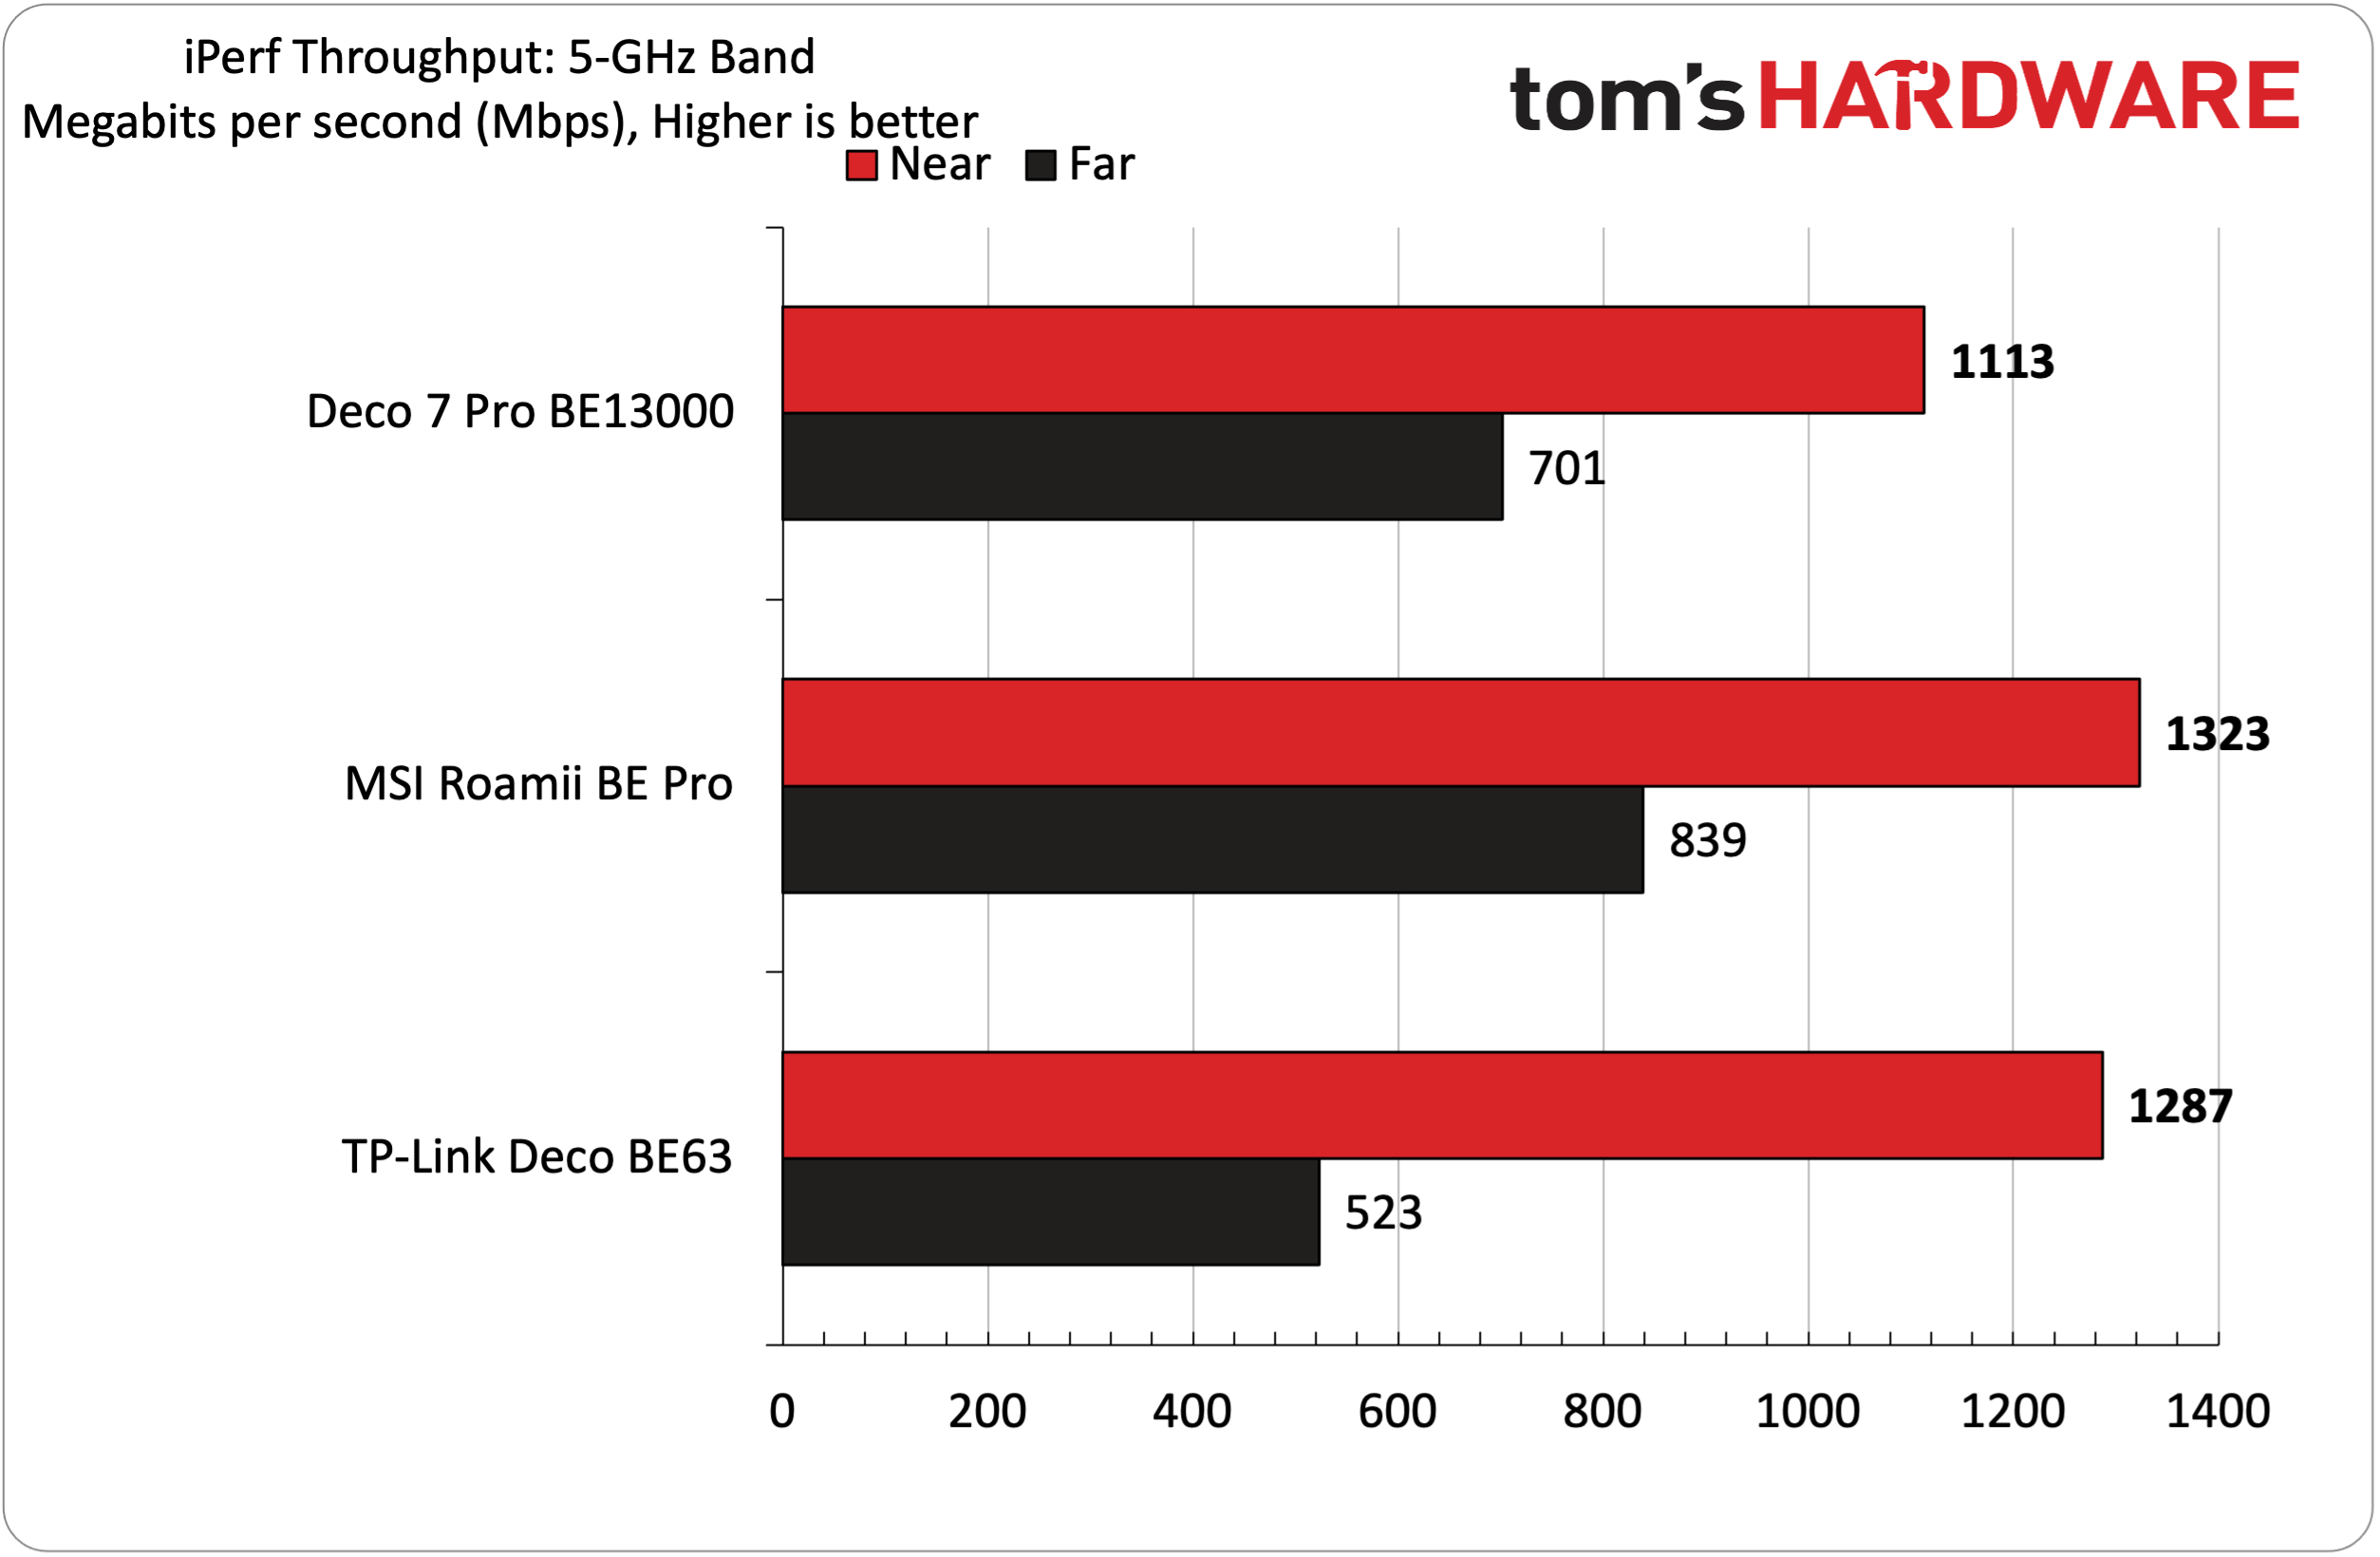
During testing on the 5 GHz band, the Deco 7 Pro BE13000 couldn't quite keep up with its two rivals. We saw 1,113 Mbps at six feet and 701 Mbps at 25 feet during the uncongested test. That put it in third place at close range and second place at long range. Those rankings held firm with congested traffic, with the Deco 7 Pro BE13000 still pulling over 1,000 Mbps at six feet.

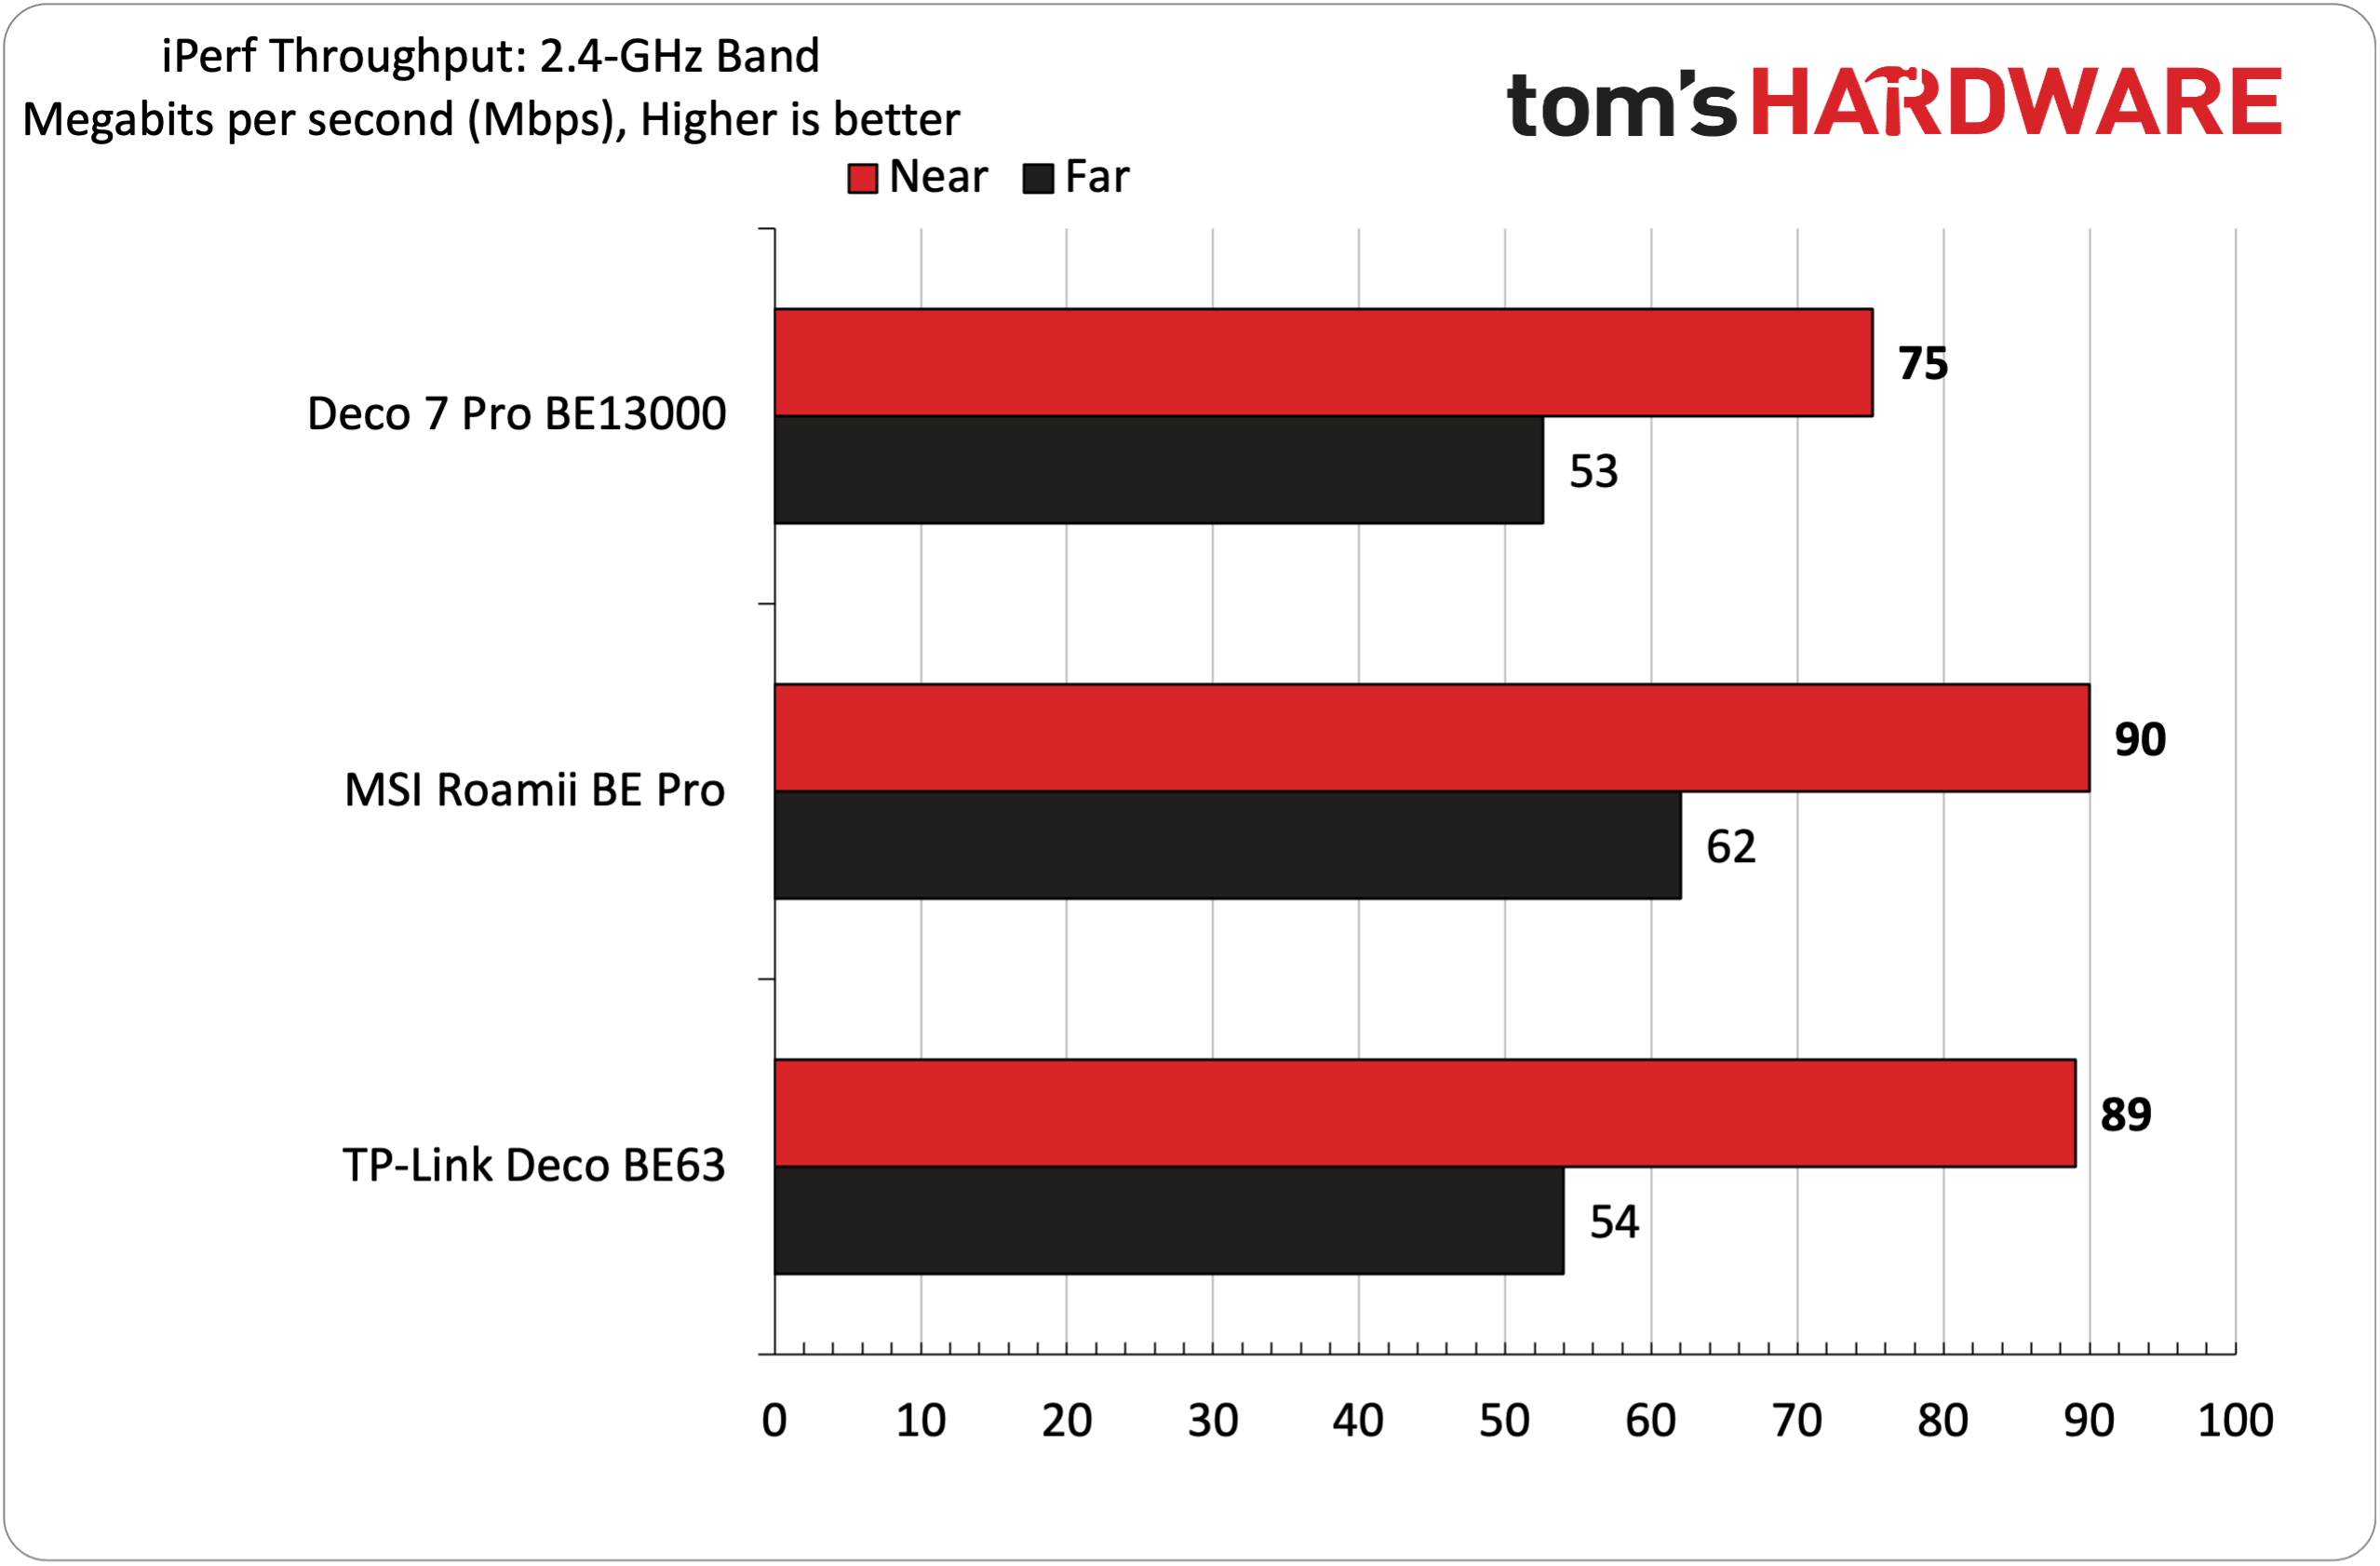
The Deco 7 Pro BE13000 once again found itself in last place during the 2.4 GHz band testing, falling roughly 15 Mbps shy of the Roamii BE Pro and Deco BE63 at close range with uncongested traffic. Things were a bit closer when we moved out to 25 feet, with the Deco 7 Pro BE13000 nearly matching its Deco BE63 sibling (53 Mbps versus 54 Mbps). With increased network traffic, the performance differential between the routers narrowed, although the Deco 7 Pro BE13000 still lagged slightly.

Bottom Line

The Deco 7 Pro BE13000 is a bit of an odd duck in the TP-Link mesh router family. While its 6 GHz performance is commendable and superior to that of the cheaper Deco BE63, it couldn’t quite reach its more affordable rivals on the 5 GHz and 2.4 GHz bands. With that said, the Deco 7 Pro BE13000 is by no means a poor performer – it just isn’t a standout across the board.

A bit more confounding is its port layout. Although it’s higher-positioned than the Deco BE63, it comes with one fewer LAN/WAN port. And while you do gain a 5 GbE LAN/WAN port, what you’re left with is a GbE LAN/WAN and a 2.5 GbE LAN/WAN. At this price point, TP-Link shouldn’t be putting GbE LAN/WAN ports on its mesh routers.

Finally, we come to the subscription services required to enable features such as web protection, intrusion protection, and antivirus. You’re looking at upwards of $129.99/year for the Total Security Package. Other router manufacturers like Asus give you those tools for free, which should definitely factor into the pricing equation for the Deco 7 Pro BE13000.

If the extra security protection isn’t appealing to you (or if the built-in tools are sufficient for your needs), the $399 price tag for three nodes is a good value, especially given the 8,100-square-foot coverage.

✇Tomshardware

Comcast turns Xfinity routers into home motion detectors — free Wi-Fi sensing feature tracks RF interference with zero extra hardware required

With the pervasiveness of Flock cameras and the public’s backlash against surveillance technology that can track their movements under seemingly lax oversight, Comcast hopes consumers will be more receptive to monitoring activities inside the home. This week, Comcast announced Xfinity Shield, which it claims offers first-of-its-kind “intelligent home protection” courtesy of your seemingly mundane Wi-Fi router.

While the best Wi-Fi routers on the market are supposed to give you higher connection speeds, extended coverage, and enough capacity to handle all of your wireless devices, Comcast is tapping into a little-used aspect of Wi-Fi signals. Called Wi-Fi Motion, it monitors the signal strength and interference between your Wi-Fi router and connected devices. By measuring these frequency signals, it can detect if someone is moving around in your house. When unauthorized activity is detected, the router can instantly send an alert to your phone.

You could achieve the same intruder detection using traditional motion sensors in your home, or even an off-the-shelf security camera, but Wi-Fi Motion doesn’t require you to purchase additional hardware to function. However, since it’s only relying on changes in frequency signals, we’d imagine that it won’t offer as much granularity in motion detection, and it could even be more prone to false positives.

This isn’t exactly new technology, as we reported on Wi-Fi routers being used to detect humans in a room over three years ago. At the time, researchers at Carnegie Mellon University used a TP-Link Archer AC1750 router to track human movement and positions in a room.

Comcast Xfinity

(Image credit: Comcast)

With that said, we must be clear that this feature is opt-in by default. You will need to use the Xfinity app to enable Wi-Fi Motion, then enable alerts to monitor for suspicious activity. The app also provides three protection modes for monitoring: Home Watch, Away Watch, and Dark Watch.

Wi-Fi Motion is just one pillar of Wi-Fi Shield, which is a subset of Xfinity Shield. The other two pillars are Xfinity CyberSecure, which provides automatic protection for devices against phishing attacks and malware, and Family Settings, which allows you to manage screen time for individual devices. Wi-Fi Shield is available free of charge to Comcast customers with Advanced Xfinity Gateways. If you want additional protection, Comcast offers Shield Select for $15/month. Shield Select includes an indoor camera, a window/door sensor, cloud storage for captured video footage, and 24/7 emergency response support.

✇Tomshardware

ViewSonic VG1457 dual-screen portable monitor review: compact size and weight, but lackluster color

Five years ago, there was very little variety in the types of portable monitors available for consumers. You had a few options from well-known desktop monitor brands, and that was about it. However, in the past few years, we’ve seen a large uptick not only in form factors for portable monitors, but also in the adoption of leading panel technologies like OLED.

ViewSonic is a well-known player among the best portable monitors, and we’ve reviewed several of its entries. The latest to grace our lab is the VG1457. This is a dual-display monitor that is quite different from the typical competitors in this space. Rather than having the two displays flank a laptop’s built-in screen with a “spine” connecting them, the VG1457 features two panels stacked on top of each other, joined by a 360-degree hinge.

Due to this design, the VG1457 can be used in several types of orientations across multiple screen modes. And with a sub-$350 price tag, it represents a relative bargain for mobile warriors.

Design of the ViewSonic VG1457

The VG1457 features a remarkable design, incorporating two display panels in a relatively light and compact form factor. Since ViewSonic doesn’t have a thick and heavy frame that needs to support two outstretched panels, the VG1457 only weighs 2.6 pounds (about double that of a portable monitor with a single display). And when folded, it has roughly the same footprint as a single-panel portable monitor (albeit thicker).

Each panel measures 14 inches across and features 1200p resolution. In its default landscape orientation, the VG1457’s panels are stacked on top of each other, with two 360-degree hinges connecting them. However, if you prefer, you can stand the panels up so that they are in portrait mode, with the two panels sitting next to each other, book-style.

Viewsonic VG1457
Tom's Hardware
Viewsonic VG1457
Tom's Hardware
Viewsonic VG1457
Tom's Hardware
Viewsonic VG1457
Tom's Hardware
Viewsonic VG1457
Tom's Hardware
Viewsonic VG1457
Tom's Hardware
Viewsonic VG1457
Tom's Hardware
Viewsonic VG1457
Tom's Hardware

In either viewing mode, the twin panels are supported by an adjustable kickstand. The kickstand incorporates dual 2-watt speakers and three USB-C ports. The bottom USB-C port is used exclusively to power the monitor, while the other three USB-C ports can handle power and video, including two-way power delivery up to 65 watts. I was able to power the VG1457 using a single USB-C cable connection to an HP OmniBook X laptop.

ViewSonic includes two USB-C cables and a 65-watt USB-C wall adapter in the box. A felt carrying case is also included, which is sufficient for protecting the VG1457 while traveling. It’s not substantial enough to protect the displays from damage if you drop it, but it should prevent more superficial damage to the displays.

ViewSonic VG1457 Specifications

Panel Type / Backlight

IPS

Screen Size / Aspect Ratio

14 inches / 16:10 x2

Max Resolution & Refresh Rate

1920 x 1200 @ 60Hz

Typical Brightness

250 nits

Contrast Ratio Typical

800:1

Ports

3x USB-C

Speakers

2x 2-watts

Weight

2.6 pounds

Warranty

3 years

ViewSonic VG1457 Operating Modes and OSD

The 360-degree hinge design allows the VG1457 to be used in various orientations. The most popular will likely be landscape mode, with the panels stacked. Portrait mode has the two panels side by side, which would be beneficial for editing two Word documents simultaneously, for example.

There’s also a “tent” mode, which would allow you to have one display facing you, and the second facing away from you (i.e., for someone sitting on the opposite side of the table from you). The VG1457 can automatically rotate the screens to the correct visual orientation using the Auto Pivot feature.

In addition to these orientations, there are also several operating modes. Mirror Mode will simply duplicate what’s on your laptop’s screen to both of the VG1457’s displays. Extend will allow you to have a separate image across each display (laptop and both VG1457 displays). Full Screen mode will display one source/image across both of the VG1457’s displays. Finally, dual source mode allows each of the VG1457’s panels to take input from a separate source. For example, one panel could use a laptop as a source, while the second panel could use a tablet as a source.

Viewsonic VG1457

(Image credit: Tom's Hardware)

As for the OSD, it’s controlled by four circular buttons on the right side of the kickstand. It took a little while to get used to, as once a button is pressed, you have to pay attention to the position of the on-screen menus and what button they correspond to. I had to do some mental gymnastics to navigate the interface somewhat smoothly.

The Display Settings menu allows you to choose between Mirror, Extend, Full Screen, and Dual Source modes. The only other configurable options are under the Color Adjust Menu, where you can only adjust Contrast and Brightness. When you’re not in the OSD, you can use the buttons to individually control brightness and speaker volume.

Display Performance on the ViewSonic VG1457

The VG1457 uses twin 14-inch 1200p IPS panels with a standard 60 Hz refresh rate. Both panels are covered with an anti-glare finish to reduce distracting reflections.

ViewSonic says that the panels are rated for up to 300 nits maximum brightness, but that wasn't the case with our review unit. Instead, we saw just 201 nits, ranking it in fourth place of five dual-screen portable monitors that we've recently tested. Only the KYY X90D was dimmer at 181.4 nits at full power.

Viewsonic VG1457

(Image credit: Tom's Hardware)

Color performance was also not up to par compared to its peers; we measured just 44.8 percent coverage of DCI-P3 and 63.2 percent of sRGB. Both figures put it at the back of the pack, and by a large margin.

It's one thing to be able to boast (or not boast) about color performance with instrumented tests, but how does the VG1457 look in real-world applications? For my needs, I spend a lot of time in Word, Excel, Microsoft Edge, and Pixelmator Pro. And for those use cases, it was "fine." Colors weren't particularly vibrant, and I wished that the brightness of the VG1457's panels at least matched the brightness of the native 14-inch display on the OmniBook X that I was using as a test system.

Watching movies was also just an "OK" experience, with muted colors and lots of grey undertones when watching dark scenes.

The VG1457 also includes a pair of 2-watt speakers, which sounded OK. They're serviceable for handling your Google Meet or Zoom calls, or listening to some music in the background while you work. However, they are by no means high-quality speakers that will blow your socks off.

Bottom Line

The ViewSonic VG1457 has a lot of positive qualities that I appreciated. Its relatively compact and lightweight frame (for a dual-screen monitor) is a boon for travel. Many dual-screen monitors are “portable” in name only, and would be a chore to carry around; however, I was able to slip the VG1457 into my laptop backpack with ease. I also like that there are three USB-C ports supporting 65-watt power passthrough to your computer or other peripherals.

On the other hand, color performance and brightness were lackluster compared to the competition. You won’t be happy if you’re looking to use the VG1457 for watching videos or photo editing. Still, for more basic productivity tasks or presenting (which is its primary mission anyway), it’s more than adequate.

✇Tomshardware

JSAUX FlipGo Horizon Pro dual-screen portable monitor review: Jack of all trades, master of some

While the overall portable monitor market has exploded over the past few years, one sub-segment that has seen increasing attention is the dual-panel market. We’ve already reviewed entries from several players in this space, but the latest from JSAUX might be one of the most versatile that we’ve seen so far.
The JSAUX FlipGo Horizon Pro is a dual-screen portable monitor with a large footprint. Still, it’s highly configurable in how you position the display panels, and it even includes an integrated hub with multiple USB-A ports and a gigabit Ethernet port. Those features are rare among the best portable monitors, so let’s see what makes the FlipGo Horizon Pro tick.

Design of the JSAUX FlipGo Horizon Pro

A lot is going on with the design of the FlipGo Horizon Pro, and for good reason. It's trying to accomplish a lot with its various operating modes, and it employs a rather ingenious system to execute on its mission.

At the heart of the FlipGo Horizon Pro is its black aluminum frame. It consists of a wedge-shaped base, on which your laptop rests. Not only does the weight of the laptop provide an additional anchor point (and stability) for the base, but it also positions the laptop on a slight incline.

JSAUX FlipGo Horizon

(Image credit: Tom's Hardware)

On the back of the base are several ports used for connecting the monitors and expanding port availability for your laptop. You’ll find two USB-C inputs for the monitors, a USB-C for power from the included 65-watt power adapter, and a USB-C port for data and video that connects directly to your laptop. In addition, there are three USB-A ports for peripherals and a Gigabit Ethernet port for networking.

JSAUX FlipGo Horizon
Tom's Hardware
JSAUX FlipGo Horizon
Tom's Hardware

Sprouting up from the base is a horizontal bar that forms the basis for mounting the monitors. Two sliding platforms attach to the horizontal bar: one for the left monitor and one for the right monitor. The sliders allow you to accommodate both large and small laptops. In addition, each slider can fold forward or back to suit your preferred viewing angle or enable a specific operating mode.

At the end of each slider are magnets that firmly hold each monitor panel in place, whether in landscape or portrait mode. The whole platform can then be adjusted for tilt thanks to the aluminum kickstand that attaches to the horizontal bar.

JSAUX FlipGo Horizon
Tom's Hardware
JSAUX FlipGo Horizon
Tom's Hardware
JSAUX FlipGo Horizon
Tom's Hardware
JSAUX FlipGo Horizon
Tom's Hardware
JSAUX FlipGo Horizon
Tom's Hardware

Each monitor is also constructed of aluminum and has two USB-C ports (one for video, one for power) and a micro-HDMI port. You’ll also find a jog wheel for the OSD and a power/menu button on each.

The whole setup comes in dual-carrying cases. A large, foam-padded carrying case opens to reveal a second carrying case that houses the two display panels. Elsewhere inside, you’ll find the 65-watt wall adapter, multiple USB-C cables to handle video and power, two HDMI cables, a MagSafe phone mount, and multiple power plug ends for global travel.

JSAUX FlipGo Horizon Pro Specifications

Panel Type / Backlight

IPS

Screen Size / Aspect Ratio

15.6 inches / 16:9 x2

Max Resolution & Refresh Rate

1920 x 1080 @ 60Hz

Typical Brightness

300 nits

Contrast Ratio Typical

800:1

Ports

2x USB-C, 1x micro-HDMI

Speakers

None

Weight

6 pounds (stand + 2 displays)

Warranty

1 year

JSAUX FlipGo Horizon Pro OSD

Since each display is independent, each has its own on-screen display (OSD). You can access the OSD by pressing in on the jog wheel. Moving up and down with the jog wheel navigates through the OSD, while pressing in goes one level deeper until you select an option. A single press on the power button goes back one menu, while a long press turns off the monitor.

JSAUX FlipGo Horizon

(Image credit: Tom's Hardware)

Once in the OSD, there are your typical adjustable settings, including brightness, contrast, and sharpness. There’s a separate menu for color temperature, saturation, and hue. You can also switch between HDMI and USB-C connections for the monitors.

JSAUX FlipGo Horizon Pro Operating Modes

The FlipGo Horizon Pro has an extensive array of operating modes that you can use with a laptop and even a smartphone. Its namesake mode is “Horizon Mode,” which has both display panels sprouting out from either side of your laptop’s display like a big pair of ears. Each display can be presented in landscape mode, portrait mode, or any combination of the two (i.e., one landscape and one portrait or both in portrait).

Stack Mode allows you to place the two panels standalone, side-by-side, in portrait orientation or on top of each other in landscape orientation. Solo Mode is for using just a single panel, while Creative Mode uses the included magnetic attachment to mount your smartphone in place of one of the monitors.

JSAUX FlipGo Horizon
Tom's Hardware
JSAUX FlipGo Horizon
Tom's Hardware
JSAUX FlipGo Horizon
Tom's Hardware
JSAUX FlipGo Horizon
Tom's Hardware
JSAUX FlipGo Horizon
Tom's Hardware

My preferred arrangement was to use Horizon Mode, with the two display panels in portrait orientation. Creative Mode just seemed like a waste to me, because the point of purchasing a FlipGo Horizon Pro is to have the expanded real estate of two monitors, and ditching one to use a smartphone in its place just rang hollow.

I had similar reservations about Solo Mode due to the unit's weight, even with one display, which is easily twice that of a traditional single-screen portable monitor due to the heavy frame.

With that said, we have to give JSAUX credit for providing a wealth of options for customers to choose from. In the end, having options is a good thing, even if they don’t align with my specific tastes.

Display Performance on the JSAUX FlipGo Horizon Pro

Before I get into the actual numbers, let me first talk about living with the FlipGo Horizon Pro. When I’m working at my desk, I use a 49-inch DQHD OLED monitor, which gives me plenty of real estate to have multiple Google Chrome and Microsoft Edge windows open, widgets strewn about my screen, along with my photo editing software. However, when I’m on the go, my go-to system is a 13-inch MacBook Air. Needless to say, the fall-off in screen real estate is jarring, which is why I usually travel with a 15.6-inch 1200p portable monitor.

With the FlipGo Horizon Pro, I was able to add two 15.6-inch 1080p monitors to flank my 13-inch MacBook Air. The extra displays are incredibly welcome, especially when I’m performing data entry or researching topics that I’m writing about. With that said, there’s room for improvement with respect to the actual panels that JSAUX uses on the FlipGo Horizon Pro.

JSAUX FlipGo Horizon

(Image credit: Tom's Hardware)

JSAUX claims that each panel is rated for 300 nits of maximum brightness; however, our instrumented test showed just under 250 nits in its default picture mode. Even using the custom setting in User mode, we maxed out at 276 nits. Likewise, color performance was dismal at best. We recorded 79.9 percent coverage of sRGB and just 56.6 percent of DCI-P3. The numbers tell one story, but real-world performance was also rather lackluster. Photos looked lifeless, and colors (particularly reds) seemed off-kilter. In addition, the stark difference in color reproduction between my MacBook Air's native IPS panel and the two panels on the FlipGo Horizon Pro was stark. I saw similar disparities when using the FlipGo Horizon Pro with a HyperX Omen 16 gaming laptop.

With that said, my needs for a portable monitor while traveling aren't incredibly demanding. When I'm editing photos, I do so on my MacBook Air's native display, while the secondary display panels are used for spreadsheets, my word processor, and browsing websites. In other words, the relatively poor quality of the panels did not put a damper on the actual functional usefulness that they provided.

Bottom Line

JSAUX FlipGo Horizon

(Image credit: Tom's Hardware)

The JSAUX FlipGo Horizon Pro is a do-everything mobile accessory, offering two screens, a built-in hub, and multiple configuration options. It seems as though JSAUX thought of everything, providing all the necessary cables and a two-tier storage case with separate padded storage for the two display panels.

I encountered no issues while using the displays, although the cable management can get a bit overwhelming. And despite the included suitcase, because of the weight of the entire apparatus, the FlipGo Horizon Pro is more of an accessory that I’d want permanently sitting on my desk than lugging around when traveling.

With that said, the FlipGo Horizon Pro carries a price of $449.99 direct from JSAUX, although the company is currently offering a coupon that takes off $40. For comparison, the KYY X90D is $224; while it doesn’t allow the screens to pivot independently into portrait mode, it represents a huge cost saving if all you want are two additional screens. But if you want the added versatility, including features like additional USB ports and an Ethernet port, there aren’t many options superior to the FlipGo Horizon Pro in the dual-screen space.

✇Tomshardware

HyperX Omen Max 16 review: All bark and no bite

If you’re looking for the absolute best performance in a gaming laptop, then you’ll likely want to consider a desktop replacement. If you’re in the market, the HyperX Omen Max 16 makes a strong case with a 16-inch form factor and a thick chassis that accommodates some beefy hardware.

Our review unit carries a sticker price of $4,699, packs a Core Ultra 9 290HX Plus processor, and includes an RTX 5090 GPU. It also tips the scales at 6.56 pounds, making it a more suitable companion for your desk than for lugging around while traveling.

Despite its imposing dimensions and beefy hardware, the Omen Max 16 doesn’t quite pass muster in performance against its slimmer competitors among the best gaming laptops.

Design of the HyperX Omen Max 16

Solid, solid as a rock,” is the phrase that comes to mind when describing the Omen Max 16. The laptop feels like it was forged from a solid piece of granite, but in actuality, it’s aluminum. It’s also thick, measuring 1.13 inches at its thickest point (at the rear).

To my eyes, the Omen Max 16 is attractively designed with no outrageous styling gimmicks. The aluminum is coated in a matte black finish, and design flourishes (like the O16 printed vertically along the deck and the HyperX logo on the lid) are subdued and don't draw significant attention. There’s also a laser-etched grille that runs nearly the width of the chassis that sits above the keyboard.

HyperX Omen Max 16
Tom's Hardware
HyperX Omen Max 16
Tom's Hardware
HyperX Omen Max 16
Tom's Hardware

The only thing that really clues you into the gaming nature of the laptop (other than its sheer size) is the per-key RGB lighting for the keyboard, and a single LED strip on the bottom front edge of the chassis that you can configure with the Omen software.

When it comes to external ports, the Omen Max 16 has a USB-A (10 Gbps) port, two Thunderbolt 4 ports, and a 3.5 mm audio jack on the left. On the right side of the chassis, you'll find another USB-A port. The back panel of the laptop is home to an HDMI 2.1 port, a 2.5 GbE port, and a proprietary power port (a 460W GaN power adapter is included).

HyperX Omen Max 16
Tom's Hardware
HyperX Omen Max 16
Tom's Hardware
HyperX Omen Max 16
Tom's Hardware
HyperX Omen Max 16
Tom's Hardware
HyperX Omen Max 16
Tom's Hardware
HyperX Omen Max 16
Tom's Hardware
HyperX Omen Max 16
Tom's Hardware

The Omen Max 16 measures 14.04 x 10.59 x 1.03 inches and weighs 6.56 pounds. For comparison's sake, the Razer Blade 16 is 13.98 x 9.86 x 0.69 inches and weighs 4.71 pounds. The MSI Raider 16 HX comes in at 14.29 x 10.62 x 1.14 inches and weighs 5.73 pounds. The Alienware 16 Area-51 weighs 7.49 pounds and measures 14.37 x 11.41 x 1.12 inches.

HyperX Omen Max 16 Specifications

CPU

Intel Core Ultra 9 290HX Plus

Graphics

Nvidia GeForce RTX 5090 Laptop GPU (24GB GDDR7, 1,597 MHz Boost Clock, 175 W Max TGP)

Memory

32GB DDR5-6400 (2x 16GB)

Storage

2TB PCIe 5.0 NVMe M.2 SSD

Display

16-inch, 2560x1600, 240 Hz, 16:10, OLED

Networking

Wi-Fi 7, Bluetooth 5.4

Ports

2x Thunderbolt 4, 2x USB 3.2 Type-A Gen 2, 1x HDMI 2.1, 3.5 mm headphone jack, 2.5 GbE

Camera

1080p IR webcam

Battery

83 Whr

Power Adapter

460 W

Operating System

Windows 11 Home

Dimensions (WxDxH)

14.04 x 10.59 x 1.03 inches

Weight

6.56 pounds

Price (as configured)

$4,699.99

Gaming and Graphics on the HyperX Omen Max 16

The Omen Max 16 is equipped with an Intel Core Ultra 9 290HX Plus processor, 32GB of RAM, and an RTX 5090 GPU (175W TGP). Given these specs and a sizable chassis to aid cooling (300W total system power), I was expecting strong numbers from the Omen 16 Max. Instead, the laptop was relegated to the back of the pack, except for one game benchmark: Far Cry 6.

My game of choice these days is Battlefield 6, running at native resolution in Overkill detail mode, with DLSS Quality and frame generation enabled. Using these settings, I was able to average between 100 and 110 frames per second.

For the competitive set, we have the Blade 16 (Core Ultra 9 386H at 25W, RTX 5090 at 175W TGP), MSI Raider 16 Max HX (Core Ultra 9 290HX Plus at 55W, RTX 5090 at 175W TGP), and the Alienware 16 Area-51 (Core Ultra 9 290HX Plus at 55W, RTX 5080 at 175W TGP). It should be noted that the Omen Max 16 uses slower DDR5-6400, whereas systems like the Blade 16 use faster LPDDR5X-9600.

HyperX Omen Max 16
Tom's Hardware
HyperX Omen Max 16
Tom's Hardware
HyperX Omen Max 16
Tom's Hardware
HyperX Omen Max 16
Tom's Hardware
HyperX Omen Max 16
Tom's Hardware

We started our benchmarking spree with Shadow of the Tomb Raider (Highest setting), and here the Omen Max 16 achieved 171 FPS at 1080p, putting it in last place behind the Razer Blade 16 (182 FPS). At 1600p, it landed in a comfortable third place (114 FPS) behind the Alienware 16 Area-51.

Cyberpunk 2077 (Ray Tracing Ultra settings) wasn't a strong showing for the Omen Max 16, either. It brought up last place at 1080p (59 FPS) and 1600p (37 FPS).

Far Cry 6 (Ultra settings) was the lone bright spot for the Omen Max 16, as it garnered 144 FPS at 1080p and 125 FPS at 1600p, easily putting it in first place. Both of these results far outpaced the rest of the field, with the next closest competitor being the MSI Raider 16 Max HX at 119 FPS and 114 FPS, respectively.

Moving to the Red Dead Redemption 2 (Medium settings) benchmark, the Omen Max 16 again wound up in last place, hitting 93 FPS at 1080p and 65 FPS at 1600p. However, in this instance, the margin between the Omen Max 16 and The Blade 16 at 1080p was just 1 FPS.

The Omen Max 16 again had trouble during the Borderlands 3 (Badass settings) benchmark, falling well off the pace set by its three competitors. The laptop hit 146 FPS at 1080p, nearly 20 FPS off the pace of the third-place Alienware 16 Area-51. At 1600p, it mustered just 113 FPS.

Metro Exodus is our go-to benchmark for laptop stress testing. Our review unit averaged 141.62 FPS at 1080p across 15 loops using the RTX benchmark preset. The CPU performance cores averaged 4.91 GHz, and the efficiency cores averaged 3.95 GHz. The RTX 5090 GPU ran at 1.81 GHz.

Productivity Performance on HyperX Omen Max 16

With its Core Ultra 9 290HX Plus processor, 32GB of RAM, and 2TB PCIe 5.0 SSD, the Omen Max 16 fared better in the productivity tests than it did with gaming.

On Geekbench 6, the Omen Max 16 with the Core Ultra 9 290HX was able to muscle past the Blade 16 with its Core Ultra 9 386H on both the single-core (3,182) and multi-core (17,989) benchmarks. However, the Alienware 16 Area-51 and Raider 16 Max HX, which use the same Core Ultra 9 290HX processor, achieved much higher multi-core numbers (each surpassed 20,000).

HyperX Omen Max 16
Tom's Hardware
HyperX Omen Max 16
Tom's Hardware
HyperX Omen Max 16
Tom's Hardware

The PCIe 5.0 SSD used in the Omen Max 16 performed quite well in our 25GB file transfer test, coming in second place at 2,439.22 MBps. The Alienware 16 Area-51 was a few ticks ahead at 2,738.90 MBps.

The soft performance of the Omen Max 16 continued with our Handbrake test, which involves transcoding a 4K video file to 1080p. Here the laptop performed the task in 2 minutes and 59 seconds. However, at least one other laptop with the same Core Ultra 9 290HX did the deed in less than two minutes.

Display on the HyperX Omen Max 16

The Omen Max 16 uses a 16-inch 2560 x 1600 OLED panel with a 240 Hz refresh rate. As is the case with most OLED displays that we test, this one had a glossy finish.

Instrumented testing on the OLED panel showed it excelling against the competition, covering 131.2 percent of the DCI-P3 color space and 185.2 percent of sRGB. Even better, the Omen Max 16 nudged past the Raider 16 Max HX to also take the crown for panel brightness (464.6 nits versus 455.6 nits).

HyperX Omen Max 16

(Image credit: Tom's Hardware)

OLED panels rarely disappoint, and I was more than impressed with the overall quality and brightness. The brightness was high enough that I was able to game while on my back porch during a partly cloudy day with minimal interference from reflections on the glossy panel.

I also viewed the first Avengers: Doomsday trailer using the display, and besides getting a tiny bit emotional while watching it, was delighted with the color reproduction, particularly in the short battle between Gambit and Shang-Chi, with flashes of purple playing cards and orange rings.

Keyboard and Touchpad on the HyperX Omen Max 16

The Omen Max 16 features a full-size RGB backlit keyboard (with per-key lighting) and NKRO anti-ghosting technology. RGB effects are customizable using HP's Omen app or directly from within Windows 11.

The keys felt quite springy when typing, and I found it incredibly comfortable to rest my fingers and click away. And while some keyboards audibly make their presence known as you type at a furious pace, the key actuation on the Omen Max 16 was whisper-quiet.

HyperX Omen Max 16

(Image credit: Tom's Hardware)

Turning my attention to the Keyhero.com typing test, I plugged away at 95 words per minute with 97% accuracy, which is definitely on the high side for me (I’m usually in the mid-80s realm).

Given the Omen Max 16 price tag of over $4,500, I was disappointed that HP didn’t go with a haptic touchpad. Instead, we get a top-hinged trackpad that is just OK. It gets the job done, but for this much money, I’d prefer to be able to click anywhere on the touchpad surface without hitting a dead zone. At least while gaming, you probably use a mouse or controller.

Audio on the HyperX Omen Max 16

Audio quality is another area where I think HP missed the mark. To beat a dead horse, but this is a laptop that retails for $4,699, and it only comes with stereo speakers. Would it have killed HP to add another pair of speakers in this tank of a chassis?

While the speakers had good overall volume levels, I felt the sound lacked some depth compared to similarly priced laptops with four (Raider 16 Max HX) or even six speakers (Blade 16). While I was more than happy listening to Keane’s “Fly to Me” from the album Hopes and Fears, I was disappointed in the sound while playing Battlefield 6.

When it came to gunfire, vehicle sounds, and background explosions while gaming, I wasn't impressed. I prefer throwing on a pair of the best gaming headsets, but there’s still no excuse to drop the ball at this price point.

Upgradeability of the HyperX Omen Max 16

Six screws need to be extracted to remove the bottom aluminum panel. While that was easy enough, it’s only half the battle. All of the serviceable components (save for the readily accessible battery) are underneath an extensive metal shield. That shield is held in place by roughly a dozen screws, making upgrades a bit tedious.

HyperX Omen Max 16
Tom's Hardware
HyperX Omen Max 16
Tom's Hardware
HyperX Omen Max 16
Tom's Hardware
HyperX Omen Max 16
Tom's Hardware

Once the shield is removed, you’ll find access to the M.2 slot for the Wi-Fi/Bluetooth module, two SO-DIMM slots (both of which were filled on our review unit), and an additional M.2 slot for a second SSD. Yet another metal shield covers the first M.2 SSD slot, although I didn’t go through the process of removing another dozen screws to uncover it.

Battery Life on the HyperX Omen Max 16

Despite its considerable girth, the Omen Max 16 is equipped with just an 83 WHr battery. For comparison, the thinner and lighter Blade 16 manages to squeeze in a 90 WHr battery.

HyperX Omen Max 16

(Image credit: Tom's Hardware)

The Omen Max 16 lasted 5 hours and 7 minutes on our battery test, which consists of web browsing, video streaming over Wi-Fi, and OpenGL testing with the screen brightness set at 150 nits. This was over three hours shorter than the Raider 16 Max HX, while the Blade 16 lasted over twice as long on a charge (12:46).

Heat on the HyperX Omen Max 16

During the Metro Exodus stress test, we measured the Omen Max 16's keyboard at 106 degrees Fahrenheit (F) between the G and H keys, while the touchpad was 84.9 F.

The hottest part of the laptop was near the rear center of the bottom of the chassis, which measured 114 F.

HyperX Omen Max 16
Tom's Hardware
HyperX Omen Max 16
Tom's Hardware

While running the Metro Exodus stress test, the CPU measured 87 degrees Celsius (C). Meanwhile, the RTX 5090 was cooler at 75 C.

Webcam on the HyperX Omen Max 16

Another area where it feels like HP skimped is with the webcam. Rather than going with a higher resolution unit, the Omen Max 16 features a bog-standard 1080p unit that looks about as good as one you’d find in a $1,000 entry-level gaming laptop.

The camera didn’t do particularly well with a nearby window where light was shining through, and there were a lot of noise artifacts in less-than-ideal light conditions. In addition, the camera didn’t really pick up fine details well, which is disappointing considering the price.

Software and Warranty on the HyperX Omen Max 16

Like many HP laptops, the HyperX Omen Max 16 comes loaded with additional software bloat that you can mostly ignore or simply delete. Scrolling down the list of “H” apps in the Start Menu, HP basically set up camp with no less than eight apps/shortcuts—everything from HP Documentation to HP Privacy Settings to HP TV+. In addition, you’ll find the usual third-party add-ons like McAfee and promotional links for Dropbox, Adobe, and Booking.com.

HyperX Omen Max 16
Tom's Hardware
HyperX Omen Max 16
Tom's Hardware
HyperX Omen Max 16
Tom's Hardware

The only really useful preinstalled app is the Omen Gaming Hub. It gives you control over power modes, lets you see CPU/GPU/RAM utilization, and provides plenty of configuration options for the onboard RGB lighting.

The Omen Max 16 comes with a one-year manufacturer warranty.

HyperX Omen Max 16 Configurations

Our Omen Max 16 came configured with an Intel Core Ultra 9 290HX Plus processor, 32GB of DDR5-6400 memory, a 2TB PCIe 5.0 SSD, RTX 5090 GPU, and a 16-inch 1600p 240 Hz OLED display. The MSRP on our review unit was a staggering $4,699.99.

There are also several less expensive options, with the cheapest being a $2,699 SKU with a Core Ultra 7 270HX processor, 32GB of RAM, a 1TB SSD, and an RTX 5080. For $3,099, you can swap the Core Ultra 7 270HX for an AMD Ryzen AI 9 HX 475 and double the SSD capacity to 2TB.

Bottom Line

The HyperX Omen Max 16 represents a swing and a miss. When I first saw the enormity of the chassis, I was looking forward to some impressive gaming performance given the 55W processor and 175W RTX 5090 onboard. Instead, what I was left with was a $4,699 gaming laptop that lingered in last place for most of the gaming benchmarks, and often by a large margin. Even the Razer Blade 16 with its 25W processor managed to get the upper hand in most benchmarks.

But the gaming wasn’t the only disappointment. Given the price tag, I would have expected a better-equipped machine. Where’s the haptic trackpad, and why do we only get two speakers? And on a minor annoyance angle, while I appreciate the two M.2 slots for storage and replaceable memory, why do I need to remove another dozen screws just to access those components?

In the end, the Omen Max 16 could have been so much more. Quite frankly, it would make sense to spend the extra $200 and grab a Razer Blade 16. Not only is it thinner and lighter (by two pounds), but it offers double the battery life.

✇Tomshardware

Sub-$400 Thunderbolt 5 dock roundup — Keychron and Plugable offer dual HDMI, but UGREEN takes top spot with an M.2 NVMe slot

Thunderbolt docks are an easy way to expand the number of available external ports for a laptop and have become quite popular in recent years. They are particularly beneficial with the best ultrabooks, which can sometimes be equipped with as few as just two Thunderbolt ports and no additional external ports for connectivity.

We’ve previously taken a look at some popular Thunderbolt 5 docks, with some costing as much as $650. This time around, we’re looking at some more affordable solutions, with all three of these units carrying a street price of less than $400. The UGREEN Revodok Maxidok has a street price of $389.99 after coupon, while the Plugable TBT-UDH2 and Keychron TB5D-1 are both available for around $350.

Plugable TBT-UDH2

Cost

$349.95

Front Ports

1x USB-C 10 Gbps (30W PD)

1x USB-A 10 Gbps

1x Thunderbolt 5 downstream (30W PD)

1x microSD UHS-II slot

1x SD UHS-II slot

1x audio combo jack

Back Ports

1x Thunderbolt 5 upstream (140W charging to host)

3x USB-C 5 Gbps

2x USB-A 5 Gbps

2x HDMI 2.1

1x 2.5 GbE

The Plugable TBT-UDH2 is a relatively compact Thunderbolt 5 dock that feels absolutely solid with its weighty aluminum chassis. The BT-UDH2 is designed to stand vertically (confirmed by the rubber feet at the base of the unit). However, there’s no reason why you wouldn’t be able to lay the unit on its side if you wanted to.

Thunderbolt 5 Docking Station Testing

(Image credit: Tom's Hardware)

As for actual ports, the TBT-UDH2 has two USB-C ports up front (one of which supports 30W PD), a single USB-A port, microSD and SD card slots, a 3.5 mm headphone jack, and a single downstream Thunderbolt 5 port (30W PD).

Moving to the rear of the unit, there are two more USB-A ports, three additional USB-C ports, two HDMI 2.1 ports, a 2.5 GbE port, and a Thunderbolt 5 upstream port for your laptop. And here lies my main complaint with the TBT-UDH2: it only has one downstream Thunderbolt 5 port, and it’s on the front. I would have liked to have seen at least two, with one on the front and one on the back. At this price point, having just one downstream Thunderbolt 5 port seems like a big miss.

Keychron TB5D-1

Cost

$349.99

Front Ports

1x USB-C 10 Gbps

2x USB-A 10 Gbps

1x microSD UHS-II slot

1x SD UHS-II slot

1x audio combo jack

Back Ports

1x Thunderbolt 5 upstream (140W charging to host)

2x Thunderbolt 5 downstream

2x USB-A 10 Gbps (15W PD)

2x HDMI 2.1

1x 2.5 GbE

The Keychron TB5D-1 is the other $350 Thunderbolt 5 dock assembled here today. It is similar in size to the Plugable dock, but is finished in natural aluminum. Keychron includes rubber feet on the bottom and one side of the dock, encouraging you to operate in either a vertical or horizontal orientation.

Thunderbolt 5 Docking Station Testing

(Image credit: Tom's Hardware)

You’ll find two USB-A and one USB-C port on the front, along with microSD/SD slots and a 3.5 mm headphone jack. Moving to the back, you’ll find two additional USB-A ports, two HDMI 2.1 ports, two downstream Thunderbolt 5 ports, and a Thunderbolt 5 upstream port for the host PC. For networking, there’s also a 2.5 GbE port.

UGREEN Revodok Maxidok

Thunderbolt 5 Docking Station Testing

(Image credit: Tom's Hardware)

Cost

$499.99

Front Ports

2x USB-C 10 Gbps (30W PD)

1x USB-C 10 Gbps

1x microSD UHS-II slot

1x SD UHS-II slot

1x audio combo jack

Back Ports

1x Thunderbolt 5 upstream (140W charging to host)

2x Thunderbolt 5 downstream

3x USB-A 10 Gbps

1x DisplayPort 2.1

1x 2.5 GbE

2x audio combo jack

Internal

1x M.2 NVMe PCIe 4.0 slot (supports up to 8TB)

The UGREEN Revodok Maxidok is the most expensive Thunderbolt 5 dock here, with a street price of around $390. However, you do get some added functionality for the $40 price difference. At first glance, the Revodok Maxidok looks like a Mini PC with its square-ish form factor. The aluminum body is finished in a combination of dark grey (upper half) and copper (bottom half).

Thunderbolt 5 Docking Station Testing

(Image credit: Tom's Hardware)

Unlike the other two docks, the Revodok Maxidok has an internal cooling fan mounted inside to help keep the electronics cool (Thunderbolt docks are notorious for their heat output). During normal operation, I couldn’t hear the fan running. I could only just barely hear it if I stuck my ear to the side of the docking station (which is, of course, not a typical usage scenario).

The front of the docking station houses microSD/SD slots, three USB-C ports (two of which support a total of 60W PD), and a 3.5 mm headphone jack. On the back, you'll find three USB-A ports, two more 3.5 mm audio ports, a DisplayPort 2.1 connector, two Thunderbolt 5 downstream ports, and one Thunderbolt 5 upstream port.

Thunderbolt 5 Docking Station Testing

(Image credit: Tom's Hardware)

The Revodok Maxidok also has one hidden feature. If you flip the dock over, it has a cover that's held in with one screw. Remove the screw, and you'll find an M.2 slot for adding an internal SSD (up to 8TB in capacity).

Thunderbolt 5 Dock Specs Comparison

Thunderbolt 5 Ports (Downstream)

USB-C Ports (Downstream)

Downstream USB-A Ports (Downstream)

HDMI

DisplayPort

microSD/SD slot

Ethernet

PCie 4.0 M.2 slot

UGREEN Revodok Maxidok

2

3

3

N/A

Yes

Yes

2.5 GbE

Yes

Keychron TB5D-1

2

2

4

Yes

N/A

Yes

2.5 GbE

N/A

Plugable TBT-UDH2

1

5

3

Yes

N/A

Yes

2.5 GbE

N/A

Thunderbolt 5 Dock SSD Performance Testing

We tested SSD performance of the three docks using a 1TB Micron 2500 Series PCIe 4.0 SSD (MTFDKBA1T0QGN-1BN1AABYY). The SSD is rated for sequential read speeds up to 7,100 MBps and sequential writes up to 5,800 MBps.

For baseline performance numbers, I tested the Micron 2500 using the onboard PCIe 5.0 M.2 slot on an Asus Z890 Creator WiFi motherboard. For testing with the Keychron TB5D-1 and the Plugable TBT-UDH2, I used an Orico Thunderbolt80G enclosure with the Micron 2500 – it supports up to M.2 (PCIe Gen4x4) SSDs. The enclosure was plugged into one of the Z890 Creator WiFi’s two Thunderbolt 5 ports. For the UGREEN Revodok Maxidok, I used the native M.2 PCIe 4.0 slot with the Micron 2400.

Thunderbolt 5 Docking Station Testing

(Image credit: Tom's Hardware)

Using the Micron 2500 SSD and Asus Z890 Creator WiFi motherboard as a baseline, we saw 6,674.53 MBps reads and 5,628.61 MBps writes. Of the three docks we tested with the Micron 2500, the Revodok Maxidok was the fastest with its native M.2 PCIe 4.0 slot. It achieved 5,780.54 MBps reads, roughly 300 MBps ahead of the other two.

The Keychron TB5D-1 and the Plugable TBT-UDH2 put up nearly identical numbers using the Orico Thunderbolt80G enclosure, with around 5,400 MBps reads and 4,200 MBps writes.

All three docks had no trouble maxing out the 2.5 GbE port using iPerf3, and I didn't run into any compatibility problems running my 49-inch 240 Hz DQHD monitor using the docks via HDMI or DisplayPort connections.

While all of the docks were warm to the touch, the Revodok Maxidok was noticeably cooler thanks to its internal cooling fan.

Bottom Line

Of the three docks that we tested, the one that I felt was the most versatile and worthy of a place on my desk is the UGREEN Revodok Maxidok. It’s the only one of the docks with a native DisplayPort 2.1 connector and the only one with an internal M.2 SSD slot. In addition, it offered ever so slightly faster storage performance than using an SSD with a Thunderbolt 5 enclosure. And with a street price of $390, you’re only paying a $40 premium over the other two docks.

Thunderbolt 5 Docking Station Testing

(Image credit: Tom's Hardware)

If you prefer having two additional HDMI 2.1 ports at your disposal, the Keychron TB5D-1 is a good option as well. All of the Keychron’s USB-A and USB-C ports are 10 Gbps, while the Plugable TBT-UDH2 gives you a mix of 10 Gbps and 5 Gbps USB ports. In addition, the Keychron dock features two downstream Thunderbolt 5 ports, while the Plugable only has one.

Additional Thunderbolt 5 Docks to Consider

Although we plan to keep this guide updated as we test additional Thunderbolt 5 docks, here are some additional units to consider:

✇Tomshardware

An inside tour of Lenovo’s North Carolina AI server manufacturing line expansion — Chinese firm expanding US-native production to meet exploding demand

We recently toured China-based Lenovo’s new production facilities here in the US. Lenovo is the number one player in the global PC market (by shipments), with products spanning consumer, business, and enterprise sectors. But while Lenovo is a Chinese-based company, it has a significant business presence in the United States. Its U.S. headquarters, which opened in 2005, is in Morrisville, NC, right in the heart of the Research Triangle Park. The company also opened its first PC manufacturing line, a short drive away in Whitsett, NC, shortly after.

This past Friday, Lenovo took the latest step in its efforts to expand its U.S. manufacturing presence with a symbolic ribbon-cutting for the expansion of manufacturing at its Whitsett facility. The company invested millions of dollars into the facility, doubling its footprint to 890,000 square feet. There are currently 400 line workers, with the capacity to expand that number to 1,000 in the near future.

It doesn’t take a rocket scientist to understand why Lenovo is making this investment, as it comes down to two words: artificial intelligence.

Lenovo in Whitsett

As Ashley Gorakhpurwalla, Executive VP and President for the Infrastructure Solutions Group, explained, for many of Lenovo’s customers, “AI is moving from the hype cycle now into the hero cycle.” With many of its customers looking to increase reliance on U.S.-produced hardware, an “infrastructure they can trust is going to be the catalyst for that.” So, it only made sense to tap into resources and the local community it has fostered over the past two decades

“Because behind every AI breakthrough, it's powerful, powerful infrastructure,” Gorakhpurwalla continued. “As technology becomes more advanced, I think that building high-quality infrastructure closer to our customers is becoming more important than ever.”

North Carolina might not always have been at the forefront of people’s minds when it comes to technological leadership, and it’s a question that Ben Massey, VP Supply Chain for Lenovo, has often fielded. “You know, people ask me all the time, how are you going to make that work in North Carolina?” Massey explained. “The way it's going to work is that we've got an arc from the Triangle to the Triad with thousands of engineers, thousands of manufacturing people in R&D who can work in supply chain, people who can all work together to bring this technology together with speed. Faster product development to mass production, shorter customer lead times, and greater end-to-end cost efficiency.”

Lenovo’s main U.S. R&D hub in Morrisville is just over an hour's drive away from the Whitsett facility along Interstate 40. In addition, the company can pull young talent from nearby universities like NC State, Duke, UNC-Chapel Hill, and Wake Forest, along with the state’s robust community college system.

Lenovo and its local contractors were able to take the facility from an empty warehouse to a fully functioning server production line in nine months. That included the necessary electricity capacity (up to 20 MW) from Duke Energy.

By the Numbers

I was given a full tour of the Whisett manufacturing facility (along with other members of the press, Lenovo dignitaries, and local lawmakers), from start to finish. It was an impressive operation; one that I wish I could express to you in photos. However, photos and videos were strictly forbidden due to the proprietary nature of the hardware and testing equipment, and to protect Lenovo's customers' privacy.

The kitting area, where the components like processors, memory, and storage are assembled, encompasses 26,000 square feet. There are 10 kitting lines, where workers currently assemble 200 racks per week, with the capability to double that number to 400. The 50 team members in this area process over 150,000 parts per day.

Lenovo North Carolina AI server manufacturing tour

(Image credit: Tom's Hardware)

There are currently seven assembly lines, residing in a space roughly double the size of the kitting area (53,000 square feet). Lenovo has the capacity to produce 1,400 server nodes per day across 28 assembly stations (one server is produced every 60 seconds).

At full tilt, Lenovo says that it will have 1,000 operators running three shifts. However, there are currently around 380. Employees get roughly 1,000 hours of training, and they rotate throughout different phases of the building process to hone their skills.

After touring the kitting and assembly lines, we moved into the testing areas, where L10 testing takes place. There are 10 thermally controlled testing pods, with 16 test racks per pod. The room is chilled using massive Computer Room Air Handlers (CRAH), each with 1 MW of cooling capacity.

In addition, there are 30 Vertiv Liebert XDU direct liquid cooling units (expandable to 50), each with a capacity of up to 300 kW, to aid with testing finished packages for customers. Lenovo explained that Nvidia GB300 racks consume 140 kW, while Vera Rubin will consume 230 kW at peak load. For comparison, the average U.S. household consumes between 1 and 1.5 kW per day. That's a lot of power coming from a rack measuring 18 inches across and seven feet tall. Lenovo’s first taste of Vera Rubin is said to be making its way to the Whitsett facility by the end of August.

We also toured where the massive freshwater pipes enter the building to fuel the cooling operations, along with the utility room, where the impressive overhead electrical conduits feed power into the site from a nearby substation. Working with Duke Energy, Lenovo was able to go from temporary power at the site to full power within 7 months.

Closing Thoughts

I’m not a native to this state; however, I’ve lived in central NC for 40 of my 46 years on this earth. So it was rather impressive to see the Whitsett facility taking shape roughly 20 minutes from my childhood home. However, the sense of pride was also clouded by the realities of the times that we live in. The proliferation of AI in nearly every facet of our lives is the entire impetus behind the need to expand server manufacturing capacity for the homeland. Companies like Google, Microsoft, OpenAI, and others crave the computing hardware necessary to feed AI demands, which in turn is driving a wedge between big tech and local communities. From strains on local water supplies and power grids to the acquisition of land to build new data centers, we’re at a real crossroads where local communities, local governments, and big tech companies are each looking to have a say in how our future plays out.

✇Tomshardware

Upgrading an MSI Claw 8 EX AI+ handheld gaming PC with a 2TB SSD

I recently tested the MSI Claw 8 EX AI+ handheld gaming PC, and came away incredibly impressed with its performance. Put simply, it has no rival in gaming performance, easily eclipsing all other handhelds on the market. Even better, the battery life is also stellar.
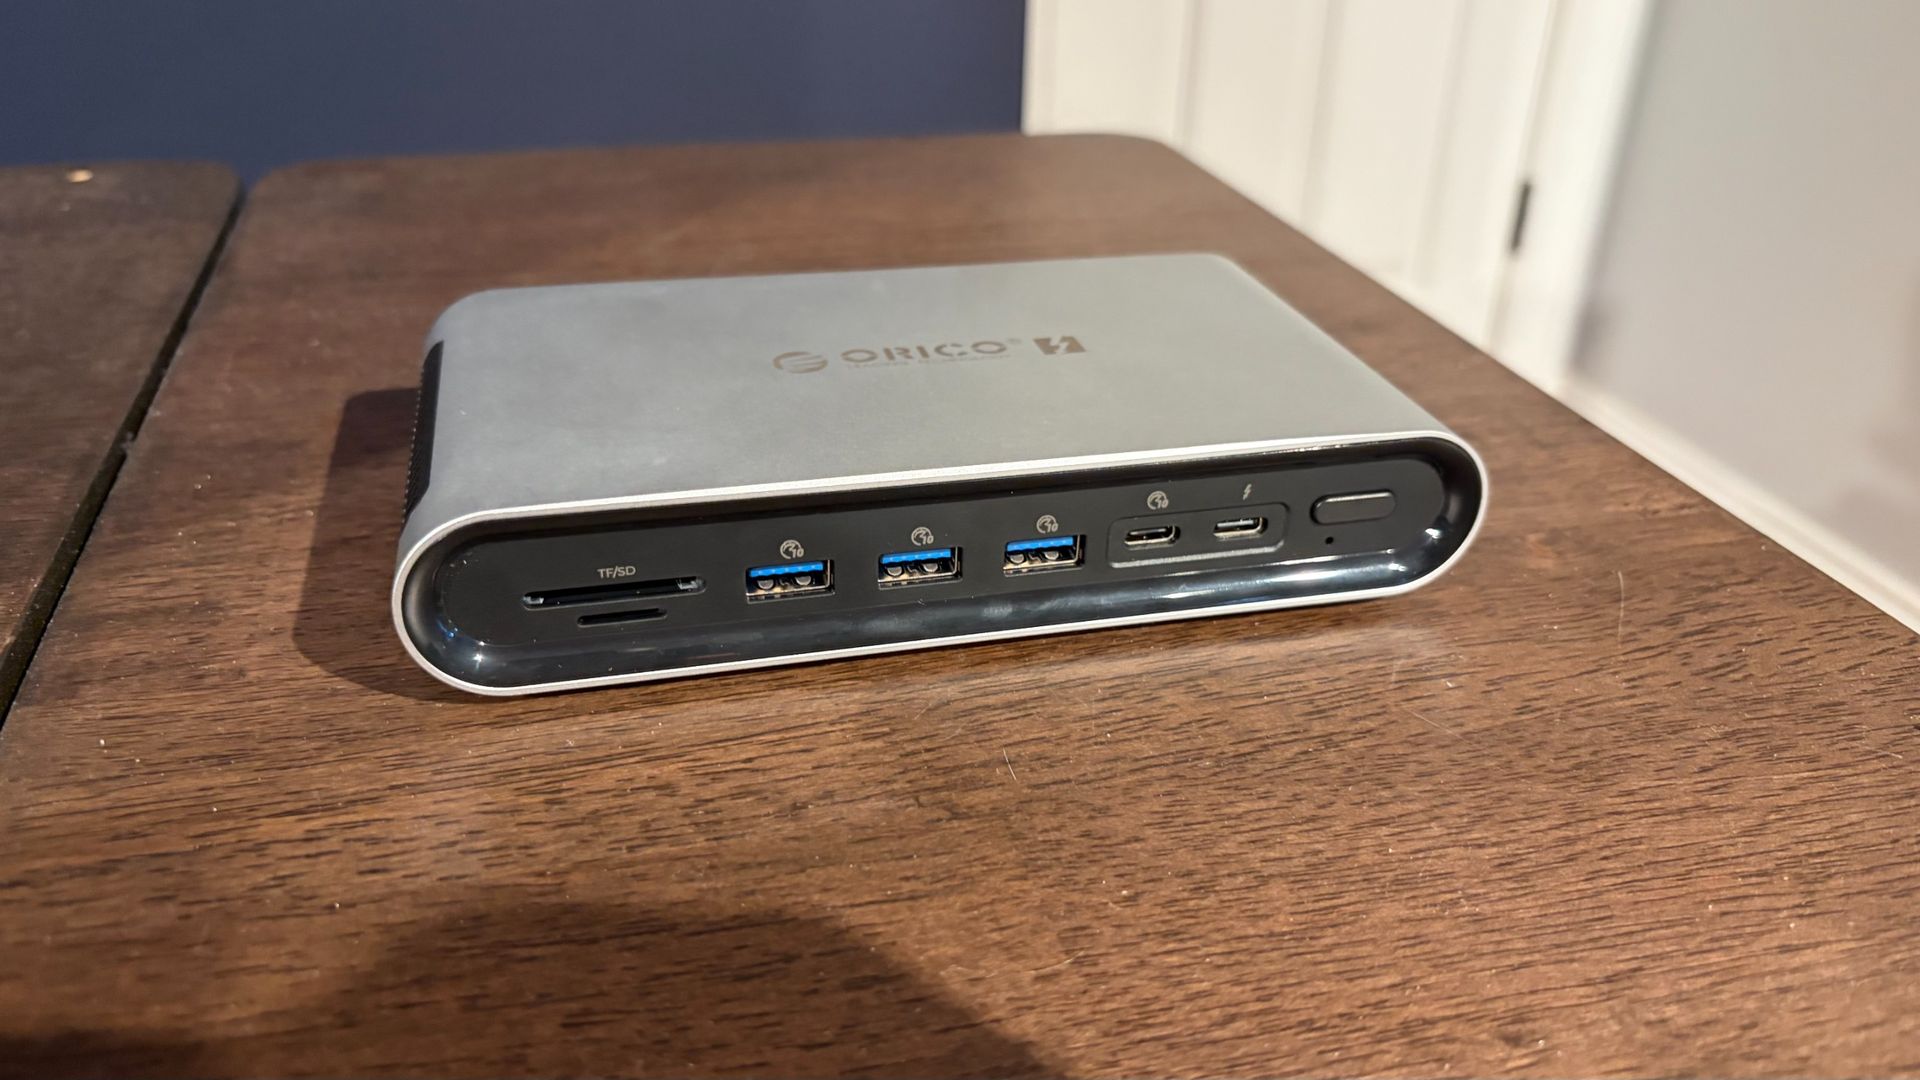
However, if there’s one thing that it could use, it’s a storage boost. Despite the $1,800 price tag as tested for our review unit, it still only includes a 1TB SSD. After installing a handful of games from Steam and from the Xbox Store, I was left with 128GB free of the 953GB available on the SSD.

I happen to have a 2TB PNY CS2150 PCIe 5.0 SSD that I used for testing a Thunderbolt 5 SSD enclosure with Thunderbolt 5 docks. Since it was currently sitting unused, I decided to take a stab at replacing the 1TB SSD in the Claw 8 EX AI+ with the CS2150 for some extra storage headroom.

Getting the hardware setup for the transition

Fortunately for me, much of the legwork had already been finished. The CS2150 was already installed inside an Orico SSD Thunderbolt 5 enclosure, which would serve as my destination drive.

Although I could complete the entire transfer process using only the input methods on the Claw 8 EX AI+, it’s rather tedious to navigate the Windows 11 user interface and enter text on the 8-inch screen. So, I decided to use a Thunderbolt 5 dock to streamline the process. I used:

  • OWC Thunderbolt 5 Dock
  • Logitech wireless keyboard and mouse
  • Orico SSD Thunderbolt 5 enclosure with 2TB PNY CS2150 SSD installed
MSI Claw 8 EX AI+
Tom's Hardware
MSI Claw 8 EX AI+
Tom's Hardware

I connected the Thunderbolt 5 dock to one of the two Thunderbolt 4 ports at the top edge of the Claw 8 EX AI+. I then plugged the Logitech USB-A receiver into the dock. Finally, I connected the Orico enclosure to the second Thunderbolt 4 port on the Claw 8 EX AI+.

Finding the proper software for cloning the drive

It’s been a while since I last cloned a drive, so I did a quick Google search for free drive-copy software for Windows 11. My search led me to a Reddit thread where the majority of commenters recommended the freeware version of Macrium Reflect 8.

I downloaded the software and installed it without issue. The interface in Reflect 8 was about as straightforward as you can expect, with my source C: drive showing up at the top. The destination field was empty, so I had to select the drive I wanted to use. I pulled up the CS2150, which I have named as Orico in Windows 11 as the D: drive.

MSI Claw 8 EX AI+
Tom's Hardware
MSI Claw 8 EX AI+
Tom's Hardware
MSI Claw 8 EX AI+
Tom's Hardware
MSI Claw 8 EX AI+
Tom's Hardware
MSI Claw 8 EX AI+
Tom's Hardware

After clicking Next, I was prompted with a warning about BitLocker encryption, so I clicked OK to acknowledge it (you’ll definitely want to re-enable BitLocker once you reinstall the SSD). The next screen showed a summary of the operations to be performed: copying the EFI and Windows partitions to the 2TB SSD. I clicked Finish, which brought up another prompt asking if I wanted to run the backup. I clicked OK, which displayed a warning that the D: drive would be overwritten. After clicking Continue, the process started.

After about an hour and a half, the cloning process was completed. At this point, I shut down the Claw 8 EX AI+ and disconnected all of the accessories.

Disassembling the MSI Claw 8 EX AI+ and installing the 2TB SSD

Next, I removed the back panel of the Claw 8 EX AI+, which required removing six screws and using a plastic prying tool. I then removed the single screw holding the already-installed 1TB SSD in the M.2 slot and extracted it. I next removed the 2TB SSD from the Orico enclosure and installed it in the M.2 slot, securing it with the screw I had just removed.

MSI Claw 8 EX AI+
Tom's Hardware
MSI Claw 8 EX AI+
Tom's Hardware
MSI Claw 8 EX AI+
Tom's Hardware
MSI Claw 8 EX AI+
Tom's Hardware

I then reinstalled the back panel for the Claw 8 EX AI+ and secured it with the previously removed screws.

Booting up and checking my work

I powered the Claw 8 EX AI+ back on, and it booted without issue. I was also surprised to see that Windows 11 didn’t throw up any activation errors. I’ll chalk that up as a win. I went to Windows Explorer to see if I was indeed utilizing the full 2TB of storage, but I instead saw that 128GB was free of 953GB – the same predicament as before.

MSI Claw 8 EX AI+

(Image credit: Tom's Hardware)

I might have missed a setting during the cloning process that would have expanded the partition to use all free space on the larger SSD. But the fix was simple enough. I opened up the Disk Management utility, selected Windows (C:), and chose “Extend Volume.” After that process was complete, I saw the full 2TB (actually, 1.81TB), with 1.02TB now free for additional game installs.

✇Tomshardware

Dell 14S review: High-class design and 20+ hour battery life

If you want the performance of Dell’s XPS family but don’t want to lay out the cash to step up to a slightly snazzier design and higher resolution display, the Dell 14S is a cheaper alternative. The 14S is Dell’s mainstream 14-inch laptop, starting at $1,269 compared to $1,589 for the XPS 14.

A nearly $300 difference is nothing to sneeze at in this economy, so we’ll take a look at the 14S and what it offers for a cost-sensitive audience. And with an as-tested price of $1,469, we’ll see whether it still represents good value compared to its more expensive sibling.

Design of the Dell 14S (2026)

Although the 14S is a lower-priced alternative to the XPS 14, it doesn't skimp on features or build quality. Like the trendier XPS 14, the 14S features an aluminum chassis finished in celestial blue on our review unit. The keyboard deck, lid, and bottom of the chassis feature a matte finish, while the edges of the chassis and lid are highly polished.

The only hint of cost-cutting to my eyes is the use of a plastic bezel around the screen. However, I wouldn’t have even noticed the material difference if Dell hadn’t explicitly pointed it out. Build quality is impeccable, with no flex in the chassis and no floppiness in the firm display hinge.

Dell 14S
Tom's Hardware
Dell 14S
Tom's Hardware
Dell 14S
Tom's Hardware
Dell 14S
Tom's Hardware

While the XPS 14 goes for a minimalist approach on the port front with just three Thunderbolt 4 ports, the 14S gives you a lot more variety. You’ll find an HDMI 2.1 port, a USB-A 3.2 Gen 1 port, and two Thunderbolt 4 ports on the left side of the chassis. On the opposite side, there’s another USB-A 3.2 Gen 1 port and a 3.5 mm jack. There’s really nothing to complain about here, and it’s nice to see that we have both USB-A and USB-C support for legacy and newer devices alike.

Dell 14S
Tom's Hardware
Dell 14S
Tom's Hardware

Our 14S review unit features a 1200p OLED touchscreen, weighs 3.28 pounds, and measures 12.35 x 8.82 x 0.61 inches. For comparison, the XPS 14 is 12.19 x 8.26 x 0.58 inches and weighs just 3 pounds. The Asus ZenBook A16 measures 13.92 x 9.54 x 0.65 inches and weighs 2.87 pounds, while the Apple MacBook Air (M5) weighs 2.7 pounds and measures 11.97 x 8.46 x 0.44 inches.

Dell 14S (2026) Specifications

CPU

Intel Core Ultra 7 355

Graphics

Intel Graphics (Integrated)

NPU

Up to 49 TOPS

Memory

16GB LPDDR5x-7467 onboard

Storage

512GB M.2 PCIe Gen 4 NVMe SSD

Display

14-inch, 1920 x 1200, OLED, 60 Hz, Multi-touch

Networking

Intel BE213 (Wi-Fi 7), Bluetooth 5.4

Ports

2x Thunderbolt 4, 2x USB-A, 1x HDMI 2.1, 3.5 mm headphone jack

Camera

2MP RGB+IR

Battery

70 WHr

Power Adapter

65W, USB Type-C

Operating System

Windows 11 Home

Dimensions (WxDxH)

12.35 x 8.82 x 0.61 inches

Weight

3.28 pounds (1.49 kg)

Price (as configured)

$1,469.99

Productivity Performance on the Dell 14S (2026)

The Dell 14S uses an Intel Core Ultra 7 355 processor, featuring 4 performance cores, 4 low-power efficient cores, and a maximum turbo frequency of 4.7 GHz. This is the same processor used in one of the XPS 14 models we tested. The Zenbook A16 uses a Snapdragon X2 Elite SoC, Qualcomm’s flagship Arm chip and an excellent all-around performer, while the MacBook Air uses Apple’s entry-level M5 Arm SoC.

Our review unit came equipped with 16GB of LPDDR5x-7467 memory and a 512GB PCIe 4.0 SSD. 512GB is rather small at this price point, considering most laptops we test come with a 1TB SSD as the baseline.

In the Geekbench synthetic CPU benchmark, the 14S's single-core performance closely mirrored that of the XPS 14 featuring the same CPU, with the former achieving a score of 2,704 versus 2,685 for the latter. However, there was a significant discrepancy between the two in the multi-core benchmark, with the 14S hitting 11,064 compared to 7,964 for the XPS 14. The Zenbook A16 proved to be an exceptional performer with its Snapdragon X2 Elite processor, with 3,807 and 22,733 on the single-core and multi-core benchmarks, respectively.

Dell 14S
Tom's Hardware
Dell 14S
Tom's Hardware
Dell 14S
Tom's Hardware
Dell 14S
Tom's Hardware

The 512GB SSD on the 14S was relegated to the back of the pack in our 25GB file transfer test, finishing at an average speed of 1,378.71 MBps. This was well behind the XPS 14 (1,730 MBps) and the chart-topping MacBook Air (1,924 MBps)

It was a similar story on our Handbrake test, in which we transcode a 4K video file to 1080p. Here, the 14S finished the test in 7 minutes and 22 seconds, nearly 40 seconds behind the XPS 14. However, the Zenbook A16 absolutely smoked all of the laptops in this test, finishing in just 2 minutes and 8 seconds.

During the Cinebench 2026 stress test, the 14S started at just over 1,600, before dipping to 1,465. It then recovered to a peak of 1,735 before settling in the 1,550 to 1,650 range for the rest of the runs.

The Ultra 7 355 P-cores averaged 2.61 GHz, while the low-power E-cores averaged 2.45 GHz.

Graphics on the Dell 14S (2026)

The Dell 14S uses integrated Intel Graphics with 4 Xe cores. On the 3DMark Steel Nomad test, the 14S achieved a score of 505, which was just below that of the XPS 14 (532).

Dell 14S

(Image credit: Tom's Hardware)

However, the Zenbook A16 once again flexed its muscle with a score of 1,262, while the MacBook Air came in at 1,005, nearly double the result of the 14S.

Display on the Dell 14S (2026)

Our 14S review unit came optioned with a 1920 x 1200 (FHD+) 60 Hz OLED touchscreen. This is a step up from the base system and features an FHD IPS display.

The display was overall quite colorful, with vivid colors and inky blanks; something that I’ve come to appreciate with OLED displays. I watched a few movie trailers, including the most recent trailer for The Odyssey and Spider-Man: Brand New Day. The trailer for Spider-Man looked especially brilliant, with the suit's iconic red and blue and the seismic destruction left by Hulk's Thunderclap.

Dell 14S

(Image credit: Tom's Hardware)

My one complaint about the display is that it wasn’t particularly bright. Dell specs the OLED panel at 300 nits, and our lab instruments measured an average of just 269 nits. The displays on all of its competitors broke the 400-nit mark, with the XPS 14 hitting 466 nits.

As for color performance, the display on the 14S reached 84.5 percent of the DCI-P3 space by volume and 119.3 percent of the sRGB space. Those numbers were right on top of the numbers we recorded for the other three laptops in this test, with just a few percentage points separating them.

Keyboard and Touchpad on the Dell 14S (2026)

The Dell 14S features an island-style backlit keyboard with springy keys and near-silent actuation. The exception to this rule was the spacebar, which seemed to bottom out easily and rewarded me with a grating “clank” every time I pressed it with my thumb.

Dell 14S

(Image credit: Tom's Hardware)

With that said, I used Keyhero.com to measure my typing speed, which was 87 words per minute with 97 percent accuracy.

Unlike the XPS 14, the 14S doesn’t feature a haptic trackpad (after all, cost-cutting has to come from somewhere). Instead, it features a top-hinged trackpad, meaning that “clicks” performed near the top of the surface, above the hinge, don’t register. You’ll need to keep your thumb near the bottom of the touchpad, where your thumb should naturally rest anyway if you’re using proper hand positioning.

Audio on the Dell 14S (2026)

The 14S uses dual 2-watt speakers, which sound reasonable enough. They’re not particularly powerful or worthy of high praise. I played the City of Angels soundtrack, culminating with the four heavenly instrumental tracks performed by Gabriel Yared.

While the strings sounded quite good, the angelic vocals that come in about a third of the way through in An Angel Falls sounded dull and lifeless. This was especially disappointing as the voices dropped into the lower registers. However, this is me being nitpicky about audio using one of my favorite albums of all time; for typical productivity-related tasks, the speakers on the 14S will do just fine. I didn’t find any third-party software to fine-tune the speakers.

Upgradeability of the Dell 14S (2026)

There are six screws (two of which are captive) that hold the Dell 14S' bottom panel in place. Once the screws are removed, the whole panel lifts off from the back.

There are two upgradeable pieces of hardware inside our review unit (besides the battery, which can be replaced): there’s an M.2 PCIe Intel BE213 Wi-Fi 7 card and a Kioxia 2230 PCIe 4.0 512GB SSD. While our unit had a 2230 SSD, the M.2 slot can accommodate up to 2280 modules.

Battery Life on the Dell 14S (2026)

One of the remarkable accomplishments of the XPS 14 that we previously tested was its battery life. The 14S also delivers on that front, lasting 20 hours and 41 minutes on our battery test, consisting of browsing the web, streaming video, and running OpenGL tests at 150 nits of brightness. This was just one minute shy of the XPS 14’s performance. Also, keep in mind that the 14S has an OLED display; our previous XPS 14 review unit used a non-touch IPS panel, so a similarly equipped 14S would likely post even better battery numbers.

Dell 14S
Tom's Hardware

For comparison, the MacBook Air, which has long been one of the reigning champs of battery life, could only muster 15 hours and 28 minutes of runtime. And the Zenbook A16, which was a performance monster in our productivity tests, couldn’t quite hit 10 hours and 30 minutes.

Heat on the Dell 14S (2026)

While running our Cinebench 2026 stress test on the 14S, we measured external surface temperatures and processor temperatures via its internal sensors.

Dell 14S
Tom's Hardware
Dell 14S
Tom's Hardware

The Core 7 Ultra 355 hit 106 degrees Fahrenheit on the keyboard between the G and H keys, around 82 F on the touchpad, and 108 F on the hottest point on the bottom. The processor measured 88 degrees Celsius.

One thing to note is that while the XPS 14 has two system fans, the 14S has just one.

Webcam on the Dell 14S (2026)

Dell's 14S uses an entry-level acceptable 2MP camera. It is by no means as clear or crisp as the 8MP unit in the more expensive XPS 14, but we weren't expecting that given its positioning. Color was quite good on the webcam, but the images were neither sharp nor grain-free. There was a lot of noise in the images, and details were quickly lost, as my facial hair looked a bit "muddy."

The camera also struggled with the overhead LED lights in my home office, causing blooming effects that marred the images.

Like many laptops, the 14S also incorporates an IR sensor for Windows Hello facial recognition.

Software and Warranty on the Dell 14S (2026)

The 14S is relatively light on included bloatware. Dell Optimizer and Dell Support Assist are installed by default. The former lets you optimize settings for the display, battery, and thermal management. The latter allows you to scan your system for issues, update software/firmware, optimize your network connection, and obtain assistance from customer service.

There are also the usual Intel utilities for graphics and security; however, I didn’t see the app shortcuts typically featured in a fresh Windows 11 installation (e.g., Dropbox, LinkedIn).

The 14S comes with one year of what Dell calls Basic Onsite Service. You can optionally add Accidental Damage Service (covering drops, spills, and power surges) for $59/year (currently on promotion for $29/year).

Dell 14S (2026) Configurations

The 14S is available with four processors (Core Ultra 5 322, Core Ultra 7 355, Core Ultra X7 358H, and Core Ultra 9 386H), Intel Graphics or Arc Graphics, 16GB or 32GB of memory, 512GB or 1TB SSD, and a 14-inch 1200p IPS or OLED display (in touch or non-touch options). You can also choose between Celestial Blue and Frost Blue for the chassis color when ordering directly from Dell.com.

The base configuration with a Core Ultra 5 322 processor, 16GB of RAM, a 512GB SSD, and a 14-inch non-touch IPS display costs $1,269.99. That is a very attractive entry point for the 14S, but options can quickly ratchet up the price. For example, a config with a Core Ultra 9 386H, Intel Graphics, 32GB of memory, a 512GB SSD, and a 14-inch touch OLED display retails for $2,019.99, while a Core Ultra X7 358H with Arc Graphics, 32GB of RAM, a 1TB SSD, and a 14-inch touch OLED display sells for $1,869.99. In the $1,800 to $2,000+ price range, you’d probably be better off going with an XPS 14.

Our review unit, featuring the Core Ultra 7 355, Intel Graphics, 16GB of RAM, 512GB SSD, and a 14-inch touch OLED display, landed about in the middle at $1,469.99.

Bottom Line

The Dell 14S attempts to mimic some of the perks of its flashier relative, the XPS 14, with a high-quality aluminum chassis, OLED display options, and stellar battery life (over 20 hours in our testing). It also adds in features you don’t get on the XPS 14, like an HDMI 2.1 port and USB-A ports.

Dell 14S

(Image credit: Tom's Hardware)

However, you also give up a bit. You don’t get the quad speakers, 8MP webcam, Gorilla Glass screen cover, or the option for a 2.8K 120 Hz OLED touch screen.

If those features aren’t important to you, consider this: our 14S review unit retails for $1,469.99. An XPS 14 with the same processor, memory allotment, storage size, and a 14-inch 2.8K 120 Hz OLED display costs $2,249.99. That’s a nearly $800 upcharge. In the grand scheme of things, the 14S is definitely living up to its “mainstream” positioning in the Dell laptop family.

✇Tomshardware

Asus ROG Xreal R1 Review: Gaming-focused AR glasses deliver 240 Hz performance and RGB style

Over the past several years, I’ve reviewed a growing number of augmented reality (AR) glasses. For the most part, these shades share the same mission: to give consumers a way to enjoy video content and even work on productivity tasks with a Mac or Windows device via a 150-inch (ish) virtual screen.

Most of these glasses top out at a 120 Hz refresh rate and weren’t designed specifically for a gaming audience (though many can be used for gaming). That is changing with the Asus ROG Xreal R1, which is a collaborative effort from two big names in tech. Not only does the R1 boost the maximum refresh rate to 240 Hz to appease hardcore gamers, but it also serves as a breakout box for gaming on your PC, Xbox, PlayStation, or Switch.

The R1 promises and delivers a lot, but it comes at an even higher price than Asus’ AirVision M1, which debuted at $700 two years ago.

Design of the Asus ROG Xreal R1

Although it shares many of the same internals as the Xreal One Series AR glasses, the R1 has an unmistakable ROG flair. Whereas the “One” glasses have smooth surfaces and rounded edges, the R1 has a more angular design and chamfers along the temples. And in keeping with ROG design ethos, there is a line of 9 LEDs along both temples, along with Republic of Gamers etchings.

The glasses are constructed from high-quality plastic, which feels similar to that of the Xreal One and One Pro. But whereas the Xreal glasses have a soft, matte finish, the R1 has a shimmering grey finish. Unlike the One glasses, the R1 doesn’t have a detachable front frame, which probably isn’t too much of a hindrance, as the glasses already have a clean, modern aesthetic when viewed from the front.

Asus ROG XREAL R1
Tom's Hardware
Asus ROG XREAL R1
Tom's Hardware
Asus ROG XREAL R1
Tom's Hardware

The R1 features open-air speakers along the temples, with a USB-C port at the rear of the left temple. The top of the right temple features a programmable Quick button. On the underside of the right temples, you’ll find a menu button and a rocker switch that navigates through the menu system. When the menu is inactive, that same rocker switch adjusts the display brightness.

The R1 uses a flat-prism lens design, resulting in much less visual heft near your eyes than traditional bird bath lenses. This design also results in a 57-degree field of view, which is identical to the One Pro. Content is projected using dual 0.55-inch Sony Micro-OLED displays, featuring a 0.01 ms response time and a 240 Hz refresh rate (double that of competing AR glasses) with Frame Rate Boost enabled. The glasses can also project an image equivalent to up to 171 inches across at a distance of 4 meters.

Asus ROG XREAL R1
Tom's Hardware
Asus ROG XREAL R1
Tom's Hardware
Asus ROG XREAL R1
Tom's Hardware
Asus ROG XREAL R1
Tom's Hardware
Asus ROG XREAL R1
Tom's Hardware
Asus ROG XREAL R1
Tom's Hardware

Three levels of electrochromic dimming are offered on the R1. The darkest setting blocks most, but not all, environmental light to heighten the sense of immersion while gaming or viewing media content. Electrochromic dimming is a must at this price point, since less expensive glasses rely on cheap physical plastic light blockers to achieve the same effect. And the physical light blockers are an all-or-nothing affair, with no granularity in their light-blocking abilities.

One other item of note: The R1 features the same accessory port between the nose pads that accepts the Xreal 6 DoF camera module.

In addition to the R1, the retail box includes a hard carrying case, the USB-C-to-USB-C cable, a prescription lens frame, small and large nose pads, a polishing cloth, and the ROG Control Box.

Specifications for the Asus ROG Xreal R1

Display

1920 x 1080 per eye

Display Type

OLED

Refresh Rate

240 Hz

Brightness

700 nits

Field of View

57 degrees

Virtual Screen Size

171 inches

Degrees of Freedom

3 DoF

Audio

Dual open-air speakers

Connectivity

USB-C

Weight

3.06 ounces (87 grams)

Asus Xreal ROG Control Dock and the Asus DisplayWidget Center

Our R1 review unit shipped with the ROG Control Dock. It’s a lightweight accessory designed to connect your R1 glasses to a PC or gaming console. The front of the unit has a single USB-C port for video out to your glasses. The back panel features two HDMI ports and a DisplayPort for video input. There are also two USB-C ports: one for power-in and one for power-in and data.

The dock ships with two USB-C-to-USB-A cables for connecting power and managing data throughput from your PC.

Asus ROG XREAL R1
Tom's Hardware
Asus ROG XREAL R1
Tom's Hardware
Asus ROG XREAL R1
Tom's Hardware

The top of the unit features a power button, an exit button, and a joystick to navigate the glasses' OSD. If you don’t want to install any additional software, you can control all R1 settings (including screen brightness, refresh rate, color modes, tint level, and more) using the joystick and the OSD.

Asus ROG XREAL R1
Tom's Hardware
Asus ROG XREAL R1
Tom's Hardware
Asus ROG XREAL R1
Tom's Hardware

However, I found that the easiest way to control (most of) the R1’s settings is to use the Asus DisplayWidget Center. After installing the app, the R1 appeared as a controllable “display” within it. From there, I could control R1 settings via three menu tabs: Gaming, Visual, and Spatial Screen. The only option under Gaming is to enable Frame Rate Boost, which allows you to set a maximum refresh rate of 240 Hz (up from the default 120 Hz). From the Visual tab, you can control the tint level for the electrochromic lenses, brightness, text sharpness, and color temperature. In the Spatial Screen tab, you can adjust the screen aspect ratio, screen size, screen distance, IPD (57 to 66 mm), and control spatial lock.

Using the Asus Xreal ROG R1

The R1 is designed with gaming in mind, so I dedicated most of my time to testing it in that environment. For my testing, I used two different gaming rigs: a desktop PC with a Core 7 Ultra 265k and an RTX 4060 Ti, and an MSI Claw 8 EX AI+ handheld gaming PC with an Arc G3 Extreme SoC.

Without question, working with the desktop system was the most involved, as it required using the ROG Control Dock with various wires going in and out for video and power. However, using the R1 with the Claw 8 EX AI+ proved to be the simplest, with me only needing to plug the glasses into a free Thunderbolt 4 port.

I’ll take the time here to talk about the much-ballyhooed 240 Hz refresh rate option. This mode is enabled by selecting Frame Rate Boost from the R1’s OSD. However, I found that switching to this mode resulted in worse image quality, with a blurrier image and some jitter (especially at the outer edges of the viewable area), which led to eye strain. The effect was noticeable when using the ROG Control Dock and when plugged directly into a Thunderbolt 4 port. This is the byproduct of Asus and Xreal using a software algorithm to “boost” the frame rate from its native 120 Hz.

Asus ROG XREAL R1

(Image credit: Tom's Hardware)

I experienced none of the visual anomalies in the native 120 Hz mode, so the 240 Hz mode was more of a novelty to me than something I’d rely on extensively for gaming. However, your experience may vary in this respect. The R1 supports an IPD range of 57-66 mm, and I’m just outside that range at 71 mm. So it could have been that my eyes were more sensitive to the 240 Hz mode.

While gaming on the desktop, I was able to play Battlefield 6 at 1080p and achieve over 100 FPS with DLSS Balanced enabled at High quality settings. Likewise, I easily hit similar FPS with details maxed out playing Lego Batman: Legacy of the Dark Knight.

The monitor I use for gaming is a 49-inch DQHD 240 Hz OLED, and I love the widescreen gaming aspect ratio. Being limited to 1080p resolution just didn’t seem to do the desktop gaming experience justice for me when using the R1. Yes, the image quality and response times are good, but if I’m sitting at my desk, I’d rather use my monitor.

That whole sentiment changes, however, when gaming on the Claw 8 EX AI+. Going from the 8-inch 1200p display to the simulated 171-inch 1080p display, with no limits on mobility, is an amazing experience. Since there’s only one cable to manage, going from the R1 to the handheld, you have great freedom in where you can game. From gaming on the couch, to the car, to your back porch, to sitting at the airport during a layover – the big-screen sensation that isthe R1 follows you anywhere.

Given the Xreal One Pro starting point, it’s no surprise that the R1 uses similar (or perhaps the same) Bose-tuned open-air speakers. As with the One Pro, the speakers are decent, with a respectable amount of bass and clarity at moderate to high volume levels. If you just want a low-impact, throw-on-and-go experience with the R1 and a gaming handheld, you’ll be more than pleased with the sound output. However, if you want the best mobile gaming experience, nothing is stopping you from also wearing a high-quality pair of wireless earbuds or headphones.

Bottom Line

The Asus ROG Xreal R1 glasses are a real testament to what’s possible when two companies at the top of their game work together on a singular product. Xreal is arguably the leader in modern AR glasses, while Asus is among the leading players in gaming peripherals, laptops, and handhelds. They’ve created an impressive product with a 240 Hz refresh mode, customizable RGB lighting effects, and support for the existing Xreal accessory ecosystem (namely the Xreal Eye camera).

The included ROG Control box lets you connect an HDMI or DisplayPort output from your graphics card to the glasses. It also provides quick access to the R1’s controls using the top-mounted joystick.

But the R1 really comes alive when used with a handheld gaming PC like Asus’ own ROG Ally, or a competing device like the MSI Claw 8 EX AI+. The R1 connects to these devices via a single cable and delivers a fully “mobile” gaming experience projected onto a virtual 171-inch display.

However, the primary sticking point with the R1, like many other high-end AR headsets, is the price tag. $849.99 is a tremendously high price, even with the ROG Control Box included. For example, the Xreal One Pro is $599, the Xreal One S is $449, while the RayNeo Air 4 Pro will set you back just $239. If you look past the 240 Hz mode (which can be hit-or-miss depending on the person), is the R1 really worth $250 more than the One Pro, or over $500 more than the Air 4 Pro? The objective answer is no on both counts.

✇Tomshardware

Razer Blade 16 (2026) review: Competitive gaming performance and class-leading endurance

The Razer Blade 16 has long been leading contender among the best gaming laptops, thanks in part to its careful component selection and strong style. In this case, our review unit comes equipped with an Intel Core Ultra 9 386H processor and a flagship RTX 5090 GPU.

While the chassis remains the same as the Razer Blade 16 that we tested a little over a year ago, the 25W processor in our new review unit enabled some impressive runtimes that eclipse the competition. You’ll have to pay a considerable sum for the luxury, but the Blade 16 makes as strong a case as a compelling premium gaming laptop.

Design of the Razer Blade 16

We were impressed with the design of last year's Blade 16, and luckily, Razer hasn’t altered the formula for this year’s model. You get the same matte-black chassis that measures just 0.69 inches at its thickest point (0.59 inches towards the front). Build quality remains excellent in true Razer fashion.

The overall design is minimalist, with a minimal amount of RGBs and no obvious ventilation slats along the sides for heat management. Instead, the clean design would look at home sitting on your desk while you're gaming with an Xbox controller, or sitting on your desk in a cubicle at work. The only bit of flash that you’ll find is the RGB Razer logo on the lid.

Razer Blade 16 (2026)
Tom's Hardware
Razer Blade 16 (2026)
Tom's Hardware
Razer Blade 16 (2026)
Tom's Hardware
Razer Blade 16 (2026)
Tom's Hardware

You’ll find thin bezels around the glossy 16-inch OLED display, below which you’ll find the full-size keyboard and a large trackpad. There’s also a small status LED at the front right of the chassis (just below the Intel Core Ultra sticker on the deck). It pulses white when the laptop is in standby mode.

There’s a healthy assortment of ports on the laptop, including three legacy USB 3.3 Gen 2 Type-A ports. There’s also one Thunderbolt 4 port, one Thunderbolt 5, an SD card reader (UHS-II), a full-size HDMI 2.1 port, and a 3.5 mm combo audio jack. There’s also a proprietary power port.

The Blade 16 measures 13.98 x 9.86 x 0.69 inches and weighs 4.71 pounds. For comparison, the MSI Raider 16 HX also packs an RTX 5090, but measures 14.29 x 10.62 x 1.14 inches and weighs over a pound more (5.73 pounds). The Alienware 16 Area-51 is heavier still at 7.49 pounds, with dimensions of 14.37 x 11.41 x 1.12 inches.

Razer Blade 16 Specifications

CPU

Intel Core Ultra 9 386H

Graphics

Nvidia GeForce RTX 5090 (24GB GDDR7, 1,597 MHz Boost Clock, 175 W Max TGP)

Memory

32GB LPDDR5X-9600 (2x 16GB)

Storage

2TB PCIe 4.0 NVMe M.2 SSD

Display

16-inch, 2560x1600, 240 Hz, 16:10

Networking

Wi-Fi 7, Bluetooth 6.0

Ports

1x Thunderbolt 5, 1x Thunderbolt 4, 3x USB 3.2 Type-A Gen 2, 1x HDMI 2.1, 3.5 mm headphone jack, SD reader (UHS-II)

Camera

1080p IR webcam

Battery

90 Whr

Power Adapter

280 W

Operating System

Windows 11 Home

Dimensions (WxDxH)

13.98 x 9.86 x 0.69 inches

Weight

4.71 pounds

Price (as configured)

$4,899.99

Gaming and Graphics on the Razer Blade 16

Our Blade 16 review unit is equipped with a Core Ultra 9 386H processor, which has 16 total cores (4 performance, 8 efficient) and a maximum performance turbo frequency of 4.9 GHz for the performance cores. There’s also 32GB of LPDDR5x memory and a GeForce RTX 5090 GPU (1,597 MHz boost clock, 175W max TGP).

This combo generally performed well across our gaming benchmark suite, with a few exceptions. While playing Battlefield 6 at native resolution in Overkill detail mode, with DLSS Quality and Frame Generation enabled, I was comfortably getting between 110 and 120 FPS, even with a lot of action happening on the screen.

For this review, the competitive set consists of last year's Blade 16 (Ryzen AI 9 HX 370 at 28W, RTX 5090 at 160W TGP), MSI Raider 16 Max HX (Core Ultra 9 290HX Plus at 55W, RTX 5090 at 175W TGP), and the Alienware 16 Area-51 (Core Ultra 9 290HX Plus at 55W, RTX 5080 at 175W TGP).

Razer Blade 16 (2026)
Tom's Hardware
Razer Blade 16 (2026)
Tom's Hardware
Razer Blade 16 (2026)
Tom's Hardware
Razer Blade 16 (2026)
Tom's Hardware
Razer Blade 16 (2026)
Tom's Hardware

As usual, we start our gaming benchmarks with the Shadow of the Tomb Raider (Highest setting) benchmark, where the Blade 16 delivered 182 FPS at 1080p. Performance at 1600p scaled down to 133 FPS. The 2025 edition of the Blade 16 was 16 FPS behind at 1080, but at the resolution that most would play at, 1600p, the older model was nearly 30 FPS faster (162 FPS versus 133 FPS).

Cyberpunk 2077 (Ray Tracing Ultra settings), the laptops were pretty evenly matched, with most running between 65 and 70 FPS at 1080p and at around 40 FPS at 1600p. For the Razer Blade 16 specifically, it achieved 65 FPS at 1080p and 42 FPS at 1600p.

Far Cry 6 (Ultra settings) saw the Blade 16 running in third place ahead of its predecessor (106 FPS at 1080p, 108 FPS at 1600p). The Alienware 16 Area-51 and Raider 16 Max HX were a few FPS ahead at each resolution, but it was still a relatively close fight among the top three.

Red Dead Redemption 2 (Medium settings) proved challenging for the Blade 16, as it lagged behind with 94 FPS at 1080p and just 71 FPS at 1600p. For comparison, last year's model eclipsed those numbers at 121 FPS and 94 FPS, respectively. The 25W CPU simply couldn’t keep up with the 28W Ryzen and 55W Intel HX chips

However, the Blade 16 was back to its fighting form in the Borderlands 3 (Badass settings) benchmark, easily slipping into second place behind the Raider 16 Max HX with 175 FPS at 1080p and 126 FPS at 1600p.

Metro Exodus is still our preferred benchmark for gaming laptop stress testing. Our review unit averaged 133.39 FPS at 1080p across 15 loops using the RTX benchmark preset. The CPU performance cores averaged 3.96 GHz, and the efficiency cores averaged 3.5 GHz. The RTX 5090 GPU also ran at 1.95 GHz.

One item of note is that the two system fans are incredibly loud while gaming, which may force you to use a pair of the best gaming headsets to block out the added noise.

Productivity Performance on the Razer Blade 16

The Razer Blade 16 uses a 16-core Intel Core Ultra 9 386H processor, 32GB of memory, and a 2TB PCIe 4.0 SSD. With some of the competition sporting upwards of 8 additional cores, the Blade 16 didn’t really break through in the multi-threaded benchmarks.

The synthetic CPU benchmark Geekbench saw the Blade 16 lag slightly behind its predecessor in single-core (2,895 versus 2,922), but pull ahead in multi-core performance (16,971 versus 16,025). However, neither Blade system was a match for the Core Ultra 9 290HX Plus processors in the Alienware 16 Area-51 and Raider 16 Max HX; the latter of which pulled numbers of 3,231 and 20,656, respectively.

Razer Blade 16 (2026)
Tom's Hardware
Razer Blade 16 (2026)
Tom's Hardware
Razer Blade 16 (2026)
Tom's Hardware

In our 25GB file transfer test, the Blade 16 took second place by the slightest of margins, hitting 1,735.09 MBps. However, this result was still 1,000 MBps behind the first-place Alienware 16 Area-51.

The multi-threaded performance shortfall crept up again in our Handbrake test, where we transcode a 4K video file to 1080p. The Blade 16 pulled up the rear in this group, even falling behind the Blade 16 with the Ryzen AI 9 HX 370. It took 3 minutes and 17 seconds to complete the task compared to just 1 minute and 51 seconds for the Raider 16 Max HX.

Display on the Razer Blade 16

As Tom's Hardware's resident monitor editor, I’m absolutely smitten with OLED panels. Thankfully, the OLED display on the Blade 16 doesn’t disappoint: it’s a 16-inch panel with a 2560 x 1600 resolution and a native refresh rate of 240 Hz.

We found that color volume was 90 percent for DCI-P3 and 127 percent for sRGB. Brightness levels were also fairly impressive, earning second place behind the Raider 16 Max HX at 408.2 nits.

Razer Blade 16 (2026)

(Image credit: Tom's Hardware)

Although the instrumented tests show some regression compared to last year’s Blade 16 in the sRGB and DCI-P3 color spaces, the display looks amazing in a vacuum. The gritty visuals while playing Battlefield 6 in Overkill mode were a delight to my eyes, with sunlight glinting through windows and concussive bomb blasts kicking up debris all around me.

Keyboard and Touchpad on the Razer Blade 16

The keyboard on the Blade 16 uses scissor switches with 1.5 mm of travel. The key presses are slightly clicky, and my fingers had no trouble getting used to typing on the keys.

I used my standard keyhero.com typing test and scored 89 words per minute with 97 percent accuracy, which is about par for the course for me.

Razer Blade 16 (2026)

(Image credit: Tom's Hardware)

The touchpad is absolutely massive, measuring 5.9 inches wide and 3.8 inches tall. It’s one of the largest trackpads you’ll find outside of Apple’s 16-inch MacBook Pros. What isn’t Apple-like is the insistence on using a mechanical linkage for trackpad actuation instead of the steadier, more consistent presses made possible by a haptic touchpad. For a laptop with a sticker price of nearly $5,000, I don’t think it’s too much to ask for some haptics here.

However, if you’re using this laptop primarily for gaming, you’ll likely be using one of the best gaming mice for your competitive sessions.

Audio on the Razer Blade 16

The six-speaker audio system on the Blade 16 is THX-optimized, and the audio quality is good, if not quite price-appropriate. While playing Battlefield 6, in-game dialog, explosions, gunfire, and vehicle noise generally sounded good, but the effects were competing with the turbine whine of the dual system fans. Cranking the volume to near-max levels helped drown out the fan noise, but at that point, I was experiencing a bit of aural overload, so I opted to put on a pair of headphones.

When the CPU and GPU weren’t heavily taxed, I was able to better enjoy the speakers, such as by playing Dave Matthews Band’s album Before These Crowded Streets for the 300th time. I cruised through the album with the volume set to a comfortable 50%, savoring the acoustic and bass guitars on “Dreaming Tree,” which always results in a relaxing frisson for me.

Similarly, I watched the Mel Gibson-helmed The Patriot to get into the mood for the Fourth of July, and reveled in the heavy dialogue, flintlock musket blasts, and cannon bursts.

You can make adjustments to the audio using the Razer Synapse software,

Upgradeability of the Razer Blade 16

Accessing the interior of the Blade 16 involves removing 10 Torx screws. Once all screws are removed, the bottom panel lifts off with minimal force. You’ll find the large 90 WHr battery at the bottom front of the chassis, and above are two M.2 slots that accept full-length 2280 SSDs.

Razer Blade 16 (2026)
Tom's Hardware
Razer Blade 16 (2026)
Tom's Hardware
Razer Blade 16 (2026)
Tom's Hardware

The right slot was populated with a 2TB Lexar NM790 PCIe 4.0 SSD, while the left slot was empty, allowing for future upgrades. Also accessible is the PCIe Wi-Fi 7 network adapter (Intel BE213).

Battery Life on the Razer Blade 16

One thing to keep in mind is that the Blade 16 maintained competitive gaming performance among its peers, while its multi-threaded performance took a back seat. However, those compromises were fully redeemed in terms of battery life.

Razer Blade 16 (2026)

(Image credit: Tom's Hardware)

The Blade 16 uses a 90 WHr battery, which delivered shockingly long endurance (for a gaming laptop) in our battery test, consisting of web browsing, video streaming over Wi-Fi, and OpenGL testing with the screen brightness set at 150 nits. The system lasted a staggering 12:46, besting the Ryzen AI 9 HX 370-equipped Blade 16 by over 5 hours and the Alienware 16 Area-51 by over 9 hours. Even the Raider 16 Max HX was no match, falling short by over 4 hours.

That is a fantastic result for such a thin and light 16-inch gaming laptop, and it is a testament to the miserly energy consumption of the Panther Lake processor.

Heat on the Razer Blade 16

While running the Metro Exodus stress test, we measured the temperature of Blade 16's aluminum-alloy chassis in various spots. The keyboard measured 102 degrees Fahrenheit (F) between the G and H keys, while the touchpad was 92 F.

Razer Blade 16 (2026)
Tom's Hardware
Razer Blade 16 (2026)
Tom's Hardware

The hottest part of the laptop was near the rear center of the bottom of the chassis, where we measured 130 F. So it’s best to keep the laptop firmly planted on your desk while gaming, lest you roast your legs.

During the Metro Exodus stress test, the CPU measured 75.3 degrees Celsius (C). Meanwhile, the RTX 5090 came in at 87 C.

Webcam on the Razer Blade 16

Razer continues to use a run-of-the-mill 1080p webcam with an IR sensor for Windows Hello support. It’s by no means a class-leading webcam, but it’s perfectly usable for Zoom or Teams meetings.

I found the colors to be mostly adequate, but there was a little lightness in the detail in my facial features.

Software and Warranty on the Razer Blade 16

One of my favorite things about Razer laptops is that they aren’t loaded down with too much added software. On our Blade 16 review unit, Razer Chroma and Synapse were preloaded.

Synapse is an all-in-one utility that lets you adjust performance profiles, keyboard macros, audio presets, and more. Chroma, on the other hand, gives you full control over system RGBs, including the per-key keyboard effects.

Otherwise, you’ll find requisite utilities, like the Nvidia app and the usual Windows app shortcuts (we’re looking at you, LinkedIn) on the Start menu.

The Blade 16 comes backed by a one-year warranty for the system itself and a two-year warranty for the 90 WHr battery.

Razer Blade 16 Configurations

Our Blade 16 review unit came configured with a Core Ultra 9 386H processor, 32GB of LPDDR5X memory, a 2TB SSD, RTX 5090 laptop GPU, and a 16-inch, 240 Hz. 1600p display. The price as-configured is a whopping $4,899.99.

There are cheaper configurations available — if you retain the Core Ultra 9 386H and opt for an RTX 5070 Ti, 1TB SSD, and 32GB of memory, the price drops to $3,499.99. Going with RTX 5080 bumps (all other hardware staying the same) takes the price to $3,999.99.

Bottom Line

Overall, the Razer Blade 16 was a strong performer in our gaming benchmarks, which is the primary reason why most people would be willing to spend nearly $5,000 for this system. More importantly, the Panther Lake-based system delivered nearly 13 hours of non-gaming battery life, outrunning its closest competitor by over 4 hours. Combine those results with the beautiful display, attractive chassis, and under-the-radar design, and you have a winning combination.

Razer Blade 16 (2026)

(Image credit: Tom's Hardware)

However, there are some detractions; the lack of a haptic trackpad at this price point is annoying, and multi-threaded performance significantly lagged the competition. Also, the $4,900 asking price is high, although not completely out of line for a system with these specs. You can save roughly $900 by going with an RTX 5080 instead of the RTX 5090 that was in our system.

But if price isn’t an issue for you, it’s hard to argue with this compelling combination of gaming performance and battery life.

✇Tomshardware

Razer Soma Chroma Gaming Chair Review: Light on adjustability, but heavy on RGBs

I've reviewed several Razer gaming chairs over the years and have come to appreciate their style, adjustability, and overall comfort. Now, Razer is introducing a new line of gaming chairs that leans heavily into styling.

Meet the new Soma Chroma, a mid-range gaming chair with a racing-style design and integrated RGB lighting customizable via Razer Chroma software. The chair can be powered via a USB-C cable or a portable power bank, and it connects to your PC via an integrated Bluetooth connection or a 2.4 GHz wireless USB dongle included in the box.

But is beauty more than skin deep? Let’s take a deep look at the Soma Chroma to see if there’s more to see other than its flashy design to make it a contender among the best gaming chairs.

Razer Soma Chroma Specifications

Upholstery

Black Fabric

Total Height (with base)

49.2 to 53.1 inches / 125 to 135 cm

Floor to Seat Height

16.1 to 20.1 inches / 41 to 51 cm

Armrest Adjustments

2D

Recline

Backrest adjustability 90 - 155 degrees

Backrest Length (not including headrest)

33.1 inches / 84 cm

Backrest Width (Shoulder Level)

23 inches / 58.5 cm

Seating Area Width (total)

21.5 inches / 54.5 cm

Seating Area Depth

18.5 inches / 47 cm

Armrest Width

4.1 inches / 10.4 cm

Armrest Depth

10.6 inches / 26.8 cm

Armrest Height (from floor)

23.2 to 31.1 inches / 58.9to 78.9 cm

Castors

2.4 inches / 5 cm PU

Max Recommended Weight

331 lbs / 150 kg

Weight

54 lbs / 24.5 kg

Warranty

3 years

MSRP / Price at Time of Review

$499

Release Date

Available Now

Assembling the Razer Soma Chroma

This is the fourth Razer gaming chair that I’ve reviewed, so I could pretty much put one together blindfolded. From the packaging to the tools/accessories included, not much has changed. Inside the box, you’ll find:

  • Fabric gloves for assembly (glued to the inner flap)
  • Backrest and seat base (left and right arms pre-attached)
  • Metal, 5-arm base
  • Casters 5x
  • Gas lift, tilt mechanism
  • Allen wrench, screws, and plastic covers for left/right side arms
  • 2.4 GHz USB dongle (attached to assembly guide)

The chair arrived in a massive box, and the actual weight listed on the shipping label as 70 pounds. Upon opening the box, I was greeted by a familiar sight: a pair of black-and-green work gloves for assembling the chair. It’s a nice touch, but I always toss the gloves aside because I prefer to work with my bare hands for a relatively simple task like this.

Razer Soma Chroma
Tom's Hardware
Razer Soma Chroma
Tom's Hardware
Razer Soma Chroma
Tom's Hardware
Razer Soma Chroma
Tom's Hardware
Razer Soma Chroma
Tom's Hardware

A large green cardstock assembly guide sits atop the components, with a tiny box containing the 2.4 GHz wireless USB dongle attached to it.

The seat base, seatback, and 5-arm base were all wrapped in clear plastic bags to protect the metal and fabric on the components during shipping. The first step was to insert the castors into the 5-arm base, and then to insert the gas lift cylinder into the base.

The next step was to remove the four screws that are preinstalled from the factory from the bottom of the seat base with the included Allen wrench tool. Once removed, I attached the tilt mechanism, reinserted the same four screws, and placed it on the 5-arm base. The seatback has two screws on each side that must be removed before you attach it to the seat base.

Once the seatback was attached, I reinserted the four screws and slipped on the plastic cover to hide the screws and attachment mechanism. I'll note that on Razer Iskur chairs, the plastic cover is secured with a single screw on either side, and the screw is covered with a tiny plastic plug. The cover on the Soma Chroma simply slides and locks into place.

Once the chair is fully assembled, you’re not quite done yet. You still need to get power to the chair for the RGB lighting to work. The chair includes a relatively short USB-C cord that hangs out the back. Razer also supplied me with a 10-foot USB-C-to-USB-C extension cable, which I used to connect to my desktop PC. However, this setup is rather cumbersome and requires continually fighting the cable as you move around your workspace.

My solution was to plug the USB-C cable from the back of the chair into a portable power bank, and then tuck it into the zippered pouch at the bottom of the seatback. This worked well, and is clearly how the chair is intended to be used — however, it does not ship with a battery pack, nor does it ship with an extra-long cable (Razer sent that separately). So you'll need to invest in a battery pack or an extension cable to use the RGB on this chair.

Razer Soma Chroma Design

The Soma Chroma introduces an entirely new design language for Razer gaming chairs. Whereas the Iskur line has a more organic design, with softer curves and radiused edges, the Soma Chroma is more angular—especially on the seatback.

The seat back and the base have recessed channels, which I assume would help to improve airflow under your buttocks and around your back. It's an interesting design choice, though I imagine the recessed channels in the seat base will also quickly fill with dirt, dust, and food crumbs. The same design is mirrored on the back of the chair. While previous Iskur chairs have used the same material on both the front and back, the back of the Soma Chroma is constructed of hard plastic.

Razer Soma Chroma
Tom's Hardware
Razer Soma Chroma
Tom's Hardware
Razer Soma Chroma
Tom's Hardware
Razer Soma Chroma
Tom's Hardware
Razer Soma Chroma
Tom's Hardware
Razer Soma Chroma
Tom's Hardware
Razer Soma Chroma
Tom's Hardware
Razer Soma Chroma
Tom's Hardware
Razer Soma Chroma
Tom's Hardware

You'll find a zippered pouch at the back of the seat base, which runs the full width. It's large enough to accommodate a portable power bank, so you don't have to be tethered to a long extension cord to power the RGB lights.

Speaking of the RGB lights, they are controlled using Razer’s Synapse software. I installed the Synapse app on my desktop computer and then plugged in the 2.4 GHz wireless USB dongle (the chair also has integrated Bluetooth LE, if you prefer to go that route). The Soma Chroma then showed up in the app, allowing me to configure it.

Razer Soma Chroma
Tom's Hardware
Razer Soma Chroma
Tom's Hardware
Razer Soma Chroma
Tom's Hardware

There’s a brightness slider and an option to dim the lights after a period of inactivity on the right panel. In the right panel, there are options to change the default effects pattern. You can configure more advanced effects using the Chroma Studio. As you might expect, you can sync the RGBs with your games, although the effect is not evenly remotely noticeable unless you’re in a dark room.

During the daytime, you’re not going to notice the lights at all, and the only people who will notice are your coworkers on Google Meet/Zoom/Teams calls.

Although you can control the RGB effects in software, there are also physical controls at the top of the headrest.

Razer Soma Chroma Adjustments and Comfort

The Soma Chroma features dual-density cold-cured foam for the seat cushion. It did a good job of conforming to my buttocks, as it's specifically designed to relieve pressure points. There's good thigh support for my 5-foot-10-inch and 161-ish-pound frame.

What you gain in RGB goodness, you lose in adjustability. There's no adjustable lumbar support — what you see is what you get. Razer said that the lumbar curve is designed to encourage a neutral position and reduce fatigue after long-term use. That may be true in theory, but my lower back begged to differ after sitting in the chair for 6 hours straight in an upright and "ergonomically-correct" position. This was never an issue for me with the Iskur V2, with its 360-degree lumbar support — or even with the Iskur V2 X, which has no lumbar controls.

Razer Soma Chroma
Tom's Hardware
Razer Soma Chroma
Tom's Hardware

The backrest is adjustable from its default 90-degree upright position all the way back to 155 degrees. I spent the majority of my time either fully upright or slightly reclined at about 100 degrees. Anything more than 100 degrees just doesn't feel natural to me in any gaming chair.

The Soma Chroma features 2D armrests, which are adjustable for swivel and height. The armrests have an up/down travel of 4 inches and can swivel in or out by up to 25 degrees. They're densely padded and were a comfortable home for my elbows during extended sessions.

The chair has a height adjustment mechanism via a handle located on the right side of the seat base. I preferred to leave the seat at its maximum height of 20.1 inches.

Bottom Line

The Razer Soma Chroma is an interesting chair for gamers who are already fully entrenched in the Chroma ecosystem. The Soma Chroma has full access to Razer’s software suite, so you can sync all your devices to suit your gaming (or other media) needs. The chair also features built-in Bluetooth LE and includes a 2.4 GHz wireless USB dongle.

The RGB integration is also well-done, with support for portable power banks and a zippered pouch on the back to discreetly hide it. You can also use a USB-C extension cord to connect the Soma Chroma to your PC, but it is a nightmare for ergonomics. Of course, the chair ships with neither a portable battery pack or an extension cord, so you'll need to purchase these separately.

On the flip side, the Soma Chroma isn’t as adjustable as some of Razer’s other chairs, as it lacks 3D armrests and lumbar controls. I also found that I had some minor lower back pain when using the chair for hours in my preferred seating position. Of course, your mileage may vary, but I haven't experienced this with previous Razer chairs.

And the other matter to consider is the $499 price. If you don’t need RGB wizardry, the Razer Iskur V2 X is $200 cheaper and just as good on chair fundamentals.

✇Tomshardware

Global consumer Wi-Fi router shipments fell 6% in Q1 2026, down 34% from 2021 peak — mesh systems and gaming routers still prove popular

The Wi-Fi router market is facing headwinds as consumers pull back on spending. According to a new report from Counterpoint, we’re witnessing a softening in global consumer Wi-Fi router shipments, with a 6 percent YoY decline in Q1 2026. This decline follows an explosion of market growth during the COVID-19 pandemic, when consumers upgraded their Wi-Fi hardware to enhance their work-from-home capabilities.

Counterpoint notes that global Wi-Fi router shipments peaked in 2021, which was at the height of consumer hardware spending during the pandemic. There were some positive points in the report, with Asus and Google seeing global shipment increases of 3.8 percent and 1.2 percent, respectively, during Q1 2026. However, Xiaomi had a 1.3 percent shortfall, Netgear was down 3 percent, while TP-Link fell by 5.4 percent. Counterpoint also notes that “Others,” which includes dozens of other hardware vendors whose sales aren’t significant enough to be broken out individually, fell by 10.4 percent.

Since 2021, global shipments have declined by almost 34 percent, and a couple of factors explain this turn of events. For starters, many people who upgraded their Wi-Fi hardware in 2021 or 2022 simply see no reason to shift to newer technology. Even though the best Wi-Fi routers use the Wi-Fi 7 (802.11be) standard, offering multi-gig speeds across the 6 GHz and 5 GHz bands, those performance benefits are not enticing consumers on the sidelines because of rising costs for more essential goods.

Counterpoint Retail Wi-Fi CPE Tracker

(Image credit: Counterpoint)

Another reason global shipments of consumer routers have seen a steady decline is that ISPs have become more adept at bundling higher-end networking hardware with their services. Whether you’re signing up for new fiber, cable, or 5G home internet service, ISPs are including routers with integrated Wi-Fi 6, 6E, or 7 wireless connectivity. For customers with non-demanding network needs, this ISP-provided hardware is sufficient. For example, T-Mobile provides a Wi-Fi 7 gateway with its $60/month 5G home internet plan and a Wi-Fi 7 gateway plus a mesh extender with its $70/month plan.

Speaking of mesh systems, this is one of the few bright points for hardware vendors. Counterpoint notes that mesh Wi-Fi systems have seen significant growth as consumers seek to blanket every area of their homes with wireless coverage to support a substantial number of connected devices. Amazon’s Eero and Google’s Nest mesh Wi-Fi router systems were called out specifically for their strong performance (driven in part by high brand recognition and heavy sales promotions). The gaming router segment also bucked the decline in the broader Wi-Fi router market, as online gaming enthusiasts seek a competitive edge with lower latency and higher available network bandwidth.

There’s a possibility we could see a rebound in sales in the second half of 2026 and into early 2027 as the first Wi-Fi 8 hardware enters the market. However, Wi-Fi 8 is seen as more of a quality-of-life upgrade than another leap in performance over previous Wi-Fi generations.
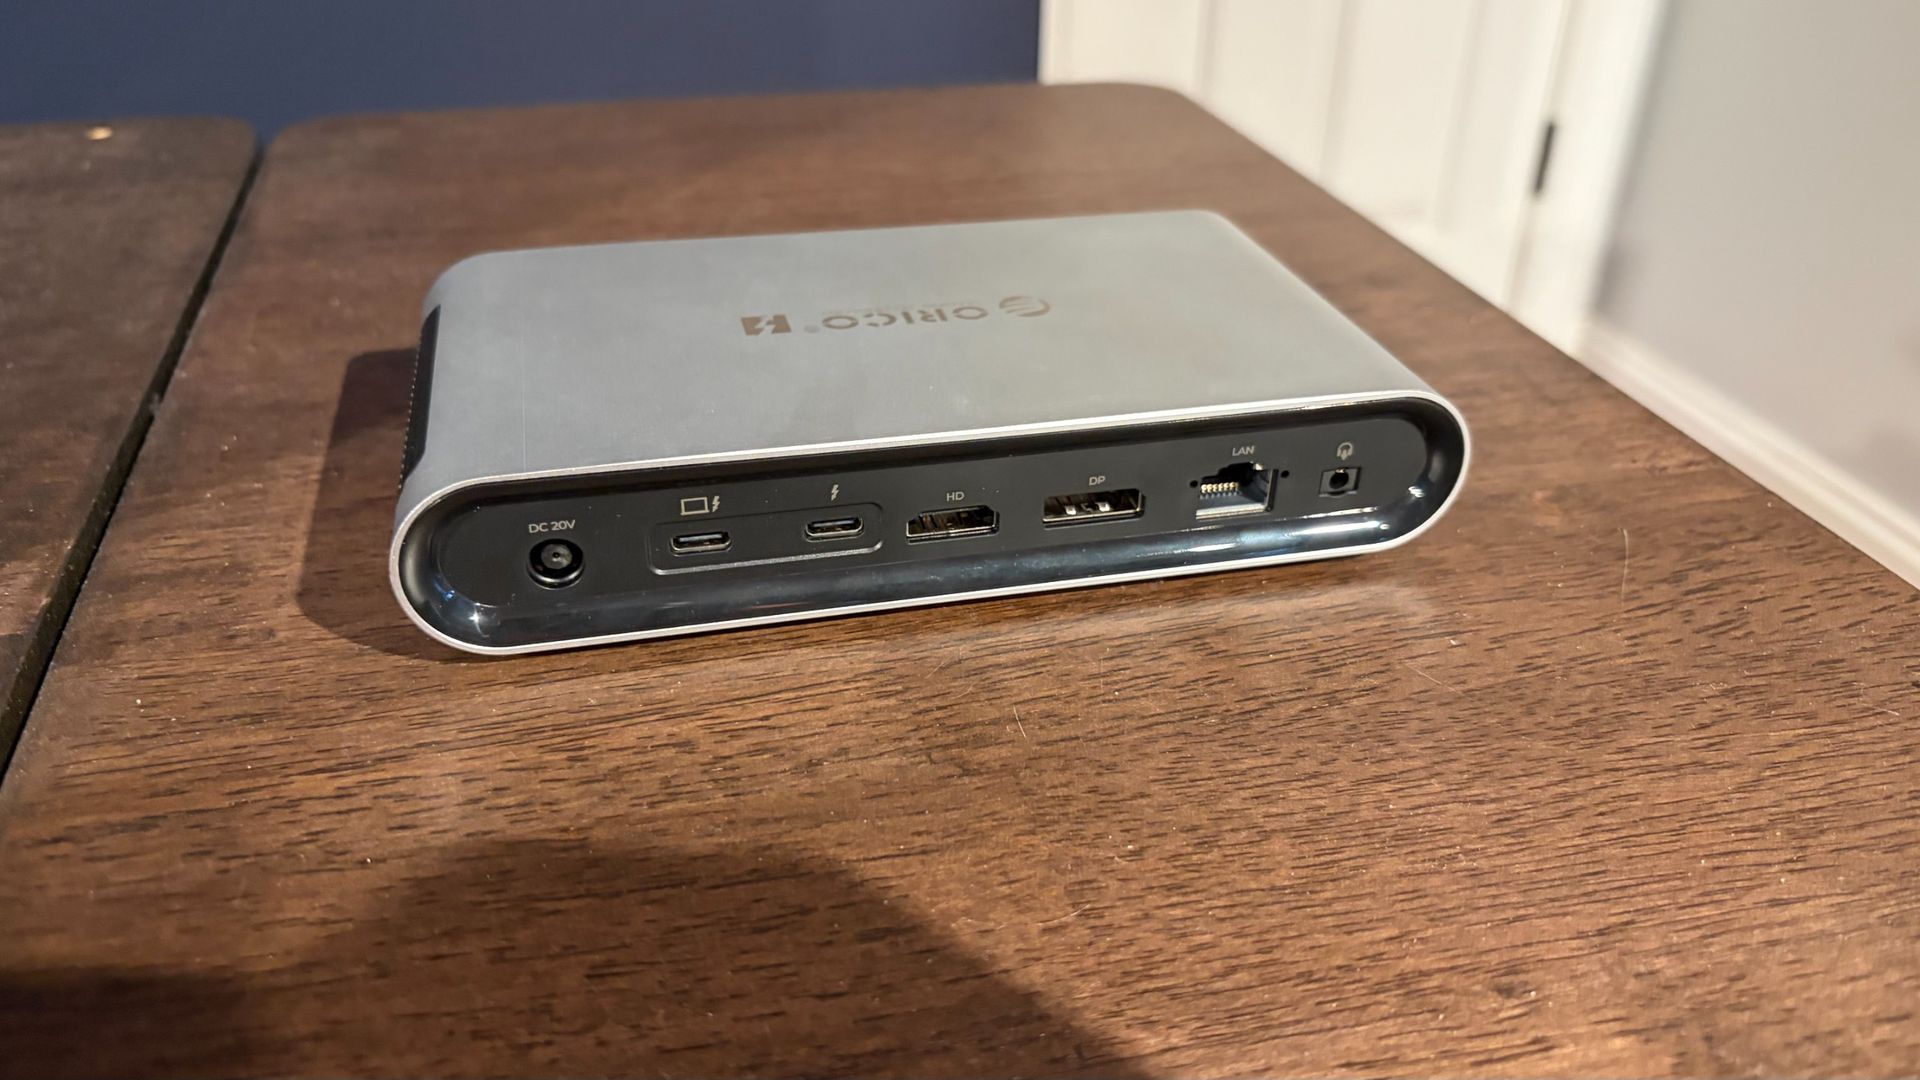
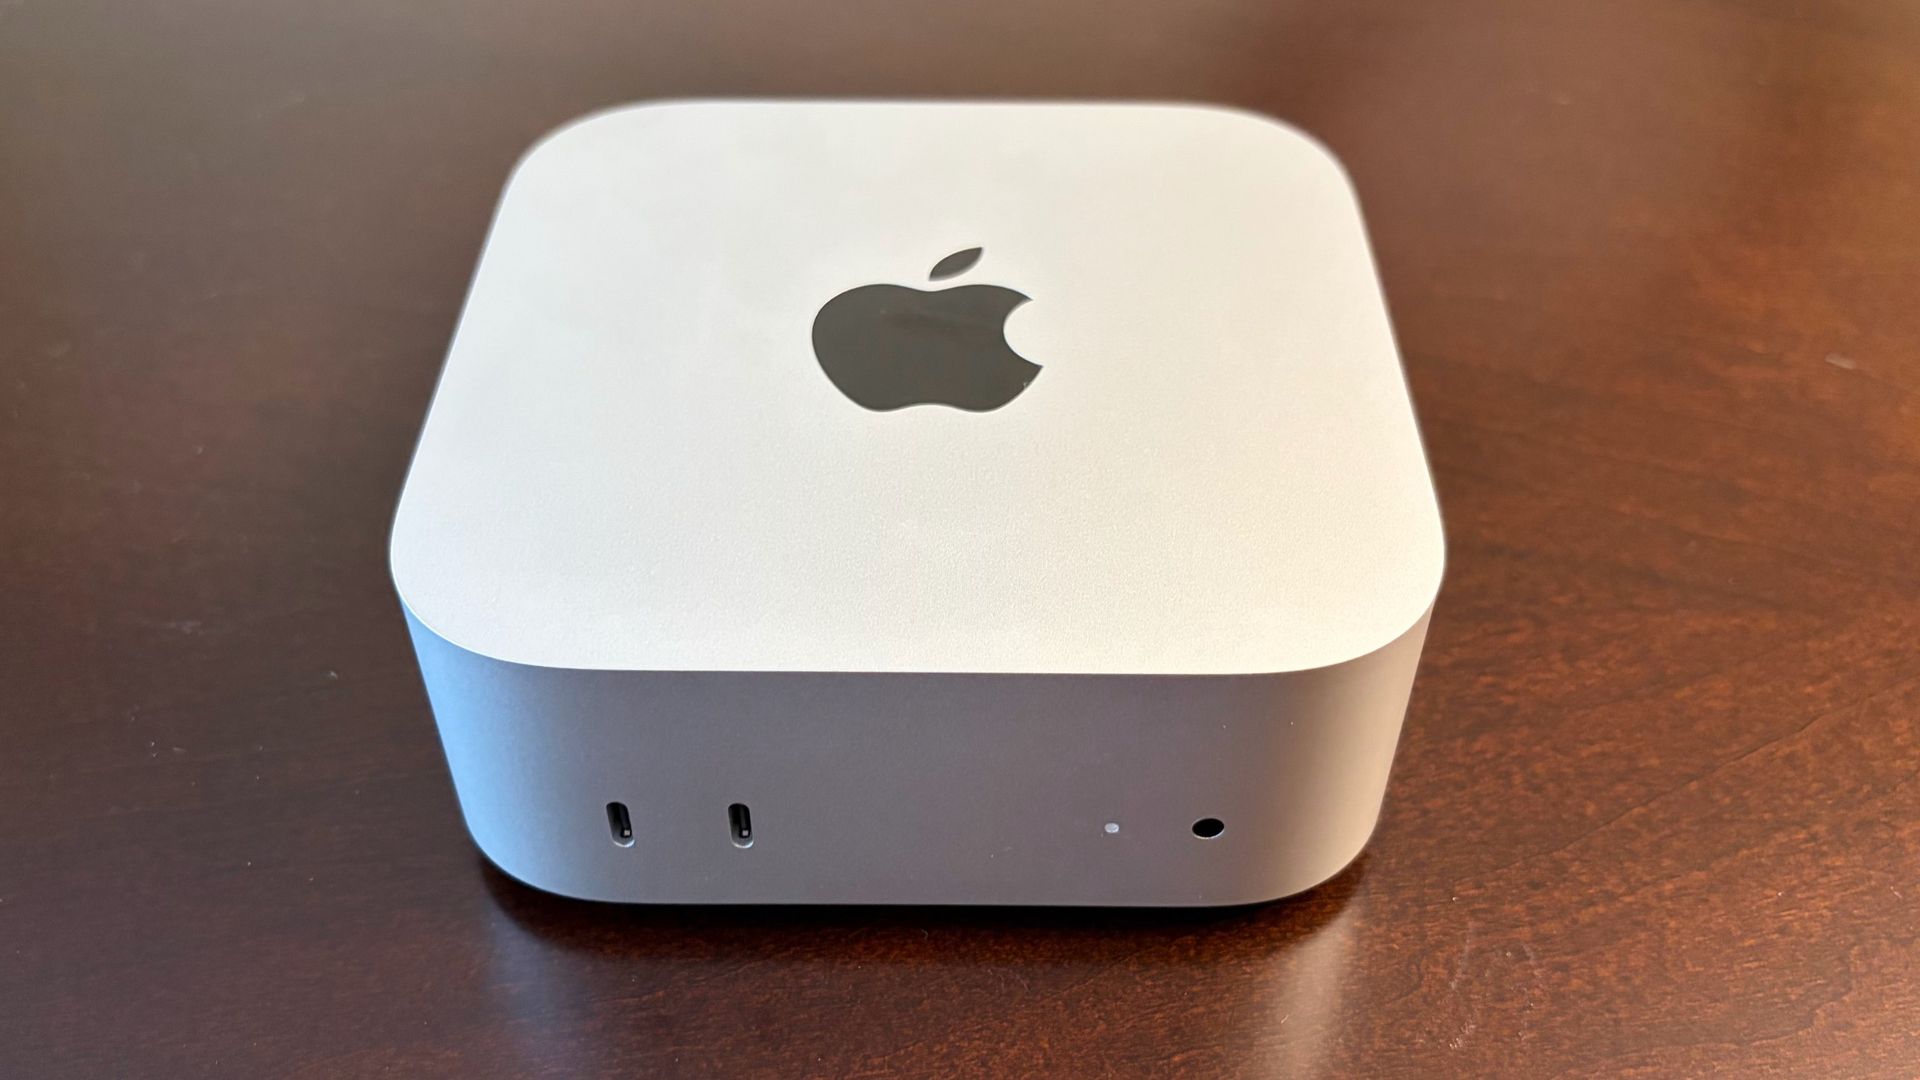
❌